HP COLOR INKJET PRINTER - CP1700 SERIES - HOW TO DISASSEMBLE
 CLEANOUT THROUGH SVC C8108-67036
 Assy. Output tray
 2nd bin SVC


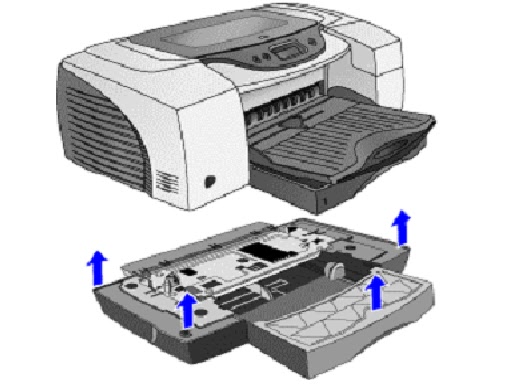
- Push the two buttons located on both sides of the clean-out trough to remove it.
- Lift the output tray.
- Pull to remove the main tray.

- Lift the output tray.
- Pull to remove the output tray.

Lift the printer off the 2nd bin SVC.
Assy. Door Main
Lift the Assy. Door Main
Release the two tabs and remove the Door Main.

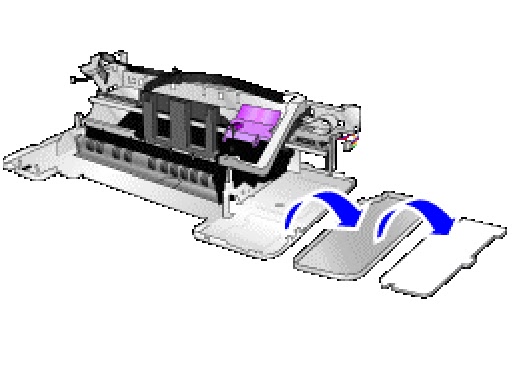
Assy. Access Door
Lift the access door.
Loosen the two catches of the access door and remove it.
Cover LIO SVC
Remove the LIO cover from its slot.

Duplexer SVC
Push the buttons located on both sides of the auto-duplex
unit to remove it.
Assy. Pick Roller SVC
First remove the following:
- Auto-duplex unit/ rear access panel
- Use long nosed pliers to turn the catch clockwise.

Case Left SVC
First remove the following:
- Auto-duplex unit/ rear access panel
- Assy. Pick Roller.
Remove Case Left.

Case Right SVC
First remove the following:
- Auto-duplex unit/ rear access panel
- Assy. Pick Roller.
Remove Case Right.

Bezel SVC
Lift the Main door.
Use a flathead screwdriver to release the six catches and
remove the Bezel.
Cover Key panel
First remove the Bezel.
Using a screwdriver remove the T-10 screws.
Remove the cover key panel.

Assy. Light pipe SVC and PCA Assy. Light pipe SVC and PCA
Key panel.
First remove the following:
- Bezel
- Cover key panel.
Pull out the harness.
Release the four catches located on the back.
Remove the Assy. light pipe and the PCA key panel.

Assy. Case Main SVC
First remove the following:
Assy. Tray Main
Assy. Output tray
Assy. Door Main
Assy. Access Door
Case Left
Case Right
Bezel
Cover Key Panel
Assy. Lightpipe & PCA key panel.
- Remove the T-20 screw and push the cable through the slot.
- Use a flathead screwdriver to release the six locks located at the bottom of the printer.
- Remove the Assy. Case Main.

HOW TO DISASSEMBLE - HP-COLOR INKJET - CP-1700 SERIES PRINTERS

Contn:
PCA Assy. Logic SVC
Remove the T-10 screws.
Pull the harness.
Remove the flexi cable.
Pull out the harness and the flexi cable.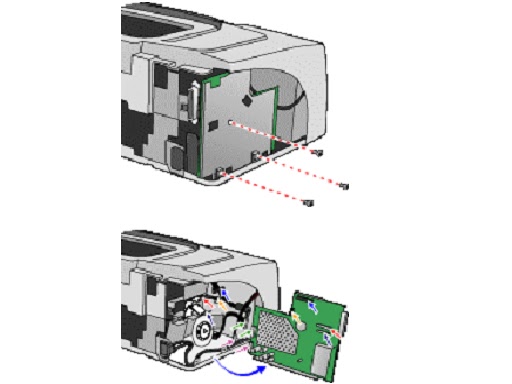
PCA Power Supply SVC
Remove the T-10 screws.
Remove the T-20 screw to remove the green harness.
Use a flathead screwdriver to remove the power harness.
Remove the power supply unit.

Assy. USB SVC
Remove the T-10 screws.
Detach the Assy. USB SVC.
PCA Duplexer Interconnect
Remove the T-10 screw.
Turn the Duplexer Interconnect unit to pull out the harness.


Assy. Service Station.
Remove the T-10 screw.
Slide out the Encoder strip from its slot in the Encoder
holder.
Remove the Encoder holder.
Use manual uncap, if necessary.
Pull out the two harnesses.
Remove the Assy. Service station.

Assy. Ink Supply Station
Remove the T-10 screws.
Pull out the (Black and white) harness and the motor
harness.
Use long nosed pliers to cut the clip to remove the harness.
Remove the ink supply station.

Base Absorber/Basin SVC
Remove the base absorber.
Remove the Basin SVC.
Bottom Cover Bottom Cover - Main Case SVC
Use long nosed pliers to push the two tabs located on the
bottom cover.
Remove the Bottom Cover Main Case SVC.

Holder Holder - raceway/hanger SVC and Assy. Replaceable IDS
SVC
Remove the T-10 screws.
Lift the printhead access latch to remove the hanger SVC.
Separate the hanger SVC and the Assy. Replaceable IDS

Encoder Strip
Remove the Encoder strip from its slot.
Remove the Encoder strip from its slot in the Encoder
holder.
Slide out the Encoder strip.
