Monday, 30 November 2020

LG WD-1247 BD WASHING MACHINE HOW TO DISASSEMBLE - EXPLODED VIEW SCHEMATIC


TEST OPERATION


WIRING DIAGRAM


Disassemble procedure

Unscrew 2 screws on the back of the top plate.
Pull the top plate backward and upward as shown.

Pull out the drawer and unscrew 2 screws.
Lift the side the Control Panel Assembly and pull it out

Push out PANEL ASSEMBLY,CONTROL after Push the hook below

Unscrew the 10 screws from the Control Panel Assembly.
Disassemble the Display PWB Assembly.


Disconnect connector from the wiring.

Two screws are unscrewed.

Push the hook of between BASE,CABINET and PWB ASSEMBLY below as shown.
Pull the PWB assembly (Main) to arrow direction.


Inlet valve removal

Disassemble the top plate assembly.
Pull out the drawer.
Push out the DISPENSER ASSEMBLY after unscrew 2 screws.

Unscrew the nut at the lower part of the dispenser.

Disassemble the 3 or 4 connectors from the valves.

Red Housing(BK/WH-YL/BK)
NA Housing(WH/BL-BK)
Blue Housing(GY/WH-BK)
Red Housing(BL/RD-BK)

Unscrew 2 or 4 screws from the back of the cabinet.

Unscrew 2 or 4 screws from the back of the cabinet.


Cabinet cover removal

Unscrew the 2 screws from the lower of the DECO PANEL.

Unscrew the 4 screws from the back of the DECO PANEL

Pull out the DECO PANEL

Unscrew the 4 screws from upper of the cabinet cover.
Unscrew the screw from filter cover.

Put a flat ( - ) screwdriver or putty knife into the both sides of the filter cover, and pull it out.

Unscrew the screw from the lower side of the cabinet cover.


Open the door.
Disassemble the clamp assembly.

Tilt the cabinet cover.
Disconnect the door switch connector.

NOTE: When assembling the CABINET COVER, connect the connector.

Lift and separate the cabinet cover.

Disassemble the clamp assembly.
Disassemble the Gasket.


Open the door.
Remove the two screws from the Hinge.
When removing the Door Assembly, it is necessary to hold the break is inner of the cabinet cover.

[Be careful: The door is heavy.]

Open the door and disassemble the CLAMP ASSEMBLY.
Unscrew the 2 screws.

NOTE: Reconnect the connector after replacing the DOOR SWITCH ASSEMBLY.


Disassemble the cabinet cover

Separate the pump hose, the bellows and the circulation hose assembly from the pump assembly.
Disassemble the pump assembly in arrow direction.

Separate the pump hose, the bellows and the circulation hose assembly from the pump assembly.
Disassemble the pump assembly in arrow direction.

CAUTION
• When assembling the heater, insert the heater into the heater clip on the bottom of the tub and check the position of wire color.
• Tighten the fastening nut so the heater is secure.

Disassemble the cabinet cover.
Unplug the white connector from the thermistor.
Pull it out by holding the bracket of the thermistor.


When foreign object is stuck between drum and tub

Disassemble the cabinet cover.
Separate the heater from the tub.
Remove any foreign objects (wire, coin, etc.) by inserting a long bar in the opening.

Disassemble the back cover.
Remove the bolt.
Pull out the Rotor.

Unscrew the 2 screws from the tub bracket.
Remove the 6 bolts on the stator.
Unplug the 2 connectors from the stator.

Disassemble the damper hinges from the tub and base.
Separate the dampers.

NOTE:  Once removed, replace the damper with new one.


To check out the fault diagnosis of TSG, in case of removing the water inside, you can pull out the plug and let the water drain away.

Be cautious in case of the TSG is hot temperature.

Remove the housing coupled the TSG (Heater, Water level frequency-sensor, Thermistor)

Taking out the screw of the TSG and Body Frame.


Taking out the screws of Body Frame (2EA)

Separate the hoses from the TSG.

Remove the Body Frame and then, separate the TSG from the washer.


Exploded view


Saturday, 28 November 2020

JBL PARTY BOX 200 AND PARTY BOX 300 - HOW TO DISASSEMBLE, SOFTWARE UPDATE PROCEDURE ,TROUBLESHOOTING, SCHEMATIC DIAGRAMS


Applicable to:

JBLPARTYBOX200AS, JBLPARTYBOX200BR, JBLPARTYBOX200CN, JBLPARTYBOX200EU, JBLPARTYBOX200IN,
JBLPARTYBOX200JN, JBLPARTYBOX200RU, JBLPARTYBOX200AM
JBLPARTYBOX300AS, JBLPARTYBOX300BR, JBLPARTYBOX300CN, JBLPARTYBOX300EU, JBLPARTYBOX300IN,
JBLPARTYBOX300JN, JBLPARTYBOX300RU, JBLPARTYBOX300AM

SPECIFICATIONS

AC power input: 100-240V ~ 50/60Hz
DC power input: 12V 8A
Built-in battery: Li-ion 10.4Ah, 7.2V (PartyBox 300)
Power consumption: 60W
Standby power consumption: <2W with BT connecting;<0.5W without BT connecting
USB output: 5V 2.1A
Speaker drivers: 2 woofer + 3 tweeter
Speaker impedance: 4 ohm
Total output power: 120 W RMS

JBLPARTYBOX200AS, JBLPARTYBOX200BR, JBLPARTYBOX200CN, JBLPARTYBOX200EU, JBLPARTYBOX200IN, JBLPARTYBOX200JN, JBLPARTYBOX200RU, JBLPARTYBOX200AM
JBLPARTYBOX300AS, JBLPARTYBOX300BR, JBLPARTYBOX300CN, JBLPARTYBOX300EU, JBLPARTYBOX300IN, JBLPARTYBOX300JN, JBLPARTYBOX300RU, JBLPARTYBOX300AM

Speaker drivers: 2 woofer + 3 tweeter
Speaker impedance: 4 ohm
Total output power: 120 W RMS

Software Upgrade Procedure
1. Put the "Harman_G1.HUI" to the root directory of U disk, and plug the U disk into USB port of machine.
2. Turn on the machine, make sure it is working.
3. Press and hold the "BT" key and "Vol+" key for 10s until the LED show white.
4. It is updating when the machine front LED show white. If it failed to upgrade, the front LED will show red. You need to restart from the step 1.
5. The machine front LED will show green after upgrade successfully and restart automatically.
6. Please press and hold the "BASS BOOST" key and "Vol-" key for 2s,to check the version number.

Key Combination - Button Function Mapping

Volume + & Bluetooth

Long press > 10s

Enter DFU mode in On Mode

Volume + & Play

Long press > 10s

Reset to factory default in On Mode.

Volume - & Bluetooth

Long press > 10s

Enter by-pass mode in On Mode.

Volume - & Bass boost

Long press > 2s

Show SW version in On Mode.

Play & Bass boost

Long press > 5s

Enter Demo mode in On Mode.

Volume + & Volume -

Short press < 2s
at same time

Mute unit output
In Mute status, press any button of
Volume+ or Volume- to release mute

Troubleshooting

Do not work

The light ring is not bright

BT cannot work

Disassembly Procedure

Dismantling top cover assy

Remove the screw cover sheet 5pcs/silicone seal 1pcs/top side foot pad 4pcs by a needle.
Dismantle the screw accordingly. Pull out the top cover and unplug the connecting cable of main board,

Dismantling top cover assy
Dismantle 8pcs screw of the key board, and take out the key board and key button. 

Dismantling terminal board
Unplug 2pcs turn-knob and dismantle 3pcs screw on the back panel.
Unplug 4pcs cable and dismantle 1pcs screw on main board, then take out the terminal board.

Dismantling power board
Dismantle 2pcs screw on AC cord socket, unplug a cable on main board and dismantle 4pcs screw on power board.
Take out the power board.
Dismantling main board
Dismantle 2pcs screw on back panel, unplug 4pcs connecting cable on main board, dismantle 3pcs screw on main board.
Take out the main board.
Dismantling side cover assy
Remove the bottom of side foot pad and screw cover sheet, dismantle the screw accordingly then take out side cover.
Dismantling bottom cover assy
Remove 4pcs foot pad and dismantle the screw accordingly, then take out the bottom cover assy.
Dismantling front panel assy
Dismantle 10pcs screw on front panel assy, use a straight screwdriver to separate front panel and wooden box carefully.
It's better to wrap screwdriver with fabric to avoid damage in separating process.
Dismantling front panel assy and Dismantling speaker on wooden box
Unplug a cable, dismantle the screw on lamp board, then take out the board.

Dismantle the screw on speaker and pry speaker by a needle then take out the speaker.

BLOCK DIAGRAM

G1-Block diagram

DC-DC CIRCUIT

BOOST CIRCUIT

MAIN BOARD CHARGE CIRCUIT-BQ24610

MAIN BOARD MIC CIRCUIT

AUDIO IN CIRCUIT

ADC5536 CIRCUIT

MAIN CHIP CIRCUIT-SPHE8107

MCU CIRCUIT

BT MODULE CIRCUIT

DSP CIRCUIT

CIRCUIT DIAGRAM-MAIN BOARD

AMP CIRCUIT

CIRCUIT DIAGRAM-TOP RGB LAMP RING BOARD

CIRCUIT DIAGRAM-BOTTOM RGB LAMP RING BOARD

LG - OLED65G2**A OLED TV HOW TO UPDATE THE FIRMWARE PROCEDURE CHASSIS: E*21G


SOFTWARE UPDATE: USB DOWNLOAD
(1) Plug in the USB to the TV
(2) If there are update-able files in the USB, the TV would ask that the user want to process the SW upper version update.

2. NSU DOWNLOAD
(This Function is needed to connect to the internet.)

Case 1) Auto Update On
(1) Go to Menu → All Settings → Support → Software Update, then check Auto update is turned on.

(2) After the update complete, the user can check a pop-up below the picture, which indicated update is complete and the new version will be applied after the TV turn off and on.

(4) If the user started the update, the TV shows a pop-up below the picture.

(5) [CHECK NOW] : Just start the update.
[Close] : Close the pop-up.

For USB Download:

Follow the Step (1} and (2) first.  Then continue

(3) Click “Yes” button : Start Update

4) Click “Check Now” : Go to SW Update menu for monitoring
(5) TV has been starting SW update.

(6) After finishing the update, it will show a pop-up below the picture.

(7) Click “Yes” : TV will be turn off and on itself.

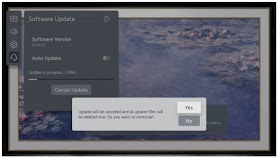
(4) If it needs to cancel the update, click “cancel update” button

(5) [“No”] : update continue.
[“Yes”] : update cancel.

Case 2) NOT Allow Automatic Updates
Toggle Item
(1) Go to Menu → All Settings → Support → Software Update

(2) If it found upper version SW than the TV SW version, TV would show a pop-up like below the picture.
“The latest version of the SW is available for your TV. Do you want to update now”

(3) [Yes] : update starts.
[No] : Close the pop-up, check out later.