 FISHER AND PAYKEL _ DEIX1 AA WW _ INTUITIVE DRYER _ FAULT DIAGNOSTICS
PROBLEM: NO POWER
- Remove the cover plate from the bottom right corner at the back of the machine and check that the wiring connections are secure.
- With an ohmmeter, check for continuity between the neutral (N) terminal of the plug and the (N) connector of the terminal block. Then check for continuity between the phase (P) terminal of the plug and the (P) connector of the terminal block.
- If there is continuity in these wires. If there is no continuity, replace the power cord and retest the dryer.
CHECK THE CONTINUITY OF MAIN HARNESS.
- Disconnect the main harness from the motor control module, manual resetable thermostat and automatic reset thermostats.
- Pass the wiring loom out through exhaust duct.
- Remove the cover plate from the bottom right corner at the back of the machine.
- Check the continuity from P on the terminal block to the wires that go to the heater relay and the mains connection on the motor control module (red wires), and the continuity from N on the terminal block to the wires that go to the mains connector on the motor control module and the manual resetable thermostat on the element housing (black wires).
- If there is no continuity, check that the terminal connections are secure. If so, replace the mains harness.
- If there is continuity in the harness, replace the motor control module and retest the dryer.

PROBLEM - NO HEAT
CHECK ALL THERMOSTATS.
- Check that the manual reset thermostat has not tripped, disconnect the wires and test for continuity with an ohmmeter, if it is open circuit do not attempt to reset the thermostat or operate the dryer until the cause has been identified. Check the elements as well as the exhaust duct for blockages or restrictions.
- Disconnect the wires to the auto reset thermostat and check it’s continuity.
- If the auto thermostat has no continuity, or the manual thermostat is unable to be manually reset, replace the offending thermostat. If the auto reset thermostat has continuity.
CHECK THE ELEMENTS
- With an ohmmeter, measure the resistance across both elements.
- Measure the resistance of the 1.4kW element between the violet wire on the front element connection and the violet wire on the mains relay on the motor control module. The cold resistance should be between 38 and 45 ohms.
- Measure the resistance of the 3.6kW element between the yellow wire on the front element connection and the yellow wire on the relay on the motor control module. The cold resistance should be between 13 and 19 ohms.
- Visually inspect the coils on each element, replace both elements if any of the coils shows signs of shorting together or sagging.
- If there is an open circuit replace the elements.
CHECK THE VOLTAGE ACROSS ELEMENTS
- Refit the top deck and reconnect the machine to power supply. Start the dryer (Note: If there is no wet load in the dryer, the controller will turn the heat off after a short space of time.)
- With the dryer running on a regular cycle in the closing direction, and with the drum up to speed, use a voltmeter and measure the voltage of the 1.4kW element, between the violet wire on the front element connection and the violet wire on the mains relay on the motor control module. The voltage should be equal to mains voltage of approximately 240V AC.
- Measure the voltage of the 3.6kW element between the yellow wire on the front element connection and the yellow wire on the relay on the motor control module. The voltage should be equal to mains voltage of approximately 240V AC.
- If there is no voltage, replace the motor control module and retest the dryer.
MEASURE THE CURRENT DRAW FOR EACH ELEMENT
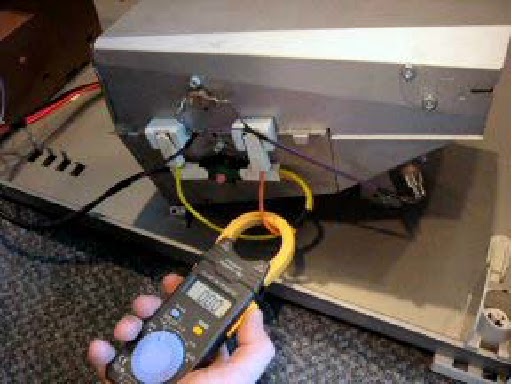
This is an alternative to measuring
the voltage.
With a clamp amp meter, measure the
current draw of each element. Approximate current draws are:
The Yellow lead = 5.8 amps.
The Orange lead = 15 amps.
Total current = 20.8 amps.
Note: The current draw will decrease,
as the elements get hot.
CHECK THE EXHAUST SENSOR
- This check will need to be performed if the dryer has stopped functioning and fault codes 8 or 9 have been displayed.
- Resistance at various ambient temperatures should be (+10%):
10ºC = 20kOhm (+10%)
20ºC = 12kOhm (+10%)
30ºC = 8kOhm (+10%)
40ºC =
5kOhm (+10%)
- Check the inlet seal, outlet duct seal, transition tube, fan housing If the seals are faulty replace.