SAMSUNG GALAXY S5 - disassembling procedure - Battery removal – Lcd display and touch screen removal - rear facing camera removal – Mobile and Smart Phones repair and service

Category: Mobiles and Smart Phones repair and Service
Contents of this article
- How to remove the battery
- How to remove the LCD and Touch screen
- How to remove the rear camera
SAMSUNG GALAXY S5
DISASSEMBLING PROCEDURE
How to remove Battery
Insert the plastic opening tool in the notch in the back cover
on the power button side of the Galaxy S5. Work your way around the entire
smartphone, gently freeing the clips and removing the back cover.
Now, use the plastic opening tool to pry the battery up and out of its secured location.
Now, use the plastic opening tool to pry the battery up and out of its secured location.

How to remove Display Assembly (LCD & Touch Screen)
The S5 Display Assembly (LCD & Touch Screen) is fused
together and cannot be separated. The display assembly is secured to the frame
of the smartphone with a good amount of adhesive; it will require heat, and
patience, to separate.
This procedure is recommended only on smartphones with a display assembly that is ALREADY DAMAGED. Use a heat gun or blow drier to heat the adhesive securing the display assembly to the smartphone’s frame/ front-housing.
This procedure is recommended only on smartphones with a display assembly that is ALREADY DAMAGED. Use a heat gun or blow drier to heat the adhesive securing the display assembly to the smartphone’s frame/ front-housing.
Next, insert the precision knife in the seam where the display
assembly meets the frame. Separate the two pieces apart enough to fit a plastic
triangle opening tool into the gap.

With liberal use of the heat gun or blow dryer, work around
the perimeter of the S5. Use the triangle opening tools to keep the adhesive
from coming back in contact.
As you near the home button side of the S5 display assembly, be cautious of the
ribbon cables on either side of the home button. When prying around this area,
make sure you do not sever the wires or you will have to replace the S5 dock
port assembly.

Once the four sides of the display assembly are pried away
from the frame/front housing, use the nylon spudger to separate the adhesive
that secures the middle of the LCD to the frame/front-housing of the Galaxy S5.
Use the nylon spudger to remove the home button assembly from the display
assembly. It is secured with a small amount of adhesive.

Next, lift the home button side (bottom) of the S5 display
assembly away from the smartphone. This will reveal a final connection for you
to release utilizing the fine tip curved tweezers.
Locate and remove the ten small Phillips screws (#00) that
secure the rear housing to the Galaxy S5 (marked with orange circles).
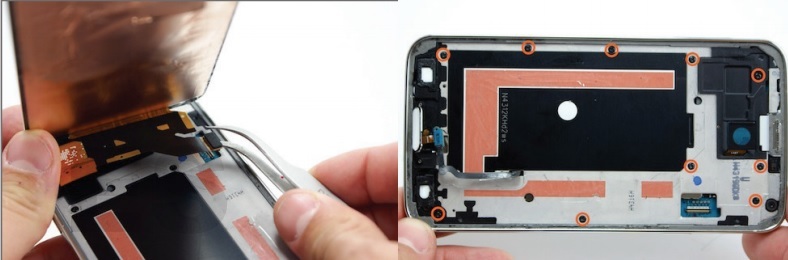
Now locate and remove the three small Phillips screws (#00)
that also secure the rear housing to the S5 (marked with orange circles).
Utilize the fine tip curved tweezers to release the series of clips that secure
the front housing to the rear housing. The series of clips are located near the
earpiece speaker.

Next, flip the Galaxy S5 over. Release the series of
clips inside where the battery was located to separate the front and rear
housing (marked with orange circles).
The front housing is snapped into the rear housing. Carefully grip, raise, and
separate them from each other.

How to remove Headphone Jack & Flex Cable
Locate the Galaxy S5 headphone jack’s flex cable connection.
Use the fine tip curved tweezers to peel up the flex ribbon cable, and then
remove the headphone jack from its location.

How to remove Home Button Assembly
Locate the home button’s connection. Use the curved tweezers
to peel up the its ribbon cable, and then remove the home button assembly from
its location.

How to remove Rear-Facing Camera
Locate and remove the two small Phillips screws (#00) that
secure the motherboard to the Galaxy S5 (marked with orange circles).
Next, locate the coaxial cable plug. Use the fine tip curved tweezers to pry it from its connector (marked with a white circle). Lift the motherboard from the S5 housing (DO NOT REMOVE). There is a connection for the dock port assembly on the bottom of the motherboard. Use the tweezers to release the connection.
Now you can completely remove the motherboard from the Galaxy S5.

Locate and pry up the rear-facing camera from its location.
