 Orion TV29LB929 – 29 inch LCD/LED TV – how to enter service mode, adjustments, SMPS and backlight inverter schematic

Power supply and back-light inverter circuit diagram, service mode, Hotel mode, Reset, white balance adjustment – Orion TV29LB929 LED LCD TV - Used ICs in power and back-light inverter section circuit => MIP2M40MSSCF, FA5640N-C6-TE3, FMV09N90E(SMPS Switching FET), BD8779EFV-E2 (Backlight voltage control)
HOTEL MODE FUNCTIONTo set the Hotel mode, please follow the steps below.
1. Press the MENU ---> 1147 button on the remote control
2. Press the DOWN button on the remote control
3. Select the "Setup" menu , then press ENTER button
4. Select the "Hotel Mode" menu, Select "On".
5. The Hotel mode setting menu will appear
6. Using the UP/DOWN button on the remote control, select the desired mode. Then press the ENTER button.
7. Using the LEFT/RIGHT button on the remote control, set the mode to desired setting.
8. The Hotel mode has now been set up.
To
reset the Hotel mode, follow the steps below.
1. Press the MENU => 1147 button on the remote control.
2. Press the DOWN button on the remote control,
3. Select the "Setup" menu , then press ENTER button.
4. Select the "Hotel Mode" menu, Select "On".
5. The Hotel mode setting menu will appear.
6. Press the DOWN button on the remote control,
7. Select the Clear Lock menu "Clear Lock" menu then press ENTER button , then press ENTER button.
8. The setting items has now been returned to initial value
CHECK
FOR THE FIRMWARE VERSION
This
unit is provided with the following SERVICE MODES so you can repair, examine
and adjust easily
Do
not adjust after other items except "Version Info".
1. Check of the VERSION and SUM DATA on the screen.
1 : Press the MENU è 1147 button on the remote control.
2 : Press the DOWN button on the remote control,
3 : Select the "Setup" menu , then press ENTER button.
4 : Select the "Version Info" menu, then press ENTER button.
5 : On the screen as shown in Fig:

ADJUSTMENT PROCEDURE
On-Screen Display Adjustment
1. Press the MENU => 1147 button on the remote control.
2. Press the DOWN button on the remote control
3. Select the "Video" menu, then press ENTER button on the remote control.
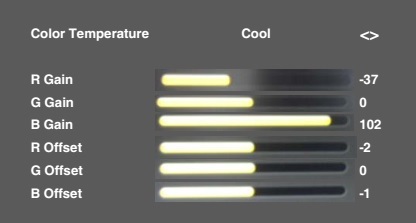
4. Select the "Color Temperature" menu , then press ENTER button on the remote control.
5. On the screen as shown in Fig:
PRINTED
CIRCUIT BOARDS POWER (INSERTED PARTS)
SOLDER SIDE and POWER (CHIP MOUNTED PARTS)
SOLDER SIDE

SMPS and Back-light inverter board circuit diagram


WHITE
BALANCE adjustments.
1. Place the set in Aging Test for more than 15 minutes.
1. Place the set in Aging Test for more than 15 minutes.
2.
Please select input About mode to adjust W/B.
3. Receive the gray scale pattern from the Pattern Generator.
3. Receive the gray scale pattern from the Pattern Generator.
4.
Press the INPUT SELECT button on the remote control to set to the AV mode
5.
Using the remote control, set the brightness and contrast to normal position.
6.
Press the MENU è
1147 button on the remote control.
7.
Press the DOWN button on the remote control.
8.
Select the "Video" menu, and then press ENTER button on the remote
control
ENTER
button on the remote control ENTER button on the remote control.
10.
Press the UP/DOWN button on the remote control to select the "R
Gain", "G Gain", "B Gain", "R Offset",
"G Offset", "B Offset
11.
Adjust the LEFT/RIGHT button on the remote control to whiten the R Gain, G
Gain, B Gain, R Offset, G Offset B Offset at each step tone sections equally..
12.
Perform the above adjustments 10 and 11 until the white color is achieved.