REPAIRING AND NOT THROWING AWAY

Richtige Fernseher haben Röhren!

Richtige Fernseher haben Röhren!

In Brief: On this site you will find pictures and technical information about Service Modes, Circuit Diagrams, Firmware Update procedure, Disassemble procedure, Universal remote control set-up codes, Troubleshooting and more....

If you go into the profession, you will obtain or have access to a variety of tech tips databases HERE IT IS Master Electronics Repair !.

These are an excellent investment where the saying: 'time-is-money' rules. However, to learn, you need to develop a general troubleshooting approach - a logical, methodical, method of narrowing down the problem. A tech tip database might suggest: 'Replace C536' for a particular symptom. This is good advice for a specific problem on one model. However, what you really want to understand is why C536 was the cause and how to pinpoint the culprit in general even if you don't have a service manual or schematic and your tech tip database doesn't have an entry for your sick TV or VCR.

While schematics are nice, you won't always have them or be able to justify the purchase for a one-of repair. Therefore, in many cases, some reverse engineering will be necessary. The time will be well spent since even if you don't see another instance of the same model in your entire lifetime, you will have learned something in the process that can be applied to other equipment problems.
As always, when you get stuck, checking out a tech-tips database may quickly identify your problem and solution.In that case, you can greatly simplify your troubleshooting or at least confirm a diagnosis before ordering parts.

Happy repairing!
Today, the West is headed for the abyss. For the ultimate fate of our disposable society is for that society itself to be disposed of. And this will happen sooner, rather than later.

How to use the site:

- If you landed here via any Search Engine, you will get what you searched for and you can search more using the search this blog feature provided by Google. You can visit more posts scrolling the left blog archive of all posts of the month/year,
or you can click on the main photo-page to start from the main page. Doing so it starts from the most recent post to the older post simple clicking on the Older Post button on the bottom of each page after reading , post after post.

You can even visit all posts, time to time, when reaching the bottom end of each page and click on the Older Post button.

- If you arrived here at the main page via bookmark you can visit all the site scrolling the left blog archive of all posts of the month/year pointing were you want , or more simple You can even visit all blog posts, from newer to older, clicking at the end of each bottom page on the Older Post button.
So you can see all the blog/site content surfing all pages in it.

- The search this blog feature provided by Google is a real search engine. If you're pointing particular things it will search IT for you; or you can place a brand name in the search query at your choice and visit all results page by page. It's useful since the content of the site is very large.

Note that if you don't find what you searched for, try it after a period of time; the site is a never ending job !

..............The bitterness of poor quality is remembered long after the sweetness of todays funny gadgets low price has faded from memory........ . . . . . .....
Don't forget the past, the end of the world is upon us! Pretty soon it will all turn to dust!

©2010, 2011, 2012, 2013, 2014 Frank Sharp - You do not have permission to copy photos and words from this blog, and any content may be never used it for auctions or commercial purposes, however feel free to post anything you see here with a courtesy link back, btw a link to the original post here , is mandatory.
All posts are presented here for informative, historical and educative purposes as applicable within fair use. NOTHING HERE IS FOR SALE !

Showing posts with label VAIO. Show all posts

Tuesday, 19 March 2019

HOW TO DISASSEMBLE SONY VAIO PCG-SR27 - PCG-SR27K - DISASSEMBLY PROCEDURE - PICTURES

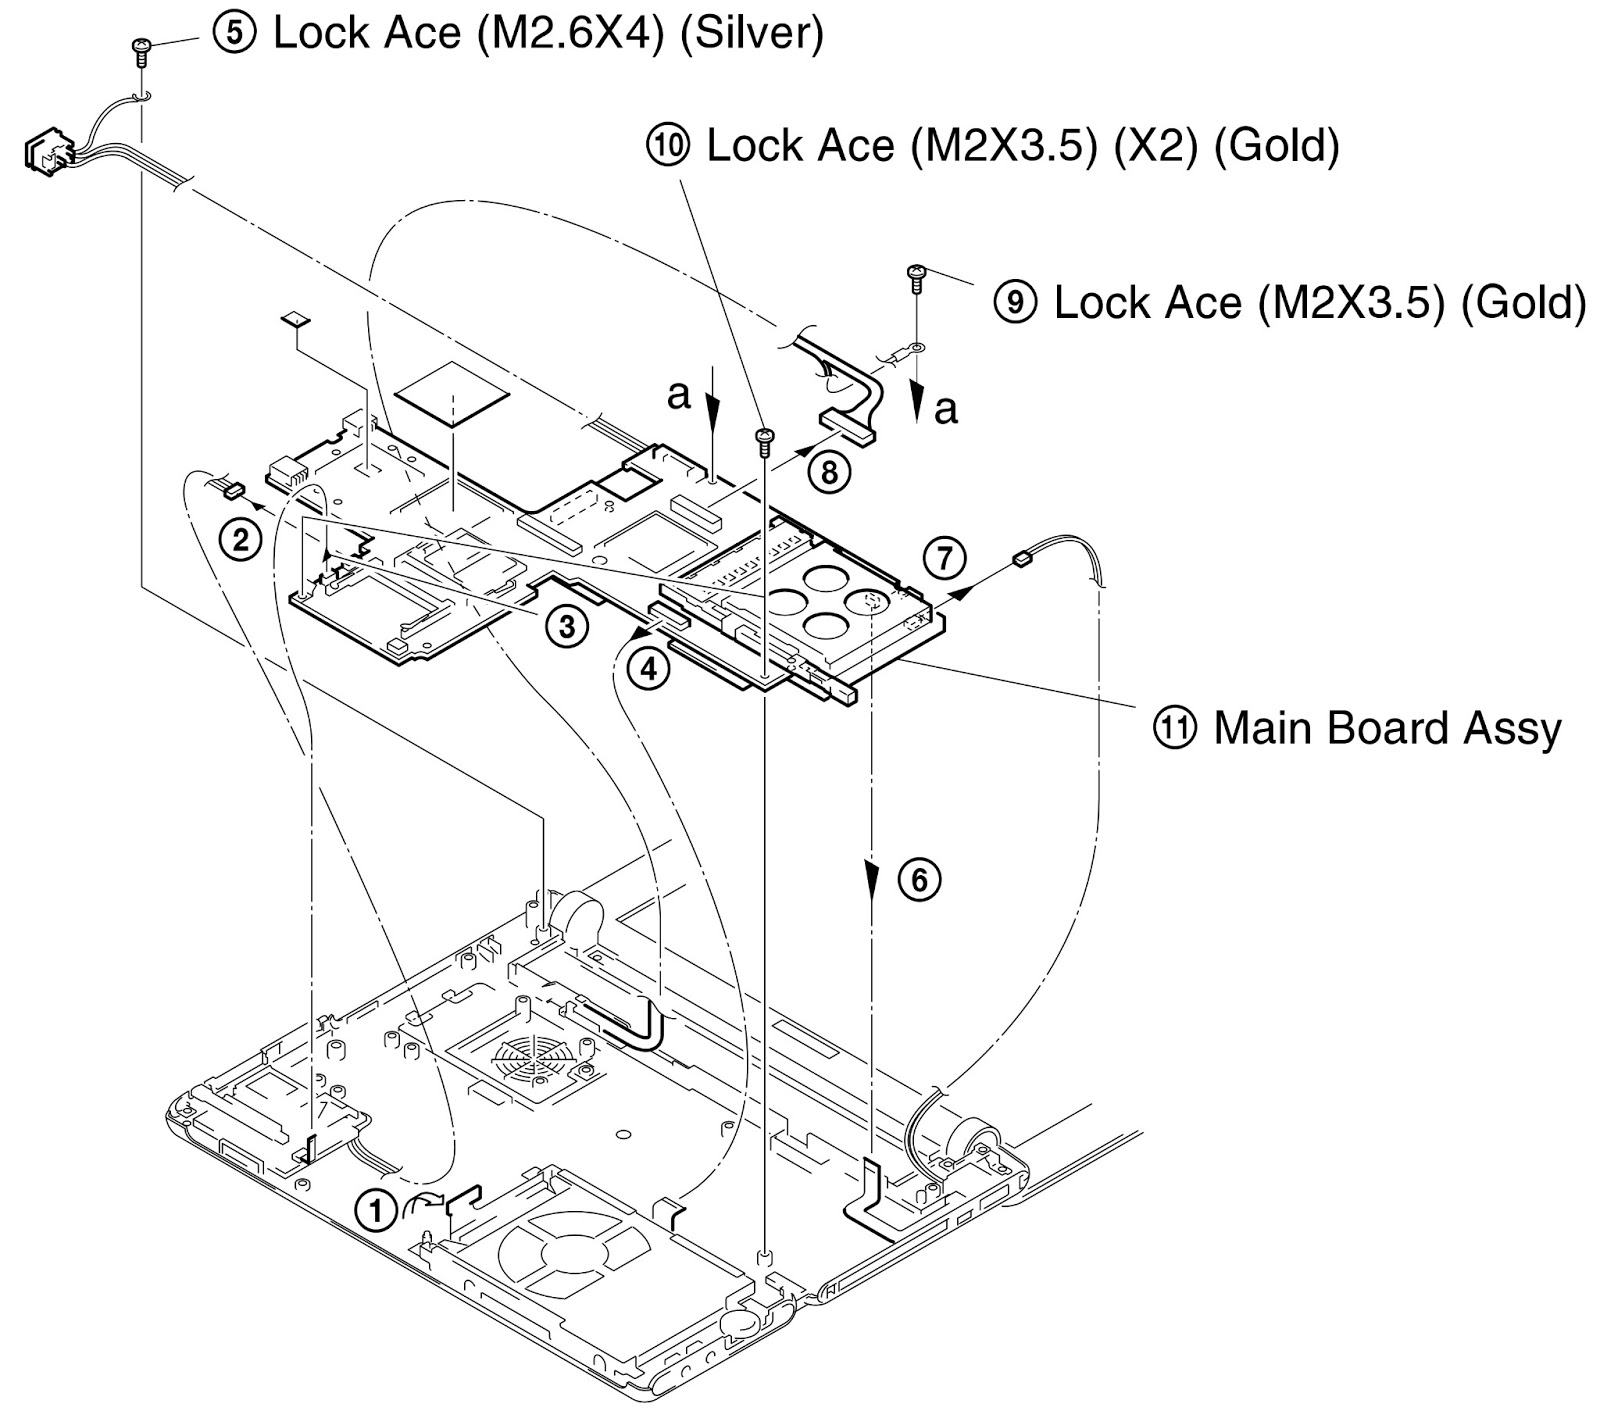
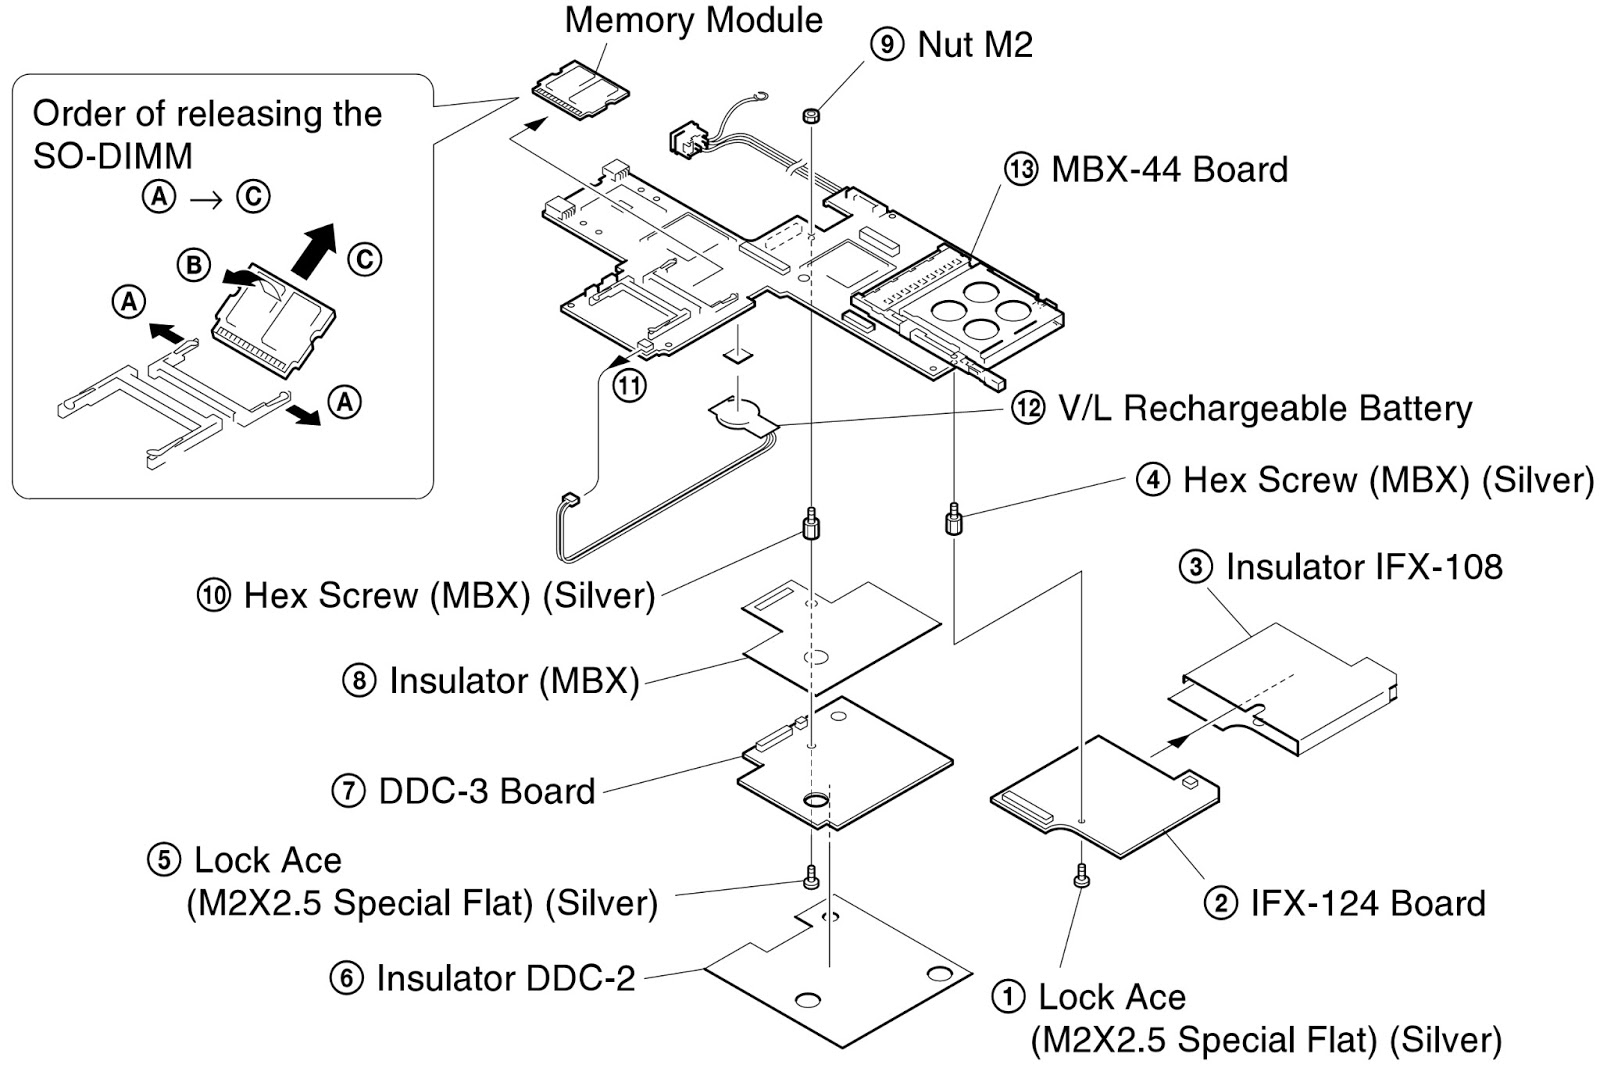
HOW TO DISASSEMBLE SONY VAIO PCG-SR27 - PCG-SR27K - DISASSEMBLY PROCEDURE - Pictures


DISASSEMBLY
REMOVAL OF KEYBOARD UNIT
{Click on pictures to Zoom In}
TOUCH PAD [R] SPEAKER & SWX-61 BOARD
HARD DISC DRIVE
SPEAKER [L] & IFX-125 BOARD
FRAME ASSY' & COOLING FAN
MAIN BOARD ASSEMBLY
MBX-44 _ IFX-124 _ DDC-3 BOARDS & V/L RECHARGEABLE BATTERY
CNX-107 BOARD
DISPLAY ASSEMBLY
LCD SECTION _ HOUSING
MICROPHONE _ LCD ASSEMBLY _ INVERTER UNIT & ANL-24 BOARD

SYSTEM RECOVERY - SONY VAIO - SUPPORT AGENT

SYSTEM RECOVERY - SONY VAIO - SUPPORT AGENT


SYSTEM RECOVERY
Using the System Recovery CD(s)
   You can use the System Recovery CD(s) to reinstall the operating system and software titles that shipped with your notebook if they become corrupted or erased. You may not need to reinstall the entire contents of your hard drive. If you experience a problem with your notebook, reinstalling an individual device driver or software title may correct the problem. Use the Application Recovery CD(s) to reinstall individual applications or use the Driver Recovery CD to reinstall device drivers. See “Using the Application Recovery CD(s)”for more information.
   The System Recovery CD contains a backup copy of all the software originally installed on your hard disk drive. It can be used only to recover the hard disk of the notebook you purchased.
   The System Recovery utility gives you Full Restore with Format, that is it formats the hard disk drive then restores all the original software.


   Full Restore with Format removes all the information on the hard disk drive. You will lose any software you have installed and any other files you have created since you started to use your notebook. This means you will have to reinstall any applications that were not included with the notebook when you purchased it. If you have any questions on using the System Recovery CD, contact Sony Customer Support.
To use the System Recovery CD(s)
  • Insert the Sony System Recovery CD in the optical drive.
  • Shut down your notebook as described in “Shutting Down Your Notebook”.
  • Wait four seconds then turn on your notebook.
  • Click OK to signify you have read and accept the Microsoft End-User License Agreement.
  • When the System Recovery menu appears, follow the on-screen instructions to complete the recovery process.
If your notebook does not start from the Recovery CD
  • Press the power button and hold it for more than four seconds to turn off the notebook.
  • Turn on the notebook. When the Sony logo is displayed, press the F2 key. The BIOS setup menu screen appears.
  • Press the arrow keys to select the Exit menu.
  • Press the arrow keys to select “Get Default Values” then press the Enter key. The message “Load default configuration now?” appears.
  • Check that “Yes” is selected, then press the Enter key.
  • Press the arrow keys to select “Exit”(Save Changes) and then press the Enter key. The message “Save configuration changes and exit now?” appears.
  • Check that “Yes” is selected, then press the Enter key. The notebook restarts from the Recovery CD.
Recovering Microsoft Word 2002
  • If you recover your operating system using the System Recovery CD, Microsoft Word 2002 will not be recovered. Use the supplied Word 2002 CD-ROM to recover this application.
  • Your system may include one or two System Recovery CDs. If you have two System Recovery CDs, insert the first CD to run the System Recovery program. You are prompted to insert the second CD once the information from the first CD has been installed.
  • The recovery process takes from 30 to 60 minutes to complete.
  • After recovering your system using the SRCD, you may be prompted to insert your ARCD after restarting Windows. Insert the ARCD to automatically complete recovery of your system.
VAIO Support Agent
  VAIO Support Agent helps you repair your own software problems without the assistance of a support analyst. VAIO Support Agent's advanced diagnostic technology identifies and tracks characteristics of your software applications and basic network settings. These diagnostics protect and store information in a
retrievable format that enables you to restore your software to a previous working state. Sony has identified the software items that are protected by the VAIO Support Agent utility.
  VAIO Support Agent has three features to help you fix your software problems:
  Quick Fix Wizard, Common Solutions, and Support Central. This section briefly describes these three features, and the automatic update capability of the VAIO Support Agent.
VAIO Support Agent main window.
Using the Quick Fix Wizard
  The VAIO Support Agent records and maintains a history of the VAIO Support Agent protected applications by taking a “snapshot” of the application at regular, timed intervals and storing it for future use. Should a problem develop with one of the protected applications, you can use the Quick Fix Wizard feature to retrieve the date/time (snapshot) that was recorded when the application worked  correctly. The Quick Fix Wizard repairs the protected application files without altering the data files you have created using the application.

To use the Quick Fix Wizard, follow these steps:
  • From the VAIO Support Agent main window, click the Quick Fix Wizard button. The Welcome window appears.
  • Click Next. The “Quick Fix Wizard: Begin VAIO Support Agent Diagnostics” dialog box appears.
  • Select the “Diagnose and fix my software” option.
  • Select the software you wish to repair from the drop-down list. [To view a list of software applications protected by VAIO Support Agent, click on the “Pick the software:” drop-down list.]
  • Next, select a date/time from the drop-down list that corresponds to the last time when the software worked properly.
  • Click “Next” to continue. Follow the instructions on the screen.
Quick Fix Wizard: Begin VAIO Support Agent Diagnostics dialog box
Common Solutions dialog box (1st level)
  • Connect to the Internet before attempting to view the category, “Vaio Support Local Server (http://sdcglobal4.sel.sony.com...).” This category is unavailable without an Internet connection.
  • Click the resize arrows next to the Support Action categories to expand or collapse the categories.

  • Select the appropriate Support Action from the list.
  • Click Run or double-click the desired Support Action. The available Support Actions are shown in bold type. [You cannot undo One-Click Fixes.]
Using Support Central
  • The Support Central feature uses Internet resources to help you fix your software. Support Central searches the Internet for answers to your questions, additional information from knowledge base systems, and the latest software updates for your protected software. Support Central also lets you contact live support agents for additional help.
  • Connect to the Internet.
  • From the VAIO Support Agent main window, click Support Central. The Support Central Welcome page appears. {You must have Internet access to use Support Central.}
Support Central: Welcome page
  • Click Enter Portal to begin using Support Central. First-time users will be asked to register with Support Central.
  • Support Central retains your registration information, so you are only required to register once. If you log on to your notebook with a different user name or have recovered your system using the System Recovery CDs, Support Central may require you to register again.
Support Central: Registration page
Support Central: Current Issues page
  • When you log on to Support Central, the Current Issues page displays, enabling you to continue working on your open issues or to close them if you are finished.
  • Support Central has a tracking feature that stores your current issues, enabling you to return and work on them later. Support Central: Current Issues page
Support Central: Support Wizard page
  • If you log on to Support Central with a new issue, or if you do not have any open issues, the Support Wizard appears. You can begin searching on the new issues. [You must be connected to the Internet to use Support Central.]

SONY VAIO - SYSTEM TROUBLEHOOTING - DOES NOT START - OPERATING SYSTEM NOT FOUND - DOES NOT SHUT DOWN

SYSTEM TROUBLEHOOTING - SONY VAIO - Does not Start - Operating System not found - Does not Shut Down


TROUBLESHOOTING
  [Windows Me only] When starting your notebook for the first time, the VAIO InitManager dialog box will appear. Please select “OK”to begin initial set-up. If you do not execute the initial set-up, you cannot use part of VAIO original hardware functions such as Jog Dial, Power Management tool, scroll function of touch pad, and keyboard short-cut key function combined with the Fn key.
DOES NOT START
  • Check that the notebook is plugged into a power source and that it is turned on. Check that the power indicator on the front panel of the notebook indicates that the power is on.
  • Check that the battery packs are inserted properly and that they are charged.
  • Make sure there is no diskette in the floppy disk drive.
  • Confirm that the power cord and all cables are connected firmly, as described in “To Connect a USB Device”.
  • If you plugged the notebook into a power strip or UPS, make sure the power strip or UPS is turned on and working.
  • If you are using an external display, check that it is plugged into a power source and turned on. Check that the brightness and contrast controls are adjusted correctly. See the manual that came with your display for details.
  • Moisture condensation may have occurred. Do not use the notebook for at least one hour and then turn on the notebook.
  • Take the battery pack off the notebook, unplug the power cord and plug it again, then turn on the power.
NOTEBOOK STARTS, BUT SYSTEM WON'T
  • When the internal backup battery is low on power, it may not start your system properly. The message “Press <F1> to resume, <F2> to setup” appears at the bottom of the screen. Follow these steps:
  • Press F2. The BIOS Setup menu appears.
  • Set the date (month/day/year). Press Enter.
  • Press to select System Time, then set the time (hour: minute: second). Press Enter.
  • Press    to select Exit, then press to select Get Default Values. The message “Load default configuration now?” appears.
  • Select "Yes" and press Enter.
  • Select Exit (Save Changes), and then press Enter. The message “Save Configuration changes and exit now?” appears.
  • Select Yes, then press Enter. The notebook restarts.
Notebook starts, but the message “Operating system not found” appears and Windows does not start.
  • Make sure there is no diskette in the floppy disk drive (non-bootable). If a non-bootable diskette is in the drive, follow these steps:
  1. Turn off the notebook, and then remove the diskette.
  2. Restart the notebook and confirm that Windows starts properly.
If Windows still does not start, follow the steps below to initialize the BIOS:
  • Remove any diskette from the floppy disk drive.
  • Turn off the notebook.
  • Remove any peripheral devices connected to the notebook.
  • Turn on the notebook.
  • Press the F2 key when the Sony logo appears. The BIOS set-up menu screen appears.
  • Press the directional arrow keys to select the Exit menu.
  • Press the arrow keys to select “Get Default Values” and then press Enter. The message “Load default configuration now?” appears.
  • Select Yes, then press Enter.
  • Use the directional arrow keys to select “Exit”(Save Changes), and then press Enter. The message “Save configuration changes and exit now?” appears.
  • Select Yes, then press Enter. The notebook restarts.  If your notebook continues to display the message “Operating system not found”, and Windows does not start, contact Sony Customer Support.
STOPS RESPONDING OR DOES NOT SHUT-DOWN
It is best to shut down your notebook using the Shut Down command on the Windows Start menu. Using other methods, including those listed here, may
result in loss of unsaved data.
  • Try restarting the notebook. On the Windows taskbar, click the Start button, click Shut Down, and then click Restart.
  • If you cannot restart as described in the preceding step, you can restart the notebook by pressing Ctrl+Alt+Delete.
  • If the previous step does not work, press and hold the power button for at least four seconds. This turns off the power.
  • If your notebook stops responding while playing a CD, stop the CD, and restart the notebook by pressing Ctrl+Alt+Delete.
  • Unplug the notebook from the AC adapter and remove the battery pack from your notebook.
  • Pressing Ctrl+Alt+Delete or turning off the notebook with the power switch may result in data loss in files that are currently open.
Does not enter the power saving mode (Windows Me only)
To enable your notebook to enter the power saving mode you select, proceed as follows:
  • Click Start, point to Program, point to Accessories, point to System Tools, and then click System Information. The Help and Support window appears.
  • Click System Configuration Utility under the Tools menu.
  • Click the Advanced button on the General tab, and confirm the following information:
  1. The message “Standby function is enabled” is displayed. If the message reads, “Standby function is disabled”, click the Enable button.
  2. The message “Hibernate feature is enabled” is displayed. If the message reads, “Hibernate feature is disabled”, click the Enable button.
  3. Click OK and restart your notebook.
System enters System Idle mode when System Suspend mode has been selected.
  • If you are connecting an optical disc drive with a PC card, disconnect it by stopping the PC card. Use the Sony Notebook Setup utility to disable devices that you are not currently using. See “Removing a PC card” for more information.
  • Make sure the PC Card is compatible with your notebook’s Windows operating system. [(Windows 2000 only) When the notebook enters and returns from a power saving mode after removing the optical drive, the message “Unsafe Removal of Device” may appear and the device name is shown listed as Secondary IDE Channel. Click OK.]
The Power Management setting is not responding.
Your notebook’s operating system may become unstable if a lower power state, such as system hibernation is initiated and then changed before the notebook completely enters the lower power state. To restore the notebook to its normal operating stability:
  • Close all open applications.
  • Push and hold the power button for four seconds or longer to shut down the notebook.
The sound of  notebook’s fan is too loud.
Use the Power Panel utility to change the Thermal Control Strategy setting to Quiet. This setting slows down the CPU speed.
LCD SCREEN TROUBLESHOOTING
LCD screen is blank.
  • Verify that the notebook is plugged into a power source and that it is turned on.
  • Verify that the power indicator on the notebook is on.
  • Verify that the battery pack(s) is inserted properly and that they are charged.
  • The notebook may be in LCD (Video) Standby mode. Press any key to activate the screen.
  • The display mode may be set to external display mode. Press and hold the Fn key while pressing F7 several times.
LCD screen continues to show the previous screen. (Windows Me only)
Press the Windows key and D key twice to refresh the screen.
The image on my connected external display is not centred or sized properly.
Use the controls on your external display to adjust the image.
To change the video resolution of my display.
  • Click Start, point to Settings, point to Control Panel, and then click the Display icon. The Display Properties dialog box appears.
  • Click on the Settings tab.
  • Move the Screen Area slider to change your video resolution.
Mouse does not work.
  • If you are using an external mouse, verify that the mouse is plugged into the mouse connector. See “Connecting a Universal Serial Bus (USB) Device” for details.
  • If you are using an optional Sony USB mouse PCGA-UMS1 series, verify that the mouse is plugged into the USB connector, and restart your notebook.
Touch pad does not work properly.
You may have disabled the touch pad without connecting a mouse to the notebook. To enable the touch pad:
  • Click Start > Programs > Sony Notebook Setup.
  • Select the Touch pad tab.
  • Click Use touch pad and click OK.
If your touch pad is interpreting a single tap as a double-click, adjust the button assignments as follows:
  1. Click Start, point to Control Panel, then double-click on the Mouse icon. The Mouse Properties dialog box appears.
  2. Change the button assignments in the Mouse Properties dialog box. (One of the buttons is assigned to the double-click action.)
Pointer does not move while using the touch pad or mouse.
  • Click the Start button on the Windows task-bar, select Shut Down to display the Shut Down Windows dialog box, then press Enter.
  • (Windows Me): If you cannot turn off your notebook as described in the step above, press Ctrl+Alt+Delete twice to restart the notebook.
  • (Windows 2000): If you cannot turn off your notebook as described in the step above, press Ctrl+Alt+Delete and click Shut Down on the Windows Security screen to restart the notebook.
  • If you cannot restart your notebook as described in the step above, press and hold the power button for more than four seconds to turn off the notebook.
  • If the pointer does not move while playing a disc, press Ctrl+Alt+Delete to stop playback and restart the notebook.
DRIVES _ PC CARDS & REFERRAL DEVICES
  • CD-ROM drive is not playing my CD properly.
  • Make sure the label of the disc is facing up.
  • If the disc requires software, make sure the software is installed according to the manufacturer’s instructions.
  • A dirty or damaged disc may cause the notebook to stop responding while it tries to read the disc. If necessary, restart the notebook, remove the disc, and then check it for dirt or damage.
  • If you are using an optional DVD Rom Drive, and can see video but not hear audio, check all of the following:
  • Check that your DVD-ROM drive does not have the mute setting enabled.
  • Check the volume setting in the audio mixer.
  • If you are using external speakers, check the volume settings, then check the connections between your external speakers and the notebook. VAIO Notebook Quick Start 58
  • Click Start, point to Settings, point to Control panel, then double-click System. The System Properties dialog box appears.
  • Click the Device Manager tab.
  • Verify that the correct drivers are installed properly.
  • Do not use adhesive labels to identify the CD. The label may come off while the disc is in use in the optical drive and cause the drive to malfunction.
  • Moisture condensation may have occurred. Leave the notebook idle for at least 1 hour with the notebook turned on.
Optical drive tray does not open.
  • Make sure the notebook is turned on.
  • Press the Eject button on the optical drive.
  • If the Eject button does not work, open the tray by inserting a thin pen tip in the hole to the right of the Eject button.
Cannot use digital video (DV) devices. The message “DV equipment seems to be disconnected or turned off” appears.
  • Verify that the DV device is turned on and that the cables are properly connected.
  • If you are using multiple i.LINK devices, the combination of the connected devices may cause unstable operation. In this case, proceed as follows:
  1. Turn off your notebook and all connected devices.
  2. Disconnect the devices that are not in use.
  3. Ensure that all other devises are properly connected.
  4. Restart your notebook.
The i.LINK-compatible devices connected to my notebook do not work.
  • Use the i.LINK connector that is located on your notebook.
  • If the message “There are no Digital Video devices connected to this computer, or the power is off” appears, unplug the i.LINK cable and try plugging it in again.

SONY VAIO - SOFTWARE TROUBLSHOOTING - VOICE-RELATED SOFTWARE DOES NOT WORK PROPERLY - MODEM CONNECTION IS SLOW

SOFTWARE TROUBLSHOOTING - SONY VAIO - Voice-related software does not work properly - Modem connection is slow


WHEN APPLICATION ICON IS CLICKED; A MESSAGE DISPLAYS
   When click an application icon, the message “You must insert the application CD into your optical drive” appears and the software does not start.
  • Some titles require specific files that are located on the application CD. Insert the disc and try starting the program again.
  • Make sure you place the CD in the tray with the label side facing up.
Cannot use the DVgate software.
If your notebook is using the Ultimate Battery Life profile for its power saving mode, you cannot use DVgate or Smart Connect software. You must select another profile.
Voice-related software does not work properly.
Disable the microphone echo function as follows:
  • Click Start, point to Settings, then point to Control Panel.
  • Click Yamaha DS-XG.
  • Click the Echo tab and remove the check-mark. Click OK.
Modem does not work.
  • Verify that the phone line is plugged into the line jack. See “Using a Phone Line” for details.
  • Verify that the phone line is working properly by plugging the line in an ordinary phone and listening for a dial tone.
  • Verify that the phone number the program is dialing is correct.
  • Verify that the software you are using is compatible with the notebook’s modem. (All preinstalled Sony programs are compatible.)
Modem connection is slow.
  The notebook is equipped with a 56K/V.90 compatible modem. Many factors may influence modem connection speed, including telephone line noise or compatibility with telephone equipment (such as fax machines or other modems).  If you think your modem is not connecting properly to other PC-based modems, fax machines, or your Internet Service Provider, proceed as follows:
  1. Have your phone company check that your phone line is free from any line noise.
  2. If your problem is fax-related, check that there are no problems with the fax machine you are calling and that it is compatible with fax modems.
  3. If you are having a problem connecting with your Internet Service Provider, check that the ISP is not experiencing technical problems.
  4. If you have a second phone line available, try connecting the modem to that line.
Speakers have no sound.
  • If the built-in speakers are turned off, press Fn+F3 or use the Jog Dial control to turn on the speakers.
  • If the speaker volume is turned to the minimum, press Fn+F4, then press or to increase the volume or you can use the Jog Dial control to control the volume.
  • If nothing is displayed when you press Fn+F3 or Fn+F4, proceed as follows:
  • Click Start, point to Settings, point to Control panel, then double-click System. The System Properties dialog box appears.
  • Click the Device Manager tab.
  • Set the sound device to enable.
  1. If notebook is powered by batteries, verify that the battery packs are inserted properly and that they are charged.
  2. If you are using an application that has its own volume control, verify that the volume is turned up.
  3. Check the volume controls in Windows.
If you connect external speakers:
  • Verify that the speakers are properly connected and the volume is turned up.
  • If the speakers have a mute button, make sure the button is off.
  • If the speakers are powered by batteries, verify that the batteries are inserted properly and that they are charged.
  • If you have connected an audio cable to the Headphone connector, disconnect the cable.
Cannot print.
  • The default setting for the printer port mode is correct for most printers. If you cannot print, try changing the printer port mode. In Sony Notebook Setup, select the Printer tab. If the printer port mode is set to ECP, change it to bi-directional. If the printer port mode is set to bi-directional, change it to ECP. See “Displaying the Sony Notebook Setup Screen” for details on using Sony Notebook Setup.
  • The  connected printer may not function after the notebook resumes from a power saving mode. If this occurs, proceed as follows to reset the printer connection:
Windows ‘Me’ Only
  • Right-click My Computer icon on the desktop and select Properties.
  • Click the Device Manager tab.
  • Select Refresh, then click OK. The printer should function properly.
Windows ‘2000’ Only
  • Click My Computer icon on the desktop, then click on the Control Panel folder.
  • Click on the Printers folder.
  • Right-click on the icon of the printer that is malfunctioning, then select Properties to access the Properties window.
  • Click OK to close the Properties window. The printer should function properly.
Microphone does not work.
  If you are using an external microphone, verify that the microphone is plugged into the Microphone connector. See “Recording from a Microphone or Audio Equipment” for details.

Monday, 18 March 2019

SONY VAIO - PCG-SR33 - PCG-SR33K - PCG-SR27 - PCG-SR27K - PARTS LOCATION & DISASSEMBLE PROCEDURE

SONY VAIO - PCG-SR33 - PCG-SR33K - PCG-SR27 - PCG-SR27K - PARTS LOCATION & DISASSEMBLE PROCEDURE


MAIN ELECTRICAL PARTS LOCATION
KEYBOARD UNIT & PALM ASSEMBLY REMOVAL
TOUCH-PAD, RIGHT SPEAKER & SWX-61 BOARD REMOVAL
{Click on pictures to Zoom In}
HARD DISC DRIVE REMOVAL
LEFT SPEAKER & IFX-125 BOARD REMOVAL
FRAME ASSEMBLY, DC FAN REMOVAL
MAIN BOARD ASSEMBLY REMOVAL
MBX-44 Board, IFX-124 Board, DDC-3 Board, V/L Rechargeable Battery removal
CNX-107 BOARD REMOVAL
DISPLAY ASSEMBLY REMOVAL
LCD SECTION

HOW TO REMOVE / REPLACE BATTERY - SONY VAIO NOTEBOOK

TO REMOVE / REPLACE BATTERY - SONY VAIO NOTEBOOK


BATTERY REPLACEMENT
You can use a battery pack as a source of power. The battery pack that comes with your notebook is not fully charged at the time of purchase. Follow the steps below to insert and charge the battery pack.
To Insert the Battery Pack
You can insert or remove the battery pack without turning off the notebook when your notebook is connected to the AC adapter. Before inserting or removing a battery pack, close the cover.

  • Move the lock lever on the bottom of the notebook to the UNLOCK position.
  • Align the grooves and tabs on the battery with the tabs and notches on the back of the notebook, and then slide the battery toward the notebook until it clicks into place.
INSERTING BATTERY PACK
Slide the lock lever into the LOCK position to secure the battery on the notebook.

The notebook automatically charges the battery (the battery indicator light flashes in a double-blink pattern as the battery charges). When the battery is 85% full, the battery indicator light turns off. This process takes 5.5 hours if the system is on. To charge the battery completely, continue charging for approximately 3 additional hours.
To Remove the Battery Pack
You can insert or remove the battery pack without turning off the notebook when your notebook is connected to the AC adapter. Before inserting or removing a battery pack, close the cover.
  • Turn off the notebook and close the cover.
  • Slide the lock lever to the UNLOCK position.
  • Slide the release lever to the UNLOCK position and slide the battery away from the notebook.

You may lose data if you remove the battery pack while the notebook is on and not connected to the AC adapter or if you remove the battery while the notebook is in a power saving mode.
  • If you find that an application exhibits unexpected behavior (such as reduced video quality) after returning from a power saving mode, you should close that application before your notebook enters a power saving mode.
  • For maximum audio and video performance, use Power Panel to select either the AC Power Profile or the Power Management Off profile.
  • If your battery level falls to less than 10 percent, you should either attach the AC adapter to recharge the battery or shut down your notebook and insert a fully charged battery.

When the internal backup battery is low on power, it may not be able to boot your system properly. You can correct this condition as follows:
  • Plug in the AC adapter and allow the notebook to charge for one hour while the power is on. Do not use the notebook during this time.
  • After one hour, turn the power off and then on again. To charge the internal backup battery fully, keep the AC adapter connected for more than 24 hours after turning the power on. You can use your notebook while charging the battery.

The operating system may become unstable if a lower power state such as Hibernate is initiated and then changed before the operating system completely enters the lower power state. To restore the notebook to its normal operating stability, close all open applications, and slide the power switch forward and hold it there for four seconds or more to completely shut down the notebook.