REPAIRING AND NOT THROWING AWAY

Richtige Fernseher haben Röhren!

Richtige Fernseher haben Röhren!

In Brief: On this site you will find pictures and technical information about Service Modes, Circuit Diagrams, Firmware Update procedure, Disassemble procedure, Universal remote control set-up codes, Troubleshooting and more....

If you go into the profession, you will obtain or have access to a variety of tech tips databases HERE IT IS Master Electronics Repair !.

These are an excellent investment where the saying: 'time-is-money' rules. However, to learn, you need to develop a general troubleshooting approach - a logical, methodical, method of narrowing down the problem. A tech tip database might suggest: 'Replace C536' for a particular symptom. This is good advice for a specific problem on one model. However, what you really want to understand is why C536 was the cause and how to pinpoint the culprit in general even if you don't have a service manual or schematic and your tech tip database doesn't have an entry for your sick TV or VCR.

While schematics are nice, you won't always have them or be able to justify the purchase for a one-of repair. Therefore, in many cases, some reverse engineering will be necessary. The time will be well spent since even if you don't see another instance of the same model in your entire lifetime, you will have learned something in the process that can be applied to other equipment problems.
As always, when you get stuck, checking out a tech-tips database may quickly identify your problem and solution.In that case, you can greatly simplify your troubleshooting or at least confirm a diagnosis before ordering parts.

Happy repairing!
Today, the West is headed for the abyss. For the ultimate fate of our disposable society is for that society itself to be disposed of. And this will happen sooner, rather than later.

How to use the site:

- If you landed here via any Search Engine, you will get what you searched for and you can search more using the search this blog feature provided by Google. You can visit more posts scrolling the left blog archive of all posts of the month/year,
or you can click on the main photo-page to start from the main page. Doing so it starts from the most recent post to the older post simple clicking on the Older Post button on the bottom of each page after reading , post after post.

You can even visit all posts, time to time, when reaching the bottom end of each page and click on the Older Post button.

- If you arrived here at the main page via bookmark you can visit all the site scrolling the left blog archive of all posts of the month/year pointing were you want , or more simple You can even visit all blog posts, from newer to older, clicking at the end of each bottom page on the Older Post button.
So you can see all the blog/site content surfing all pages in it.

- The search this blog feature provided by Google is a real search engine. If you're pointing particular things it will search IT for you; or you can place a brand name in the search query at your choice and visit all results page by page. It's useful since the content of the site is very large.

Note that if you don't find what you searched for, try it after a period of time; the site is a never ending job !

..............The bitterness of poor quality is remembered long after the sweetness of todays funny gadgets low price has faded from memory........ . . . . . .....
Don't forget the past, the end of the world is upon us! Pretty soon it will all turn to dust!

©2010, 2011, 2012, 2013, 2014 Frank Sharp - You do not have permission to copy photos and words from this blog, and any content may be never used it for auctions or commercial purposes, however feel free to post anything you see here with a courtesy link back, btw a link to the original post here , is mandatory.
All posts are presented here for informative, historical and educative purposes as applicable within fair use. NOTHING HERE IS FOR SALE !

Showing posts with label ILO. Show all posts

Saturday, 30 March 2019

KONKA LCD TV - LC32AS28 – LC26A2 - ILO CIWL2606 AND FUNAI 26 INCH LCD TVS - SMPS SCHEMATIC

KONKA LCD TV - LC32AS28 – LC26A2 - ILO CIWL2606 and Funai 26 inch LCD TVs - SMPS SCHEMATIC

Used ICs - OZ9932 – 6930A – LD7575 – CE3B1065 – DLA001 – UCC28051 – STP10 (Power MOSFET) – PC123Y82 (Photo-coupler) - 2SK3797 Power Switching FET (ILO - Funai)
ILO-CIWL2606 and FUNAI 26 Inch LCD TV SMPS
CLICK ON THE PICTURES TO MAGNIFY

Thursday, 21 March 2019

ILO LCT27HA36 - MT8202 - MT5351AG - SOFTWARE UPGRADE PROCEDURE

ILO LCT27HA36 - MT8202 - MT5351AG - SOFTWARE UPGRADE procedure


UPGRADE PROCEDURE MT8202
  • Turn on AC power of the TV and then press the button “standby” of the remote control . The image could be found on the screen of the Plasma TV while the color of the power indicator is green . (the mode of the TV will be standby mode if after turn on the main power only . )
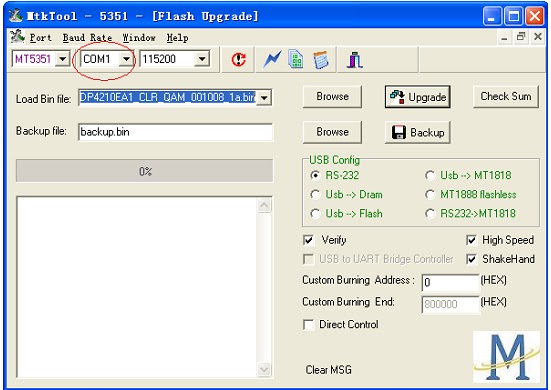
Execute MTKtool and select the chipset as MT8202. (the software of MTKtool will be sent to your side).

  • Select current COM port. (try to check the COM port of your PC)
  • Choose the bit rate as 115200.
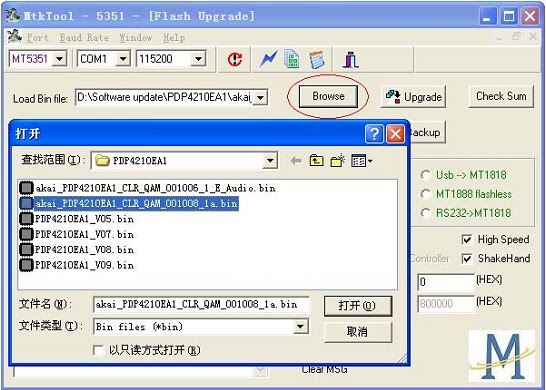
  • Select the update binary by pressing browse button. For example, the binary file name is PDP4210EA1_V09.bin.(this update firmware will be sent to your side)
  • Press Upgrade button and start update process.

  • The update process is successful as the progress bar is 100%. After the update process is ok, turn off power and wait indicator light is off. Turn on power and TV can work.
CHECKING
  • It is needed to check the version of the firmware for MT8202 which has been download into the Plasma TV .  
  • Press Menu button of the remote control following input “8202”of the remote control and OSD menu for Factory Setting is appeared on the screen.
  • Use the remote control and select the mode of Firmware Version and then enter the mode of Firmware Version. It is easy to be found the version of the current firmware for MT8202 is as the following : “Factory ID : PDP4210EA1_VXX ”
PROCESS OF UPDATE MT5351AG
  • Connect the Plasma/LCD TV and PC with the Software Upgrade Board.
  • Store the MtkTool into the PC
DOWNLOADING
  • Turn on AC power of the TV and then press the button “standby” of the remote control. The image could be found on the screen of the Plasma TV while the color of the power indicator is green . (the mode of the TV will be standby mode if after turn on the main power only . )
  • Execute MTKtool and select the chipset as MT5351. (the software of MTKtool will be sent to your side)
  • Select current COM port.(please try to check the COM port of your PC).
  • Choose the bit rate as 115200.
  • Select the update binary by pressing browse button. For example, the binary file name is XXXX_PDP4210EA1_000000XX_X_P.bin. (this update firmware will be sent to your side)
  • Press Upgrade button and start update process.
  • The update process is successful as the progress bar is 100%. After the update process is ok, turn off power and wait indicator light is off. Turn on power and TV can work.
CHECKING
  • It is needed to check the version of the firmware for MT5351AG which has been download into the Plasma TV.
  • Press Menu button of the remote control and the main OSD menu is appeared on the screen.
  • Use the remote control and select the DTV menu. Following input “0000” (zero , zero , zero , zero) of the remote control .Then enter the mode of factory after input the digits .
  • It is easy to be found the version of the current firmware for MT5351AG is “PDP4210EA1 CLA_QAM_XXXXXX_XX”under the mode of factory .

Wednesday, 13 March 2019

ILO LCT27HA36 LCD TV TROUBLE SHOOTING

ILO LCT27HA36 LCD TV TROUBLE SHOOTING

TROUBLE SHOOTING 


1.Do not power on .
1 .1 Please check AC cable if connect to AC plug. Is true the connector don’t connect to AC plug. Please connect it.
2.2 Please check AC cable if connect to AC power. Is true the AC cable don’t connect to AC power. Please connect it.
3.3 Please check power board of fuse if broken. If the F1 fuse is broken, Please pull out the AC cable from AC power. Please check AC L power and AC N ground by multimeter, The read number is infinite, the fuse is broke. Then look up power board if not burn out place. Is true it. Please change power board or be changed power board.
2. The power on switch of green extinguish.
2.1 The power of led(indicator light) is red light, To touch power on key when indicator light wink. Is true that the power DC output have somewhere short circuit. Check connector J39,J31 .If not connector direction is wrong. Or the mainboard somewhere of power short circuit.
3.The power is normal work ,but don’t backlight.
3.1 The indicator light work normal (green light ). Check Main board of transistor Q18 collect if not has +5v voltage.
Is true Q18 collect hasn’t +5v ,To check Q18 if fail. Or to check Q18 of base if not low. (Low is working, high don’t work).
Please refer to attached sheet A circuit diagram.
3.2 Check backlight of connector if not it direction is wrong or the connector of wire compositor direction is wrong.
3.3 To check connector panel of voltage is +24v. It’s true .Then to check of the first pin if it have +5V voltage, It’s true , than to check power board of +24v voltage ,It’s true. The panel of backlight board is fail. The change panel of backlight board
4.The screen don’t have picture But have backlight.
4.1 To check to panel of voltage ,To check main board of bead L69 and L57 connect if not OK.Then check the L69 and L57 of voltage is +12v( 27 inch panel voltage is +5v, To check L68 and L56) . Next to check fuse F1 and connector J10 if not is +12v(27 inch panel voltage is +5v). If isn’t please check power board of connector CON5 if has +12v( 27 inch panel
voltage is +5v).
4.2To check to main board +12 V voltage. To check to main board IC U35 of the first pin if +5v voltage ,It’s fail. It’s low (close 0 v) working.
5.The remote control don’t be control.
5.1 The check batteries of remote control if it run out of .
5.2 To check main board of connecter J21 of wire connect fastness and the connecter of
wire open.
6.The sound don’t output.
6.1 To check main board +24v voltage of connector J8 ,It’s true not +24v voltage. Then to to check power main +24v fail .
7.The DTV don’t detect .
7.1 To check mainboard of connecter J24 and DTV mainboard of connector HA1 of FCC wire if no connect fastness.

Saturday, 23 February 2019

RCA - FUNAI - SYMPHONIC AND ILO - 1W3206 TVS - SERVICE MODE

RCA - FUNAI - SYMPHONIC and ILO - 1W3206 TVs - SERVICE MODE


TO ENTER THE SERVICE MODE TO THESE SETS, YOU HAVE TO MAKE A SERVICE REMOTE CONTROL OUT OF PRESENT USER REMOTE CONTROL.  DO THE FOLLOWING TO MAKE THE USER REMOTE CONTROL TO SERVICE REMOTE CONTROL.  AFTER ALL SERVICE ADJUSTMENT HAS BEEN DONE, THE CHANGES WERE MADE TO THE REMOTE MUST BE REMOVED.

TO MAKE A SERVICE REMOTE CONTROL UNIT
  • Prepare normal remote control unit [part number NE906UD].  Unscrew three screws at the back side [one of them inside the battery compartment].  Expose out the printed circuit board.  Make a jumping at the point marked "J1' with a jumper wire.  Close the remote control.
SERVICE MODE ENTRY
  1. Use the service remote control.
  2. Turn ON the power to TV.
  3. Press 'Sleep" button on the service remote control unit.  Version of Microcomputer will be displayed {M02-0.05 N2S**}
  4. Check the display at lower left is "02" and if it is not "02" set it at "02" according to "Initial setting"
INITIAL SETTING
  • Enter the service mode.
  • Press 'Vol Dn' button on the service remote control.  Display changes to "C/D", "7F", "VIDEO", "AV MEMO", "STABLE SOUND", "300", "YUV MEMORY" and "NOSIG BRT", cyclically when {Vol Dn] button is pressed. 
  • To set the following each data value, press {Ch Up / Ch Dn} buttons on the service remote control.
  • 7F -- SET TO "FF".
  • AV MDMO -- SET TO "OFF"
  • STABLE SOUND -- SET TO "OFF"
  • 7E DATA SET TO -- "300"
  • YUV MEMORY IS SET TO -- "OFF".
  • NO SIG BRT -- IS SET TO "0".

ILO - LCT42HA36M LPL SERVICE MODE ENTRY

ILO - LCT42HA36M LPL SERVICE MODE ENTRY


TO ENTER SERVICE MODE

  • Press "Menu" button on the remote control.
  • Enter digits ( 5=>3=>7=>1 ) by the remote control.
  • Use remote control and select the item of "Version Information" and then press 'Enter' button.
  • The version of the current firmware for MT5371 is [PDP42Z5TA | Version: V17_LGX3SMC_20070119

ILO - LCT32HA36 SERVICE MODE.

ILO - LCT32HA36 SERVICE MODE.


TO ENTER SERVICE MODE

  • Press "Menu" button on the remote control.
  • Enter digits (8=>2=>0=>2).
  • Factory setting screen will appear.
  • Firmware [MT8202]: Factory Id [PDP4210EA1_VXX]
Quick Installation Guide for Software Upgrade Board.
  1. Connect RS232 cable to PC serial port.
  2. Connect other side of RS232 cable to the board.
  3. Connect RS-232 VGA cable (RS232 side) to the board.
  4. Connect RS-232 VGA cable (VGA) side to the TV.
  5. Connect USB cable to the board.
  6. Connect other side of USB cable to PC.
Process of Upgrade MT5351AG
  1. Connect the Plasma | LCD TV and PC with SOFTWARE UPGRADE BOARD.
  2. Store the MtkTool into the PC.
  3. Turn on AC power of the TV, and press the button 'Standby' of the remote control.  The image could be found on the screen of the TV, while color of power indicator is Green.  The mode of the TV will be standby mode if after turn On the main power supply only.
  4. Execute 'MtkTool', and select the chip set as MT5351.
  5. Select current COM port.
  6. Choose Bit Rate as 115200.
  7. Select Update Binary by pressing Browse Button.[ for example, if binary file name is XXXX_PDP4210EA1_000000XX_X_P.bin]
  8. Press 'Upgrade' button and start Update Process.
  9. The update process is successful as the progress bar is 100%.  After the update process is OK, turn of Power and wait till indicator light is Off.  Turn On power, and TV can work.
Checking

It is needed to check the version of the firmware for MT5351AG, which ahs been downloaded to the TV.  

Press "Menu' button of the remote control and the main OSD menu appears on the screen.  

Use the remote control and select the DVD Menu, following input (0000) of the remote control.  Then enter the mode of factory after input the digits.  

It is easy to be found the version of the current firmware for MT5351AG  is "PDP4210EA1  CLA_QAM_XXXXXX_XX" under the mode of Factory.