LG 42LG70 ADJUSTMENTS AND SOFTWARE UPDATE PROCEDURE

ISP DOWNLOAD
- The Micom upgrade via the external port for the service for the customer.
- PC
- B/D for the interface (IIC & ISP)
- Jig for downloading (for the power supply).
Adjustment
condition (Download condition)
- IC name & Circuit number: MYSON MTV416GMF & IC4015
- Power supply: 5V (P4004 Pin 3)
- SCL: D-sub Pin 10
- SDA: D-sub Pin 7
DOWNLOADING
- After executing LGE Monitor Tools v1.1, click the first icon.
When the screen is displayed as
shown, set the items as follows:
- MCU Select: MTV512M64
- R/W Option: Auto Write(Verify)
- Jig Option: Myson
- Transmit Speed: Medium
- Check: blank
- PORT: Select the Parallel Port to use (LPT1 in general)
- # Caution: Select the EPP as LPT from the ROM BIAS setting.
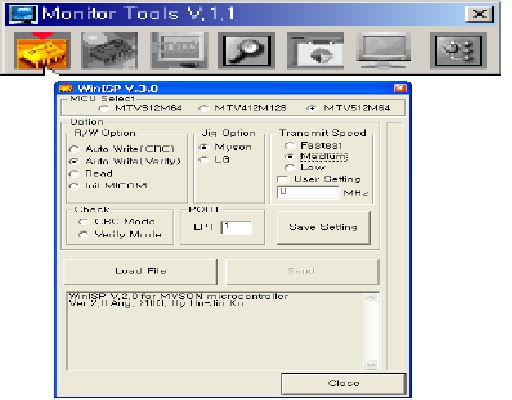
- Click the Load File Button, and select the desired Hex File to download. (If no file is displayed, make sure that the file format is selected as Hex file (*.hex))

- Click 'Send Button'
USB SOFTWARE DOWNLOAD
The
USB download is for the quick service response via the S/W upgrade and for
applying the S/W upgrade necessary for the board adjustment.
- After turning on the set, make sure that the display screen is turned on.
- When the USB Memory Stick with the upgrade file applied is inserted into the USB jack on the main board, the following screen (example) is displayed after several seconds.

- Check the current version at [Current TV Software Version Information], check the S/W version to upgrade at [New Found TV Software Version Information], and press the Enter button of the TV remote controller.
- Downloading is proceeded as shown at the below screen, and when it is ended, turning on/off is automatically done. (When the automatic proceeding is not smoothly done, manually perform the power On/Off).


- When downloading is ended, remove the USB Memory Stick from the USB jack.
- Press the IN-START button of the remote controller to check the upgraded S/W version.
COUNTRY SELECT OPTION
- Press the In-Start key of the Adjust R/C and press the red oval OP1(PIP CH-) key to enter into the Factory Option menu.
- Select 1.USA, 2.CANADA or 3.MEXICO from the country select according to the destination.
- At this time, use the volume +/- key to adjust.
WHITE BALANCE ADJUSTMENT [DEVICES TO USE]
- Color Analyzer : CA-210 (NCG: CH 9 / WCG: CH12)
- Computer to adjust (needed for the automatic adjustment, possible to communicate with the RS-232C)
- Adjustment remote controller
- Video Signal Generator MSPG-925F 720p/216Gray (Model:217, Pattern:78) => Applied only when the inner pattern cannot be used
- # Use the Color Analyzer with the matrix calibrated by the CS-1000.
"wb 00 00": Start
Auto-adjustment of white balance.
"wb 00 10": Start Gain
Adjustment (Inner pattern)
"jb 00 c0" :
…
"wb 00 1f": End of
Adjustment. * If it needs, offset
adjustment (wb 00 20-start, wb 00 2fend)
"wb 00 ff": End of
white balance adjustment (inner pattern disappear)
TO ADJUST AUTOMATICALLY
- The adjustment condition should be set by the Power On key.
- Perform the zero calibration of the Color Analyzer and place the probe close to the display center.
- Connect the communication cable (RS-232C).
- Select the desired model of the adjustment program and perform the adjustment.
- After the adjustment is ended (check the OK sign), check the adjustment condition for each mode of the set. (Warm, Medium, Cool)
- Disconnect the probe and the communication cable to end the adjustment.
# The adjustment should be started with "wb 00 00" and
ended with "wb 00 ff", and the offset should be adjusted when necessary.
MANUAL ADJUSTMENT
- The adjustment condition should be set by the Power On key.
- Press the ADJ of the R/C to enter into 'EZ-ADJUST'.
- Select '10.TEST PATTERN' with the CH +/- key and press the Enter key for 30 minutes or longer to perform the heat run.
- Perform the zero calibration of the Color Analyzer and fix the sensor with the 10cm or less distance at the center of the LCD module surface when adjusting.
- Press the ADJ of the R/C to select '7.White-Balance' of the Ez-Adjust and press the right arrow key(G ) to enter into the adjustment mode. (As soon as you press 'G ', the screen is entered into the full white inner pattern.)
- Fix one of the R/G/B gains to 192 and decrease the remaining two gains to adjust not to exceed 192.
- The adjustment is done at three white balances of Cool, Medium and Warm.
The inner pattern is basically used, and if it is not
possible, the adjustment can be done by selecting the HDMI input. NONE, INNER
or HDMI can be selected by the bottom option at the Ez Adjust Menu 7. White
Balance menu and it is set to INNER as default. If the adjustment cannot be
done by the inner pattern, select the HDMI to adjust.