PANASONIC TH-P50PV600AZ_ SERVICE MODE-1 & SERVICE MODE-2 _ ADJUSTMENTS _ WHITE BALANCE _ SUB BRIGHTNESS _ HOTEL MODE

PAL PANEL WHITE BALANCE ADJUSTMENT
- Make sure the front panel to be used on the final set is fitted.
- Make sure a color signal is not being shown before adjustment.
- Put the color analyzer where there is little color variation.
- Complete the adjustment within 10 minutes after the turn on electricity.
- Turn on the power supply again when it is not possible to complete it by aging etc.
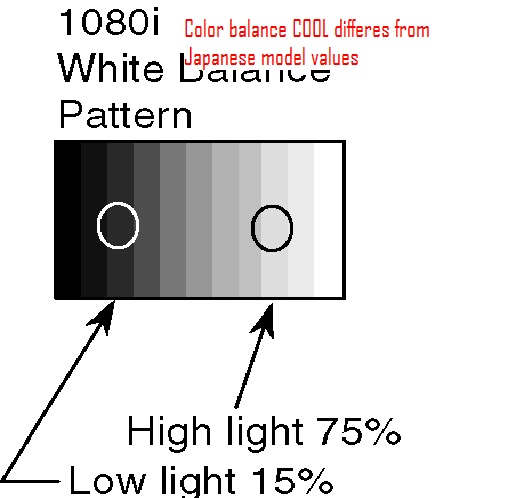
- Display the white balance pattern.
- Check that the color balance is “cool”.
- Enter the <Service1> mode.
- Select “G-CUTOFF” item, using the color-key “Red” or “Green”, and set to “128”, using the color-key “Yellow” or “Blue”. Also, “B-CUTOFF” and “R-CUTOFF” set to “128”.
- Set “G-DRIVE” at “208”.
- Touch the signal receiver of color analyzer to the highlight window’s center, and adjust B drive and R drive so x, y become the “Color balance Cool” in the below table.
- Set “ALL-DRIVE” to “252”.
- Set color-balance to “STANDARD”.
- Fix G cutoff , B cutoff and R cutoff at “128”.
- Fix G drive at “208”.
- Adjust B drive and R drive so the highlight window’s x, y become the “Color balance “STANDARD” in the below table.
- Set “ALL-DRIVE” to “252”.
- Set color balance to “Warm”.
- Set G cutoff, B cutoff and R cutoff to “128”.
- Set G drive to “208”.
- Adjust B drive and R drive so the highlight window’s x, y become the “Color balance Warm” shown in the below table.
- Set “ALL-DRIVE” to “252”.

COLOR TEMPERATURE
|
X
|
Y
|
COOL
|
0.276
|
0.276
|
STANDARD
|
0.288
|
0.296
|
WARM
|
0.313
|
0.329
|
HDMI WHITE BALANCE ADJUSTMENT
- Make sure the front panel to be used on the final set is fitted.
- Make sure a color signal is not being shown before adjustment.
- Put the color analyzer where there is little color variation.
- Complete the adjustment within 10 minutes after the turn on electricity.
- Turn on the power supply again when it is not possible to complete it by aging etc.
- Display the white balance pattern.
- Check that the color balance is “cool”.
- Enter the <Service1> mode.
- Select “G-CUTOFF” item, using the color-key “Red” or “Green”, and set to “128”, using the color-key “Yellow” or “Blue”. Also, “B-CUTOFF” and “R-CUTOFF” set to “128”.
- Set “G-DRIVE” at “208”.
- Touch the signal receiver of color analyzer to the highlight window’s center, and adjust B drive and R drive so x, y become the “Color balance Cool” in the below table.
- Set “ALL-DRIVE” to “252”.
- Set colorbalance to “Standard”.
- Fix G cutoff , B cutoff and R cutoff at “128”.
- Fix G drive at “208”.
- Adjust B drive and R drive so the highlight window’s x, y become the “Color balance “Standard” in the below table.
- Set “ALL-DRIVE” to “252”.
- Set color balance to “Warm”.
- Set G cutoff, B cutoff and R cutoff to “128”.
- Set G drive to “208”.
- Adjust B drive and R drive so the highlight window’s x, y become the “Color balance Warm” shown in the below table.
- Set “ALL-DRIVE” to “252”.
COLOR TEMPERATURE
|
X
|
Y
|
COOL
|
0.276
|
0.276
|
STANDARD
|
0.288
|
0.296
|
WARM
|
0.313
|
0.329
|
SUB-BRIGHTNESS ADJUSTMENT
- White balance adjustment is finished for each signal.
- Do adjustments in a dark room.
- Complete the adjustment within 10 minutes after the turn on electricity.
- Turn on the power supply again when it is not possible to complete it by aging etc.
- Display the 10 steps gray-scalepattern for adjusting subbright from video input.
- Use "Sub-Bright" in the <Sevice1> mode to adjust so the 6th section shows up and the 7th fades away.
Data
Sub-Bright data addresses
Sub-Bright (upper) A0-0116
Sub-Bright (lower) A0-0117

ABL ADJUSTMENT
- Make sure the set is aged for 30 minutes or more before adjustment. (Do not switch off during or after aging.)
- Voltage 230V 50Hz (variation within 1%)
- Volume at minimum and screen size at “16:9”
- Component input, dynamic, standard
- Connect the set´s AC power to the wattmeter.
- Input the signal (top half: color bar, Bottom half :Horizontal 10steps bar).
- Select the “PWRCTL” item in the <Service1> mode.
- Adjust PWRCTL so the set´s power consumption is 438 ±10W
The initial data are
Data address: A0-0102
Default data: 0x00
The power and data are in
reverse relationship. (Lower the data
to raise the power.)
Raising direction (Up): 0à255,
254, 253
Lowering direction (Dn): 0à1,
2, 3
There is a possibility that
the adjustment value can do two places, adjust it in that case, that the value
of PWRCTL is large.
HOTEL MODE
Access command
- Enter to the Service 2 Mode.
- Press Information button on remote control and entry to the EAROM EDITOR Mode.
- Press the RED/GREEN button to step up/down through the address.
- Press the YELLOW/BLUE button to step left/right through the address.
- Press the PROGRAMME UP/DOWN button to step up/down through the page.
- Press the VOLUME UP/DOWN button to change the function values.
- Set the data of EEPROM(ADDRESS 0BAF) to 01.
- Press the OK button to memorize the data
- Push the Power switch(button) off/on the set(the remote control) to turn the set off/on. It can be made Hotel mode.

- TO EXIT
- First, set the data of EEPROM(ADDRESS 0BAF) to 00. Next, Push the Power switch(button) off/on the set(the remote control) to turn the set off/on.
- Then, it is no longer hotel mode.
Access command to the Hotel
mode setup menu
Prerequisite : It is
conditions that the data of EEPROM(ADDRESS 0BAF) is 01.
- In order to display the Hotel mode setup menu, enter the following command (within 2 second).
- [TV]:down + [REMOTE]:TV/AV(3 times)
- Then, the Hotel mode setup menu is displayed.

MPU controls the functions
switching for each IICs through IIC bus in this chassis. The following setting
and adjustment can be adjusted by remote control in Service Mode.
SERVICE
1
- In sound menu, set BASS to MAXIMUM, and set TREBLE to MINIMUM.
- Simultaneously press INDEX button on remote control and DOWN button { -- / v ] on the TV set..
- Set the channel to CH99.
- Select the EQ 12kHz.
- Press HOLD button on remote control.