 PHILIPS 32PFL3805D/78 - 32PFL5605D/78 - 32PFL6605D/78 - 40PFL3805D/78 -
40PFL5605D/78 - 40PFL6605D/78 - 46PFL5605D/78 - 46PFL6605D/78 SERVICE
MODE
PHILIPS 32PFL3805D/78 - 32PFL5605D/78 - 32PFL6605D/78 - 40PFL3805D/78 -
40PFL5605D/78 - 40PFL6605D/78 - 46PFL5605D/78 - 46PFL6605D/78 SERVICE
MODE

PHILIPS 32PFL3805D/78 - 32PFL5605D/78 - 32PFL6605D/78 - 40PFL3805D/78 - 40PFL5605D/78 - 40PFL6605D/78 - 46PFL5605D/78 - 46PFL6605D/78
SERVICE MODE
Service Modes
The Service Mode feature is split into following parts:
1 Service Default Mode (SDM).
2 Service Alignment Mode (SAM).
3 Customer Service Mode (CSM).
The Service Mode feature is split into following parts:
1 Service Default Mode (SDM).
2 Service Alignment Mode (SAM).
3 Customer Service Mode (CSM).
1.Service Default Mode (SDM)
Purpose
Set the TV in SDM mode in order to be able to:
# Create a pre-defined setting for measurements to be made.
# Override software protections.
# Start the blinking LED procedure.
# Read the error buffer.
# Check the life timer.
Set the TV in SDM mode in order to be able to:
# Create a pre-defined setting for measurements to be made.
# Override software protections.
# Start the blinking LED procedure.
# Read the error buffer.
# Check the life timer.
How to Activate SDM
For this chassis there are two kinds of SDM: an analog SDM and a digital SDM.
For this chassis there are two kinds of SDM: an analog SDM and a digital SDM.
Analog
SDM: use the standard RC-transmitter
and key in the code “062596”, directly followed by the “MENU” (or HOME) button.
Note: It is possible that, together with
the SDM, the main menu will appear. To switch it “off”, push the “MENU” (or HOME)
button again.
Digital SDM: use the standard RC-transmitter
and key in the code “062593”, directly followed by the “MENU” (or HOME) button.
Note: It is possible that, together with the SDM, the main menu will appear. To switch it “off”, push the “MENU” (or HOME) button again.
Note: It is possible that, together with the SDM, the main menu will appear. To switch it “off”, push the “MENU” (or HOME) button again.
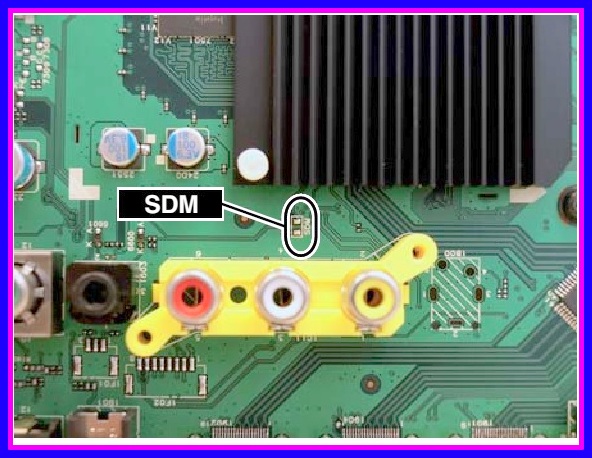
Analog SDM can also be activated by grounding
for a moment the solder pad on the SSB, with the indication “SDM”
How to Exit SDM
Use one of the following methods:
# Switch the set to STAND-BY via the RC-transmitter.
# Via a standard customer RC-transmitter: key in “00”- sequence
Use one of the following methods:
# Switch the set to STAND-BY via the RC-transmitter.
# Via a standard customer RC-transmitter: key in “00”- sequence
2.Service Alignment Mode (SAM)
Purpose
# To perform (software) alignments.
# To change option settings.
# To easily identify the used software version.
# To view operation hours.
# To display (or clear) the error code buffer.
Purpose
# To perform (software) alignments.
# To change option settings.
# To easily identify the used software version.
# To view operation hours.
# To display (or clear) the error code buffer.
How to Activate SAM
Via a standard RC transmitter: Key in the code “062596” directly followed by the “INFO” button. After activating SAM with this method a service warning will appear on the screen, continue by pressing the “OK” button on the RC.
Via a standard RC transmitter: Key in the code “062596” directly followed by the “INFO” button. After activating SAM with this method a service warning will appear on the screen, continue by pressing the “OK” button on the RC.
How to Exit SAM
Use one of the following methods:
• Switch the TV set to STAND-BY via the RC-transmitter.
• Via a standard RC-transmitter, key in “00” sequence, or select the “BACK” key
Use one of the following methods:
• Switch the TV set to STAND-BY via the RC-transmitter.
• Via a standard RC-transmitter, key in “00” sequence, or select the “BACK” key
3.Customer Service Mode (CSM)
Purpose
The Customer Service Mode shows error codes and information on the TV’s operation settings. A call centre can instruct the customer (by telephone) to enter CSM in order to identify the status of the set. This helps them to diagnose problems and failures in the TV before making a service call. The CSM is a read-only mode; therefore, modifications are not possible in this mode
How to Activate
To activate CSM, press the following key sequence on a standard remote control transmitter: “123654” (do not allow the display to time out between entries while keying the sequence).
To activate CSM, press the following key sequence on a standard remote control transmitter: “123654” (do not allow the display to time out between entries while keying the sequence).
How to Exit CSM
Press “MENU” (or HOME) / “Back” key on the RC-transmitter.
Press “MENU” (or HOME) / “Back” key on the RC-transmitter.
The Blinking LED Procedure
Introduction
The software is capable of identifying different kinds of errors. Because it is possible that more than one error can occur over time, an error buffer is available, which is capable of storing the last five errors that occurred. This is useful if the OSD is not working properly.
Errors can also be displayed by the blinking LED procedure. The method is to repeatedly let the front LED pulse with as many pulses as the error code number, followed by a period of 1.5 seconds in which the LED is “off”. Then this sequence is repeated.
Example (1): error code 4 will result in four times the sequence LED “on” for 0.25 seconds / LED “off” for 0.25 seconds. After this sequence, the LED will be “off” for 1.5 seconds. Any RC5 command terminates the sequence. Error code LED blinking is in red color.
Example (2): the content of the error buffer is “129600”
After entering SDM, the following occurs:
# 1 long blink of 5 seconds to start the sequence,
# 12 short blinks followed by a pause of 1.5 seconds,
# 9 short blinks followed by a pause of 1.5 seconds,
# 6 short blinks followed by a pause of 1.5 seconds,
# 1 long blink of 1.5 seconds to finish the sequence,
# The sequence starts again with 12 short blinks.
White Point
# Set “Active control” to “Off”.
# Choose “TV menu”, “TV Settings” and then “Picture” and
set picture settings as follows:
# Set “Active control” to “Off”.
# Choose “TV menu”, “TV Settings” and then “Picture” and
set picture settings as follows:
Picture Setting
|
Off
|
Dynamic backlight
|
|
Dynamic Contrast
|
Off
|
Colour Enhancement
|
Off
|
Picture Format
|
Unscaled
|
Light Sensor
|
Off
|
Brightness
|
50
|
Colour
|
0
|
Contrast
|
100
|
White point alignment LCD screens:
• Use a 100% white screen as input signal and set the following values (in SAM mode):
“Color temperature” to “Cool”.
“Whitepoint red”, “Whitepoint green”, and “Whitepoint blue” values to “127”. “Red BL offset” and “Green BL offset” values to “7”.
With a color analyzer:
Depending on which color analyzer you use (CS-200 or CA- 210), and what kind of panel is mounted in the set (CCFL with panel codes 231/232, or LED with panel codes 233/234/236), different values apply. Refer to
# Measure with a calibrated, contactless (max. 25 mm distance) color analyzer in the centre of the screen. Consequently, the measurement needs to be done in a dark environment.
# Adjust one or two registers (so holding one of the White point registers R, G or B on 127) to obtain the “Cool” x,y values. Tolerance: dx: ± 0.004, dy: ± 0.004.
# Repeat this step for the “Normal” and “Warm” color temperatures.
# When finished press “OK” on the RC and then press “Store” (in the SAM root menu) to store the aligned values into the NVM.
# Restore the initial picture settings after the alignments.