 SAMSUNG WF6450S7W - WASHING MACHINE - DISASSEMBLE PROCEDURE

DISASSEMBLE PROCEDURE
TOOLS NEEDED
No
|
Tool
|
||
1
|
Box driver
|
10mm
13mm
19mm
|
Motor (1), Balance (5), 2 holes of each left and right
of the shock absorber 1 Pulley hole
|
2
|
Double-ended
spanner
|
10, 13,19mm
|
Replaceable
for the box driver. Since the bolt
runs idle when the box driver is used, use the
box driver 17mm.
|
3
|
Vice pliers
|
Tool to protect the idle and abrasion of the bolt for
the box driver.
|
|
4
|
Other(Driver, Nipper, Long nose)
|
General tools for the after service.
|
|
5
|
JIG for the Tub
|
1 (Disassemble and Assemble)
|
- Remove the two screws holding the Top Cover at the back of the unit.

- Remove the top-cover through pushing and pulling.

- Then, the Water (Pressure) Sensor, Noise Filter and Water Valve can be replaced.

- Remove the Top Cover and the Ass’y Drawer.

- Remove the two screws on the front of the control panel.

- Remove the one screw on the plate(U).

- Remove the control panel by disconnecting the connector that connects PCB to the wire-harness.

- Insert a flat head screwdriver into the gap and pry down the Cover Front (Left) to separate it.

- Remove the Wire Diaphragm from the Frame Front and unseat the Diaphragm.

- Remove the 7 screws on the frame front.

- Before removing the belt, should be opened the Cover Bottom.

- Remove the belt before the re-assembly.
- Ensure the belt is placed on the center of the motor pulley.
- Hang the belt on the motor pulley before placing it around the pulley.

SAMSUNG WF6450S7W - WASHING MACHINE - DISASSEMBLE PROCEDURE
- Remove the wire housing from the motor.
- Remove the bolts holding the motor by using the power screwdriver.
- Remove the motor.


WATER SUPPLY VALVE
- Remove the fixing screws for the water supply valve.

- Disconnect the valve wires.
- Separate the water hoses

WATER LEVEL SENSOR
- Remove the top cover.
- Remove the fi xing screws for the water level sensor.
- Disconnect the water level sensor harness.
- Disconnect the hose pressure.
- Replace the water level sensor.


DOOR HINGE
- Remove the fi xing screws holding the Door-Glass.
- Separate the glass.
- After removing the two screws holding the Holder Glass, replace the Door Hinge.
- After putting them back together, check if the screws holding the Door Hinge is fastened properly.


DRAIN PUMP
- Insert the fl at head screwdriver into the slot on the top of the Cover Filter and lever it down to separate it.
- Unscrew the drain filter by turning it counter clockwise.
- The water remaining inside could flow out. So, put an empty bowl on the floor to hold the water.

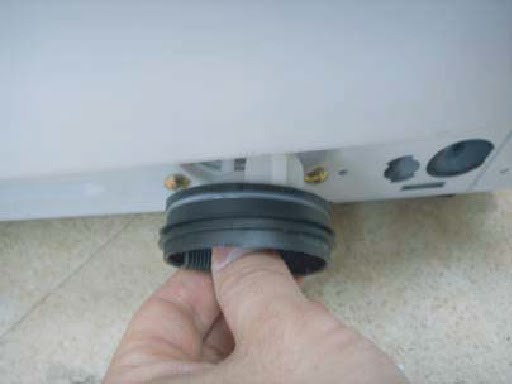
- Tilt the unit backward and take out the drain pump.
- Disconnect the incoming water hose and the wire harness. (Caution: Check if the unit is plugged out. There is possibility of electric shock.)


- Separate the Hose Filter Tub and the Drain Hose.
- Remove the Drain Filter and check if there are foreign substances (coin, buttons, etc) blocking inside - If so, clear the inside.
- Check if the wire harness is connected properly - If not, connect it properly.
- If water leaks, check if the Clamp Hose and the Cap Drain are assembled tightly. If not, assemble them tightly.
- Remove the water remaining inside by turning the Filter counter clockwise.

DOOR S/W
- Open the door.
- Remove the Spring Diaphragm and separate the Diaphragm from the Frame Front.
- Insert the flat head screwdriver and pry up the spring to remove the Spring Diaphragm.
- The Diaphragm could get damaged when taking it out. So, unseat it in one direction slowly.


Remove
the screws holding the Door S/W.
Take out
the Door S/W.
Disconnect
the wire connector. (Press the hook to unlock the tab and plug it out.)
Remove
the frame-front.


- Disconnect the connector housing.

- Remove the nut holding the heater, and separate the heater.
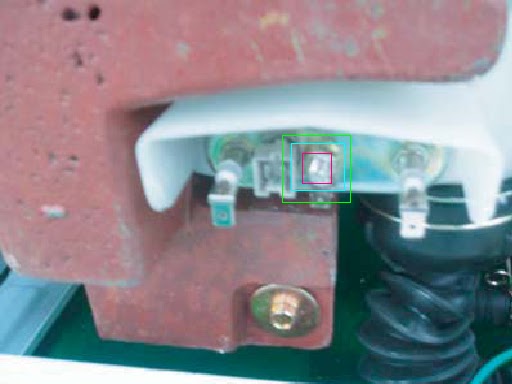
- Take out the heater from the tub. Be sure to insert the heater into the bracket in the tub. If not, it may cause a fire. Make sure to have a packing seating on its place. Fasten the nut with 5Kgmf/cm2. If the nut is fastened loosely it may cause water damage.
