REPAIRING AND NOT THROWING AWAY

Richtige Fernseher haben Röhren!

Richtige Fernseher haben Röhren!

In Brief: On this site you will find pictures and technical information about Service Modes, Circuit Diagrams, Firmware Update procedure, Disassemble procedure, Universal remote control set-up codes, Troubleshooting and more....

If you go into the profession, you will obtain or have access to a variety of tech tips databases HERE IT IS Master Electronics Repair !.

These are an excellent investment where the saying: 'time-is-money' rules. However, to learn, you need to develop a general troubleshooting approach - a logical, methodical, method of narrowing down the problem. A tech tip database might suggest: 'Replace C536' for a particular symptom. This is good advice for a specific problem on one model. However, what you really want to understand is why C536 was the cause and how to pinpoint the culprit in general even if you don't have a service manual or schematic and your tech tip database doesn't have an entry for your sick TV or VCR.

While schematics are nice, you won't always have them or be able to justify the purchase for a one-of repair. Therefore, in many cases, some reverse engineering will be necessary. The time will be well spent since even if you don't see another instance of the same model in your entire lifetime, you will have learned something in the process that can be applied to other equipment problems.
As always, when you get stuck, checking out a tech-tips database may quickly identify your problem and solution.In that case, you can greatly simplify your troubleshooting or at least confirm a diagnosis before ordering parts.

Happy repairing!
Today, the West is headed for the abyss. For the ultimate fate of our disposable society is for that society itself to be disposed of. And this will happen sooner, rather than later.

How to use the site:

- If you landed here via any Search Engine, you will get what you searched for and you can search more using the search this blog feature provided by Google. You can visit more posts scrolling the left blog archive of all posts of the month/year,
or you can click on the main photo-page to start from the main page. Doing so it starts from the most recent post to the older post simple clicking on the Older Post button on the bottom of each page after reading , post after post.

You can even visit all posts, time to time, when reaching the bottom end of each page and click on the Older Post button.

- If you arrived here at the main page via bookmark you can visit all the site scrolling the left blog archive of all posts of the month/year pointing were you want , or more simple You can even visit all blog posts, from newer to older, clicking at the end of each bottom page on the Older Post button.
So you can see all the blog/site content surfing all pages in it.

- The search this blog feature provided by Google is a real search engine. If you're pointing particular things it will search IT for you; or you can place a brand name in the search query at your choice and visit all results page by page. It's useful since the content of the site is very large.

Note that if you don't find what you searched for, try it after a period of time; the site is a never ending job !

..............The bitterness of poor quality is remembered long after the sweetness of todays funny gadgets low price has faded from memory........ . . . . . .....
Don't forget the past, the end of the world is upon us! Pretty soon it will all turn to dust!

©2010, 2011, 2012, 2013, 2014 Frank Sharp - You do not have permission to copy photos and words from this blog, and any content may be never used it for auctions or commercial purposes, however feel free to post anything you see here with a courtesy link back, btw a link to the original post here , is mandatory.
All posts are presented here for informative, historical and educative purposes as applicable within fair use. NOTHING HERE IS FOR SALE !

Wednesday 20 March 2019

SONY KDF-E42A10 – KDF-E50A10 – LCD REAR PROJECTION TV - OPTICAL LAMP & LAMP DRIVER ASSEMBLY REMOVAL

SONY KDF-E42A10 – KDF-E50A10 – LCD REAR PROJECTION TV - OPTICAL LAMP & LAMP DRIVER ASSEMBLY REMOVAL


OPTICAL BLOCK
Although the design is greatly simplified from previous optical assemblies, the entire chassis must be removed to access it.
LAMP DRIVER
This board is not as easily accessible as were prior designs The entire chassis must be removed to access this circuit.
REAR COVER REMOVAL
NEW LOCKING CONNECTORS
  • Three types of locking connectors are used to secure the wiring to the circuit boards. Other types of locking connectors are used for cable-to-cable connections and these have been used in the past so they will not be covered. The connectors used on the circuit boards are of a small design and it is not easy to identify the locking mechanisms used unless one is already aware of them. Because of their small size, they could be easily damaged if an attempt is made to pull them directly out of their socket. The illustration below shows the 3 types of connectors and how they are released.
Remember: The connectors are easily removed if the locks are disengaged. If you are exerting effort, the lock is not released and the connector will be damaged.
  • Place the chassis assembly aside to begin the next steps to remove the Lamp Driver or Optical Block. Note how the wire harness is rested on top of the B Block to protect the connectors from snagging onto other items. [How to remove chassis will be illustrated by next post].
RE-INSTALLING WIRE HARNESS
  • When re-installing the chassis, it is important to install the wire harness properly. If it is not, the B Block assembly will not seat correctly and wires may be damaged. The most important step is to place the harness in the upper retainers as shown below so that it rests below the cabinet ridge to clear the backside of the B Block.
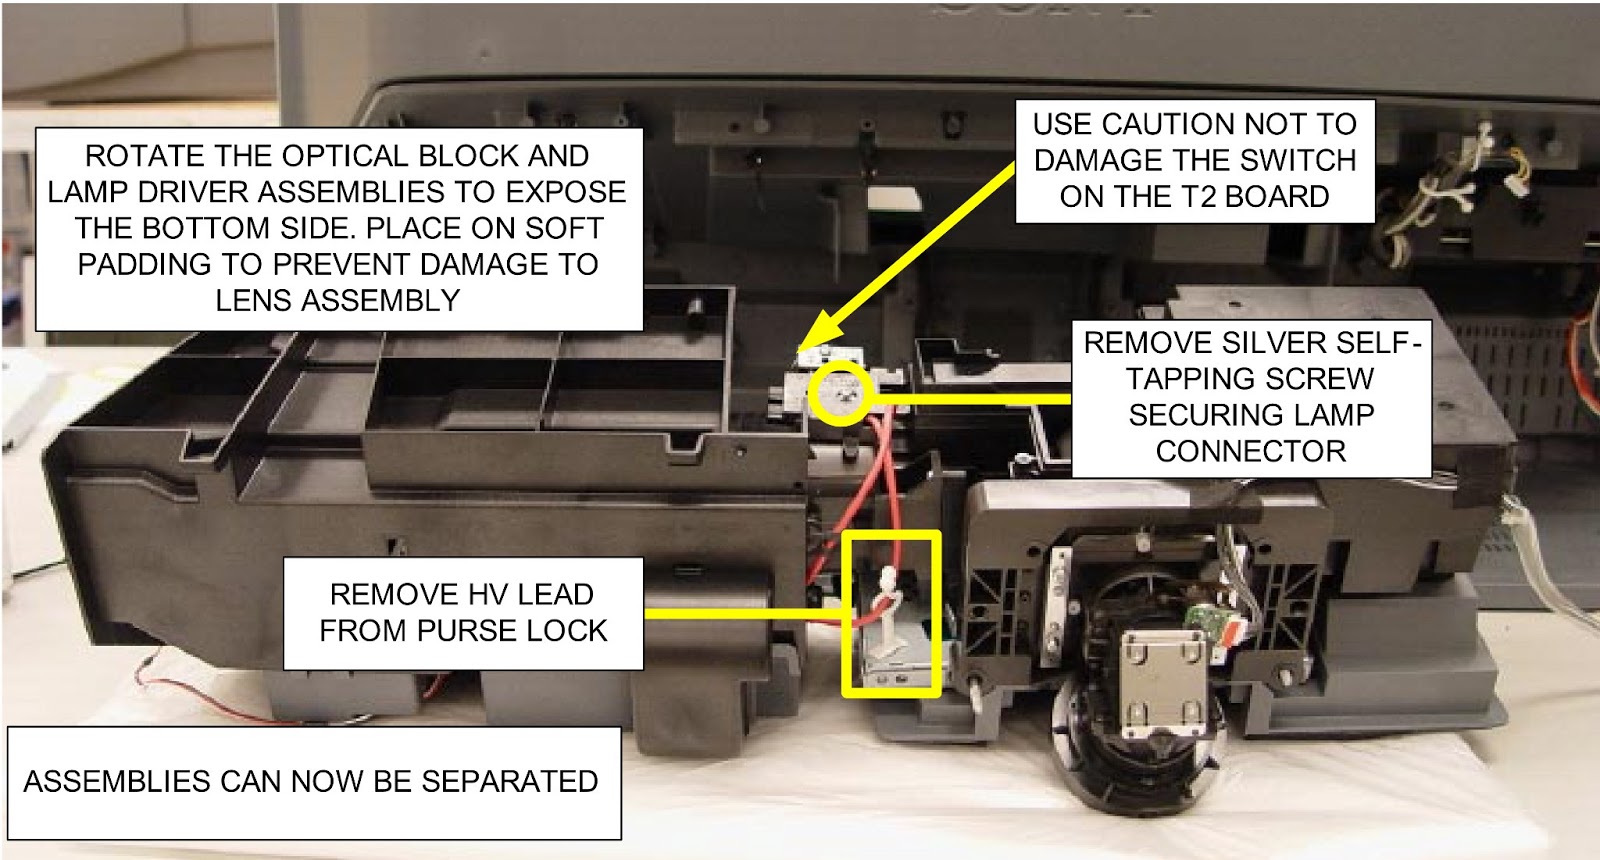
LAMP DRIVER AND OPTICAL BLOCK REMOVAL
  • The following steps will remove these items from the cabinet assembly. The units will be separated and each can be serviced from that point.
  • The Lamp Driver and Optical Block must now be separated in order to service the units individually.
LAMP DRIVER DISASSEMBLY
  • This step disassembles the Lamp Driver housing to gaIn access to the Lamp Driver board.  NOTE: When re-installing the lamp connector to the brackets, make sure the connector is installed as shown. The connector should sit flat on the bracket and the tabs on the ends should seat flush with the bracket. If not done correctly, the lamp cannot be installed.
OPTICAL BLOCK REPLACEMENT
  • Replacement Optical Blocks are shipped as shown, minus the Iris and LVDS cables. Transfer these cables and any cloth tape pieces to the new Optical Block.