REPAIRING AND NOT THROWING AWAY

Richtige Fernseher haben Röhren!

Richtige Fernseher haben Röhren!

In Brief: On this site you will find pictures and technical information about Service Modes, Circuit Diagrams, Firmware Update procedure, Disassemble procedure, Universal remote control set-up codes, Troubleshooting and more....

If you go into the profession, you will obtain or have access to a variety of tech tips databases HERE IT IS Master Electronics Repair !.

These are an excellent investment where the saying: 'time-is-money' rules. However, to learn, you need to develop a general troubleshooting approach - a logical, methodical, method of narrowing down the problem. A tech tip database might suggest: 'Replace C536' for a particular symptom. This is good advice for a specific problem on one model. However, what you really want to understand is why C536 was the cause and how to pinpoint the culprit in general even if you don't have a service manual or schematic and your tech tip database doesn't have an entry for your sick TV or VCR.

While schematics are nice, you won't always have them or be able to justify the purchase for a one-of repair. Therefore, in many cases, some reverse engineering will be necessary. The time will be well spent since even if you don't see another instance of the same model in your entire lifetime, you will have learned something in the process that can be applied to other equipment problems.
As always, when you get stuck, checking out a tech-tips database may quickly identify your problem and solution.In that case, you can greatly simplify your troubleshooting or at least confirm a diagnosis before ordering parts.

Happy repairing!
Today, the West is headed for the abyss. For the ultimate fate of our disposable society is for that society itself to be disposed of. And this will happen sooner, rather than later.

How to use the site:

- If you landed here via any Search Engine, you will get what you searched for and you can search more using the search this blog feature provided by Google. You can visit more posts scrolling the left blog archive of all posts of the month/year,
or you can click on the main photo-page to start from the main page. Doing so it starts from the most recent post to the older post simple clicking on the Older Post button on the bottom of each page after reading , post after post.

You can even visit all posts, time to time, when reaching the bottom end of each page and click on the Older Post button.

- If you arrived here at the main page via bookmark you can visit all the site scrolling the left blog archive of all posts of the month/year pointing were you want , or more simple You can even visit all blog posts, from newer to older, clicking at the end of each bottom page on the Older Post button.
So you can see all the blog/site content surfing all pages in it.

- The search this blog feature provided by Google is a real search engine. If you're pointing particular things it will search IT for you; or you can place a brand name in the search query at your choice and visit all results page by page. It's useful since the content of the site is very large.

Note that if you don't find what you searched for, try it after a period of time; the site is a never ending job !

..............The bitterness of poor quality is remembered long after the sweetness of todays funny gadgets low price has faded from memory........ . . . . . .....
Don't forget the past, the end of the world is upon us! Pretty soon it will all turn to dust!

©2010, 2011, 2012, 2013, 2014 Frank Sharp - You do not have permission to copy photos and words from this blog, and any content may be never used it for auctions or commercial purposes, however feel free to post anything you see here with a courtesy link back, btw a link to the original post here , is mandatory.
All posts are presented here for informative, historical and educative purposes as applicable within fair use. NOTHING HERE IS FOR SALE !

Showing posts with label ERICSSON. Show all posts

Monday, 10 February 2020

SONY ERICSSON PLAYSTATION PHONE HARD RESET PROCEDURE

sony ericsson playstation phone repair manual
This is the procedure on how to factory reset the Sony Ericsson PlayStation Phone if you want to wipe and clear all data and you want to restore its original factory default settings again.

Just follow this simple step by step instructions on how to hard reset the Sony Ericsson PlayStation Phone

Please note: the result of this procedure  will be delete all data installed or stored from the Sony Ericsson PlayStation Phone. And also, the result of this process may or may not delete data stored on the microSD memory card. Please do have a back up copy all of your personal data before proceeding.

Factory Reset from the main home screen,

   1. From the Main Home Screen, select Menu
   2. Select Settings, then select Privacy
   3. Select Factory Data Reset
   4. Select Reset Phone
   5. Enter the Password if prompted, then confirm by selecting Erase Everything

If the Sony Ericsson PlayStation phone is frozen, do a hard reset through button combination.

   1. Turn Off the device power. If your Sony Ericsson PlayStation Phone is frozen, take the battery out from the device and reinsert it back again.
   2. Hold the Left and Right buttons located just beneath the LCD display
   3. Press and then  release the Power button
   4. Just follow the on-screen instructions on  how to hard reset your Sony Ericsson PlayStation Phone

Once the factory reset process  is complete, the phone will reboot to its factory fresh state.
All data including third-party applications installed and stored already deleted from the Sony Ericsson PlayStation Phone

SONY ERICSSON XPERIA X8 HARD RESET INSTRUCTION - WIPE AND RESTORE TO FACTORY SETTING

 Sony Ericsson FormatHere's, how to hard reset the Sony Ericsson Xperia X8 with simple step by step instructions.

Please note this process  will  delete all data from the Sony Ericsson Xperia X8 , but may or may not delete the data stored on the microSD memory card. Do have  a back up or a copy of all  your personal data before you may proceed.

Restore through the Main Home Screen Settings

   1. From the Main Home Screen, select Menu
   2. Select Settings, then select Privacy
   3. Select Factory Data Reset
   4.Then Reset Phone
   5. Enter the Password if prompted or required, then select Erase Everything.

If the phone is frozen: You can Hard Reset it trough key combination.

   1. Turn the power off first. If the Sony Ericsson Xperia X8 is frozen, take the battery out from the device and then reinsert it back again after a few seconds.
   2. Hold the Left and Right Keys located beneath the LCD Display
   3. Press and release the Power Key
   4. Just then follow the on-screen instructions that appears to hard reset the Sony EricssonXperia X8

Once the wipe process is complete, the phone will then reboot to its factory fresh default state settings.
All data including third-party applications already deleted from the Sony Ericsson Xperia X8.You may need to reinstall it back again.

Saturday, 9 February 2019

SONY ERICSSON _ T630 _ T628 _ SERVICE SETTINGS AND TESTS

SONY ERICSSON _ T630 _ T628 _ SERVICE SETTINGS AND TESTS


SERVICE SETTINGS


  • Start the phone.  Note: It is not necessary to have a SIM card inserted.
  • The Service Settings menu is entered using the following navigation-key and key sequence: { => * <= <= * <= * } and select .Service Settings.
CONTRAST [TO ADJUST CONTRAST]

  • Make assure that the contrast setting in the display menu (in the user MMI) is set to 0.
  • Select .Contrast. from the .Service Settings..
  • Adjust the contrast with the navigation-key.
  • Press save and you will return to the Main menu.
SERVICE TESTS

DISPLAY TEST

  • Select .Display. from the .Service Tests. menu.
  • The display toggles between four different test patterns.  Make sure that there are no dots missing and that the colors and contrast is OK.
  • Press the ‘Return’ key to go back to the service tests menu.
CAMERA TEST

  • Select Camera from the .Service Tests. menu.
  • The camera function will now starts and are visible in the display. Make sure that the contrast and light is OK.
  • Press the ‘Return’ key to go back to the service tests menu.
LED ILLUMINATION TEST

  • Select “LED/illumination” from the “Service Tests” menu.
  • Check that the backlight is toggle between on and off, and that the LED in the navigation key toggles between “red” and “off”.
  • Press the “Ok” key to go back to the service tests menu.
KEYBOARD TEST

  • Select “Keyboard” from the “Service Tests”.
  • Press all keys on the keypad, the camera and the volume keys on the right side and the Online key on the left side. If they are ok a text feedback is displayed showing the information which key was pressed. All keys should be tested. On/Off button is not included in the test; functionality is secured if the phone can be switched on/off.
  • If you stop pressing keys the phone will return to the service test menu after 3 seconds.
POLYPHONIC RING SIGNAL TEST

  • Select Polyphonic from the Service Tests menu.
  • Adjust the volume with the navigation-key and then press “Ok” to go back to the service test menu.
VIBRATOR TEST

  • Select “Vibrate” from the “Service Tests” menu.
  • Press any key and the vibrator will vibrate 3 times.
  • Press the “Ok” key to go back to the service tests menu.
EARPHONE TEST

  • Select “Earphone” from the “Service Tests” menu.
  • Press a numeric key and check that you get a tone in the earphone.
  • Press the “Ok” key to go back to the service tests menu.
MICROPHONE TEST


This test is intended to test the microphone. Therefore, the earphone should be tested before this test is entered.
  • Select “Microphone” from the “Service Tests” menu.
  • Check that every sound that is going into the microphone can be instantly heard in the earphone.
  • Press the “Ok” key to go back to the service tests menu.
REAL TIME CLOCK SET

  • Select “Real time clock” from the “Service Tests” menu.
  • After approximately 5 seconds you will get information whether the clock is ok or not.
  • Press the “Return” key to go back to the service tests menu.
ON THE AIR CALL TO MOBILE

To verify the function of the earphone, microphone, buzzer, volumes button and radio:
  • Insert an operator SIM card and start the phone.
  • Set up a call from a landline phone (PSTN) to the mobile phone.
  • Answer the phone call.
  • Check that the polyphonic ring signal is working and that the backlight switches on OK.
  • Also check that the quality of the sound both in the mobile phone and the land-connected phone (PSTN) are OK.
  • Press the volume key up and down and check that the volume in the phone is altered.
  • End the call.
  • Check that the ending procedure is OK and that the speech time is displayed.
INFRARED TEST

To verify that the Infrared communication is working:
  • Insert a SIM card, connect a battery and start the unit.
  • Activate the function by entering Connectivity/Infrared port and select .10 minutes.
  • Set up an infrared link between an IR device and the phone. The IR-module is placed in the top of the phone. If a link can be established, the module is considered working.
BLUETOOTH TEST


  • Insert a SIM card, connect a battery and start the unit.
  • Activate the Bluetooth function by entering Connectivity/Bluetooth and turn it on.
  • Set up a link between the phone and another Bluetooth compatible device. If a connection can be established the Bluetooth module is considered working
SYSTEM CONNECTOR TEST

Hands free equipment and a charger are used in this test, to check the functionality of the System Connector.
  • Insert a SIM card, connect a battery and start the unit.
  • Connect the Hands free equipment to the system connector and set up a call and listen if you can speak/hear in the hands free set.
  • Connect the charger to the system connector and see if the phone starts to charge and if the charging is indicated in the display.

SONY ERICSSON _ T630 _ T628 _ DISASSEMBLE PROCEDURE GUIDE

  SONY ERICSSON _ T630 _ T628 _ DISASSEMBLE PROCEDURE GUIDE


  • Remove the battery cover with your fingers. Slide the battery cover down.


  • Remove the battery from the phone by overturn the phone.


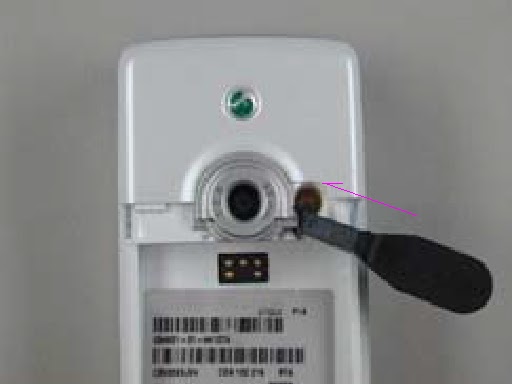
  • Remove the rubber plug, for the external antenna, with a pair of tweezers.


  • Remove the camera ring by using the front opening tool.  Place the tool under the camera ring in the arrow direction.


  • Turn the tool until a click sound is heard. Remove the camera ring.


  • Remove the antenna cover. Use the Antenna Cover Opening tool. Push the tool inside the battery cavity in the arrow direction until it contacts the battery cavity wall. The cover should only be pushed until the snap lock is released and a .click. sound is heard.
  • Be careful not to damage the close clips on the antenna cover with the antenna cover opening tool. If you damage it you must replace the antenna cover.


  • Remove the antenna cover, with your fingers, in the arrow (1) direction.
  • The on/off key sometimes falls out when the antenna cover is removed. The arrow (2) shows the on/off key location.


  • Remove the antenna assembly by using the front opening tool NTZ 112 302. 
  • Place the thumb on the antenna assembly at the left side to release the assembly in a controlled way


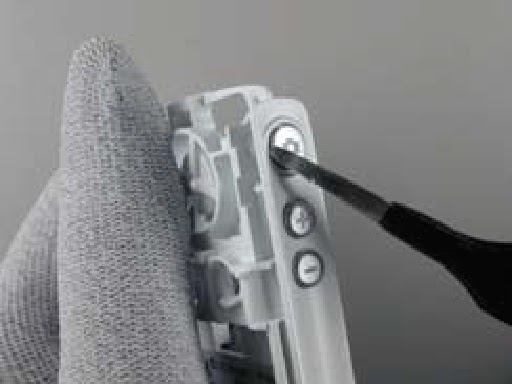
  • Remove the 4 screws.


  • Open the phone with the front opening tool.  Be careful not to scratch the phone with the front opening tool.
  • Begin as the picture shows.  If necessary gently move the tool along the gap both ways until the latch on the inside is loose. If necessary do the same thing on the other side.


  • Remove the keyboard with your fingers.


  • Lift the display with your fingers. You may have to loose the latches at the arrows.  Do not touch the display glass with your fingers.

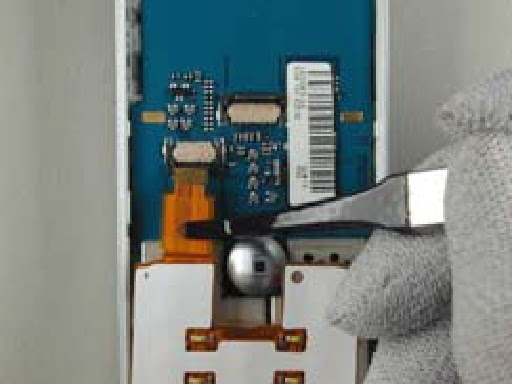
  • Remove the ZIF tape with the help of a pair of tweezers.  Open the ZIF-connector, connected to the display, with a pair of tweezers.  Be careful not to damage the ZIF-connector.


  • Remove the Flex film from the ZIF-connector with the flex film-assembly tool.  Use the correct pair of tweezers


  • Open the ZIF-connector, connected to the dome foil assembly, with a pair of tweezers.
  • Be careful not to damage the ZIF-connector.
  • Remove the Flex film from the ZIF-connector with the flex film assembly tool.
  • Use the correct pair of tweezers.

  • Remove the joystick button with your fingers.  The Joystick may be a little bit tight fitted to the switch.  If necessary use a pair of tweezers. Put the tweezers under the joystick button and press gently upwards.  Be careful not to damage the button, gasket and PCB when using a pair of tweezers.

  • Release the PCB from the frame cavity by overturn the frame.
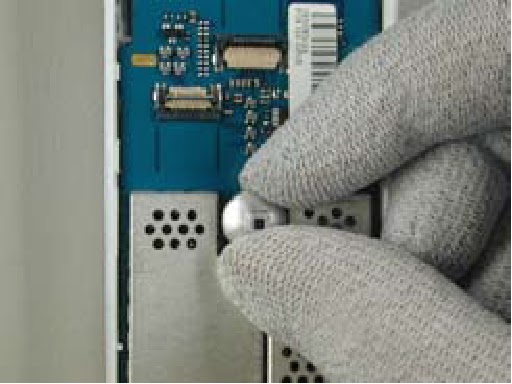
  • Tilt the camera and remove it from the camera holder by sliding it gently with your fingers in the arrow  direction.  Be careful not to damage the camera holder or camera flexfilm when removing the camera.  Lift the camera board to board connector  gently with a pair of tweezers.  Be careful not to damage the components on the PCB when using the pair of tweezers

  • Remove the system connector from the board with your fingers.
  • Remove the speaker gasket.  Use a pair of tweezers.  Removed speaker gasket can not be reused and must be scrapped.  Do not touch the contact pads on the speaker with your fingers.
  • Pick up the speaker from the frame cavity with a pair of tweezers.  Do not touch the contact pads on the speaker with your fingers.
  • Pick up the microphone from the frame with a pair of tweezers.  
  • Gently push the camera key and the two volume keys in from the outside.  Be gentle.  Keys might be cosmetically damaged if pushing to hard.  Pick it up on the inside with a pair of tweezers.  The rubber can be damaged when picking it up.


  • Remove the internet access key by gently pushing it in from the outside.  Be gentle.  The rubber can be damaged when picking it up.  Pick it up on the inside with a pair of tweezers.


  • Remove the Sim lock lid with your fingers by first open it.  Lift it up and then pull it backwards.


SONY ERICSSON _ T630 _ T628 _ INSTALLATION _ SETUP _ SOFTWARE

SONY ERICSSON _ T630 _ T628 _ Installation _ Setup _ Software


HARDWARE

  • All hardware must be approved by Sony Ericsson and is documented in the Equipment List.
TEST SETUP


COMPUTER
  • IBM compatible computer with Windows 98, Windows XP or Windows 2000 installed. The computer should include at least two USB-ports.
HARDLOCK
  • Hardlock with article number KRY 105 165 is required. The Hardlock should be connected to the parallel port on the computer.
SERVICE CARD READER
  • The Service Card Reader is delivered with the necessary software and instructions for installation. The Service Card Reader should be connected to an USB-port on the computer.

SERVICE CARD READER


SONY ERICSSON PROGRAMMING INTERFACE - SEPI
  • The USB programming interface is delivered with the necessary software and instruction for installation. The USB programming interface should be connected to an USB-port on the computer.
SONY ERICSSON INTERFACE - SEPI

  • The cable is the interface between the USB programming interface and the phone.
USB PC CABLE

  • The A-B Plug-Plug cable is the interface between the computer and the USB interface.  Connect the cable between the USB programming interface and the computer.
INFRARED DEVICE
  • A Jet-Eye, inbuilt Infrared on laptop or other Infrared device can be used to verify the Infrared function in the phone. Install the chosen equipment ccording to the installation instruction from the manufacture.
BLUETOOTH DEVICE
  • Any Bluetooth device as headset, other Bluetooth phone or other Bluetooth device can be used to verify the Bluetooth function in the phone. Set up the connection according to the chosen equipments manufacture.
LABEL PRINTER [OPTIONAL]
  • A Zebra printer model 90xi, 90xiII or 4000 deluxe shall be used. Connect the printer with a standard RS 232 serial printer cable [refer to the Zebra printer manual] to the serial port on the computer. Read the Zebra installation manual for more information about the installation.
SOFTWARE
  • EMMA II contains all software required to service the product. Installation and user manuals are available in the EMMA II start page. For more details can be had from here.
LABELMAKE SOFTWARE [OPTIONAL]
  • Download the Labelmake software from CAPN Unzip the file and run the setup.exe and follow the instructions. Read the file README.txt under C:\Program Files\Ericsson\Labelmake and follow the instructions. Start the program by selecting Labelmake in your Windows START-menu.  This product is using labels from the EU-database. To add the latest Database from CSPN, download the latest file and run the Setup.exe and follow the instructions from here.

SONY ERICSSON _ T630 _ T628 _ FRONT REPLACEMENT _ REPAIR HELP

SONY ERICSSON _ T630 _ T628 _ FRONT REPLACEMENT _ Repair Help


DISASSEMBLE THE THE PHONE AS DESCRIBED EARLIER POST
  • Remove the four screws at the arrows.  Use screwdriver, torx no 6.  Removed screws cannot be reused and must be scrapped.

  • Remove the dust gasket, inside the new front, with a pair of tweezers. Make sure no dust, particles or adhesive remains on the glass.
  • Place the front over the frame.  Very important: Check for dust inside the phone before assembling the front.  Use air blow equipment.  Place the front over the frame.

  • Mount the screws, with washer.  Use Torque screwdriver torx no 6 set to 20 Ncm Screw until the torque is reached.  Removed screws cannot be reused and must be scrapped.