REPAIRING AND NOT THROWING AWAY

Richtige Fernseher haben Röhren!

Richtige Fernseher haben Röhren!

In Brief: On this site you will find pictures and technical information about Service Modes, Circuit Diagrams, Firmware Update procedure, Disassemble procedure, Universal remote control set-up codes, Troubleshooting and more....

If you go into the profession, you will obtain or have access to a variety of tech tips databases HERE IT IS Master Electronics Repair !.

These are an excellent investment where the saying: 'time-is-money' rules. However, to learn, you need to develop a general troubleshooting approach - a logical, methodical, method of narrowing down the problem. A tech tip database might suggest: 'Replace C536' for a particular symptom. This is good advice for a specific problem on one model. However, what you really want to understand is why C536 was the cause and how to pinpoint the culprit in general even if you don't have a service manual or schematic and your tech tip database doesn't have an entry for your sick TV or VCR.

While schematics are nice, you won't always have them or be able to justify the purchase for a one-of repair. Therefore, in many cases, some reverse engineering will be necessary. The time will be well spent since even if you don't see another instance of the same model in your entire lifetime, you will have learned something in the process that can be applied to other equipment problems.
As always, when you get stuck, checking out a tech-tips database may quickly identify your problem and solution.In that case, you can greatly simplify your troubleshooting or at least confirm a diagnosis before ordering parts.

Happy repairing!
Today, the West is headed for the abyss. For the ultimate fate of our disposable society is for that society itself to be disposed of. And this will happen sooner, rather than later.

How to use the site:

- If you landed here via any Search Engine, you will get what you searched for and you can search more using the search this blog feature provided by Google. You can visit more posts scrolling the left blog archive of all posts of the month/year,
or you can click on the main photo-page to start from the main page. Doing so it starts from the most recent post to the older post simple clicking on the Older Post button on the bottom of each page after reading , post after post.

You can even visit all posts, time to time, when reaching the bottom end of each page and click on the Older Post button.

- If you arrived here at the main page via bookmark you can visit all the site scrolling the left blog archive of all posts of the month/year pointing were you want , or more simple You can even visit all blog posts, from newer to older, clicking at the end of each bottom page on the Older Post button.
So you can see all the blog/site content surfing all pages in it.

- The search this blog feature provided by Google is a real search engine. If you're pointing particular things it will search IT for you; or you can place a brand name in the search query at your choice and visit all results page by page. It's useful since the content of the site is very large.

Note that if you don't find what you searched for, try it after a period of time; the site is a never ending job !

..............The bitterness of poor quality is remembered long after the sweetness of todays funny gadgets low price has faded from memory........ . . . . . .....
Don't forget the past, the end of the world is upon us! Pretty soon it will all turn to dust!

©2010, 2011, 2012, 2013, 2014 Frank Sharp - You do not have permission to copy photos and words from this blog, and any content may be never used it for auctions or commercial purposes, however feel free to post anything you see here with a courtesy link back, btw a link to the original post here , is mandatory.
All posts are presented here for informative, historical and educative purposes as applicable within fair use. NOTHING HERE IS FOR SALE !

Showing posts with label HARSPER. Show all posts

Thursday, 21 March 2019

HARSPER HL32XXB - 32" LCD TV - DISASSEMBLE PROCEDURE - PART NAME & PART NUMBER

HARSPER HL32XXB - 32" LCD TV - DISASSEMBLE PROCEDURE - PART NAME & PART NUMBER


DISASSEMBLE PROCEDURE
BACK COVER
Remove pointed screws screws on the back cover.
Open the back cover
Remove pointed screws on the back bracket
STAND GUIDE REMOVAL
REMOVAL OF BACK BRACKET
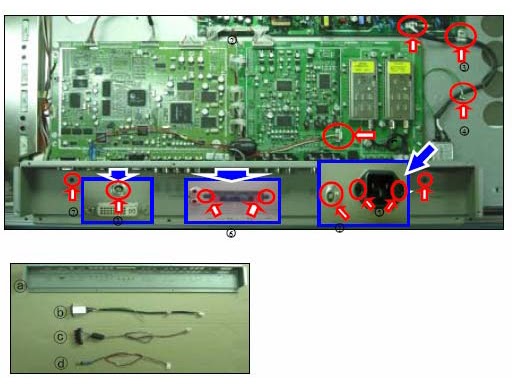
  • Remove nut on antenna cable.
  • Remove inlet shield cable from SMPS board
  • Remove inlet ground cable
  • Remove power inlet from back bracket.
  • Remove speaker cable connected sub board from back bracket
  • Remove back bracket.
CABLES REMOVAL
  • Remove Power Control cable from SMPS and LCD Module ( f )
  • Remove LVDS cable connected LCD Module and main board LVDS connector unit. ( e )
  • Remove Power Cable ( 11 Pin ) connected SMPS and Main Board ( d )
  • Remove Power Cable ( 10 Pin ) connected SMPS and Sub Board ( c )
  • Remove Inverter Cable 2 connected SMPS and Main Board ( b )
  • Remove Inverter Cable 1 connected LVDS board in LCD Module and Module Lamp unit.
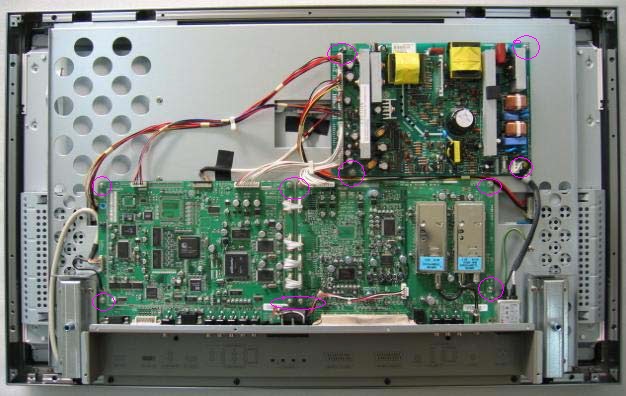
POWER SUPPLY & VSC BOARD REMOVAL
  • Remove screws on Main Board and Sub Board.
  • Remove SMPS Board.
LCD MODULE REMOVAL
  • Disassemble Extrusion Bar from LCD Module.
  • Remove Board Bracket from LCD Module
  • Remove Inner Bracket from LCD Module.
OSD BOARD REMOVAL
  • Remove OSD Board from bracket
  •  Remove OSD Board Bracket and OSD Ground Cable from Extrusion Bar.
  •  Remove OSD Lens/Knob.
FRAME BREAK DOWN
  • Remove Aluminum Bracket Frame at 4 corners of Extrusion Bard
  • Remove screws
  • Remove Frame Fixture at 4 corners.
REPLACEMENT PART LIST  {Click on image to ENLARGE]


Saturday, 23 February 2019

HARSPER - HL032XXB 32' LCD TV PAL SYSTEM FIRMWARE UPDATE

HARSPER - HL 032XXB 32' LCD TV PAL SYSTEM FIRMWARE UPDATE


FIRMWARE DOWNLOAD & UPDATE


  • 10.1 => First copy the download program (.exe file) in proper folder of your operating sstem to the upper folder which contains this document and firmware data.  ("/Wndow98" for Windows 95,98,ME and Windows2000xp" for Windows 2000 and XP.)   Before start the firmware upgrade, read whole guide carefully .  Upgrade program needs Microsoft Windows 2000 or XP.
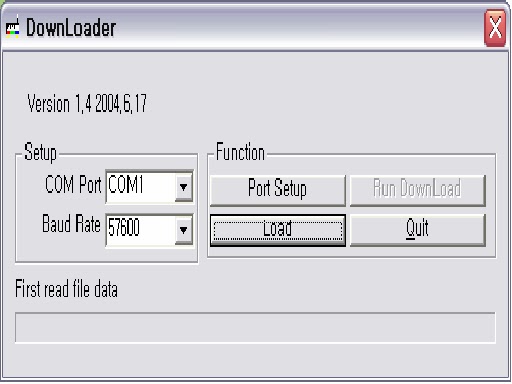
  • Run file name : Birch Download Win2K.exe
10.1.1 => Start Setup Menu. Setup "Com.port":  Select connected serial port between COM1 or CCOM2.  Baud rate is 57600[default]

10.1.2 => Port setup:  After set up common port, click 'Port Setup' and an other window appears.

10.1.3 => Load:  Choose firmware folder and Load the file.  Select the target file, which format is only binary file.  Here [V02PP50N3.bin] is selected.

10.1.4 => Download:  After select firmware file, click 'Run Download'.  Status bar is waiting for download process like a 'Ready Signal.......'  If you fail downloading a message "Fail to Communication" will be displayed.  If so, you must close Downloader Window, and back to step 1.1.  After click "Run Download", it is ready to download .  Connect AC power cord.  Then it starts download. NB:  If AC power cord is already connected, pull it out and reconnect 30 seconds later.  Then it starts download.  When it starts download, existing memory in the flash memory will be deleted.  And it will start to copy Boot Block.  Herewith LED shows amber color for 2 seconds.  Be very careful "Power Off"and disconnection of Serial Port at this time.  [LED colors:  Green On(Power On) => Amber On(erase) => Red Blinking -Data copy.]   <Window shows the new program is being downloaded into the flash IC.>

10.1.5 => After download, "Wait Initialize message will be displayed.  The Rome will be reset.  During reset, LED will show Green and Red color alternately  It will take about 5 minutes to download the firmware.  If it takes over 10 minutes disconnect AC power cord for '2' minutes, and upgrade again.  Initialize process will be carried out after download.  During the initialize process, the LED blinks Green, Red color alternately.  If it is an old version, LED shows Red color only.  DO NOT DISTURB DURING THE INITIALIZE PROCESS, but wait over 1 minute.  If LED shows Orange color, wait for over one minute without turning OFF power.  After initialize LED shows normal Green color.  then your are ready to watch the TV.  If upgrade firmware again from the begining, make sure issues stated below during download process.

When Initialize is completed, "Download Complete" is displayed.

Be careful below items during Download.

[1]  During Erase and Boot code copy:  do not cut the power or disconnect Serial Port.  If it happens, main board might have to be replaced.
[2]  Normal Data Copy:  When serial port is disconnected, LED  color will be changed from Red to Green for standby status.  Re-connect the serial port again, when LED is Red.  
[3]  When power is Off:  Close the window, and start the download process from the beginning.

Saturday, 16 February 2019

HARSPER HL32XXB T'CON BOARD - INVERTER BOARD REMOVAL

HARSPER HL32XXB T'CON BOARD - INVERTER BOARD REMOVAL

                       HOW TO REPLACE THE TIMING CONTROL [T'CON] BOARD.
                                        Remove screws from the protection metal plate.
                  Find out FPC which is connected LCD panel & timing control board.
                                                   Disconnect FPC by flipping
                                              Remove board from LCD module
                        How to remove back light inverter
                                          Remove screws from the protection metal plate.
                                                  Disconnect inverter cables & FPC cable
                                                                   Remove board

HARSPER HL32XXB LCD MONITOR FIRMWARE UPDATE

HARSPER HL32XXB LC

D MONITOR Firmware Update

FIRMWARE DOWNLOAD
First copy the download program (.exe) file in proper folder of your operating system to the upper folder which contains this document and firmware data.  ["/Windows 98" for Windows 95, 98, Me and "/Windows 2000 xp" for Windows 200 and xp.)
Firmware upgrade before start the upgrade, read whole guide carefully.  Upgrade program needs Microsoft Windows 2000 of XP.
Run file name:  Birch Download Win2K,exe.
Start: Setup Menu.

Set up 'Com Port':  Select connected Serial port between Com 1  and Com 10 (ex: COM 1 or COM 2)

Baud Rate is 57600. {Default is 57600}

PORT SETUP
After setup Com Port, click "Port Setup".  Display as below can be seen.

Choose Firmware loader and Load the file.

Select the target file, which format is only binary file.

Download
After select Firmware file, click the "Run Download".
Status bar is waiting for Download process like a "Ready Signal ---"

If download fails"Fail to communication' message will be displayed.  If so, close the Downloader window, and back to step-1.

After click "Run Download" it is ready to download.  Connect the AC power cord.  Then its starts download.
NB:  If the AC cord is already connected, pull it out, and re-connect after 45 seconds later.  The starts Download.

When it starts download, existing memory in the Flash Memory will be detected.  And it will start to copy Book Block.  Herewith LED shows 'Amber' color for 3 seconds.
Be very careful, not to 'Power Off' or 'Disconnect any cables' at this time.
LED Color Process:  Green On {Power On} => Amber On {Erase} => Red Blinking {Data Copy}

<Window shows the new program is being downloaded into the flash IC>
After Download, "Wait Initialize' message will be displayed. {THIS IS NOT APPLICABLE TO WIN 95/98}

After download, ROM will be reset.  During 'Reset', LED shows Green and Red  color alternately. It takes about five minutes to Download Firmware.  If it takes over '10' minutes, disconnect AC power cord for about one minute, and upgrade again.

  • Initialize process will be carried out after Download.  During this initialize process:
  • The LED blinks Green and Red color alternately.  If it is old version, LED shows Orange color during the initialize process.  After initialize process LED shows Red color.  "Do not Power OFF at this time, it will take over one minute to complete".  Wait till initialization to complete.  If LED shows Orange Color , wait for one minute without Turning OFF Power.  After initialize the LED shows the normal Green color. all have been done, and the set is ready with new firmware to use.  
  • If have to upgrade the firmware again from beginning , make sure below issues during Download process.
When initialize is completed "Download Complete" should be displayed.
## Be careful below items during downloading. 

  1. During Erase and Boot Code Copy:  Do not cut the Power or disconnect the Serial port.  
  2. Normal Data Copy:


  • When the serial port is disconnected:  LED will change from Red to Green for Standby Status.  Re-connect Serial Port again when LED is Red.  It starts Download again.  
  • When Power Is OFF:  Close the window and start the Download process from the beginning
  • HARSPER HL32XXB LCD TV DISASSEMBLE PROCESS

    HARSPER HL32XXB LCD TV DISASSEMBLE PROCESS


                                      Disassemble process
                                                                    Back cover Open.

    Remove pointed screws: T4*8, M3*6 on the back cover. Open the back cover. Remove pointed screws H3*5L, T3*12 on the back bracket.
                                                              Removal of Stand Guide.

                                                            Remove stand guide - T4*8.
                                                                 Removal of bracket.

    • Remove antenna cable.
    • Remove shield cable from SMPS board.
    • Remove inlet ground cable.
    • Remove power inlet from the back bracket.
    • Remove speaker cable connected to sub board from the back bracket.
    • Remove the back bracket.
                                                                 Removal of Cables.
    • Remove power control cable from SMPS & LCD module.
    • Remove LVDS cable connected LCD module and main board LVDS connector unit.
    • Remove power cable connected SMPS & Main board [11 pin].
    • Remove power cable connected to SMPS & Sub board [10 pin]
    • Remove inverter cable [2] connected to SMPS & Main board.
    • Remove inverter cable [1] connected to LVDS board in LCD module lamp unit.
                                                                 Removal of Cables.
    • Remove Data Cable connected Main board and Sub board [10 pin]
    • Remove Ground cable on upper left side of Main board and disconnect OSD cable that connects OSD board located beneath of Extrusion Bar and OSD connector unit on Main Board.
                                                  Removal of Power Supply and VSC board.
                                                        Removal of LCD module
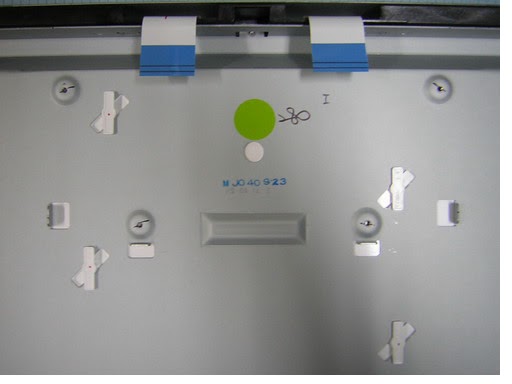
                                                               40" LCD module
                                                                         Board Bracket
    1. Disassemble Extrusion  bar from LCD module.
    2. Remove board bracket from LCD module.
    3. Remove inner bracket from LCD module.
                                                         Removal of OSD board
                                                 Remove OSD connector from OSD board.
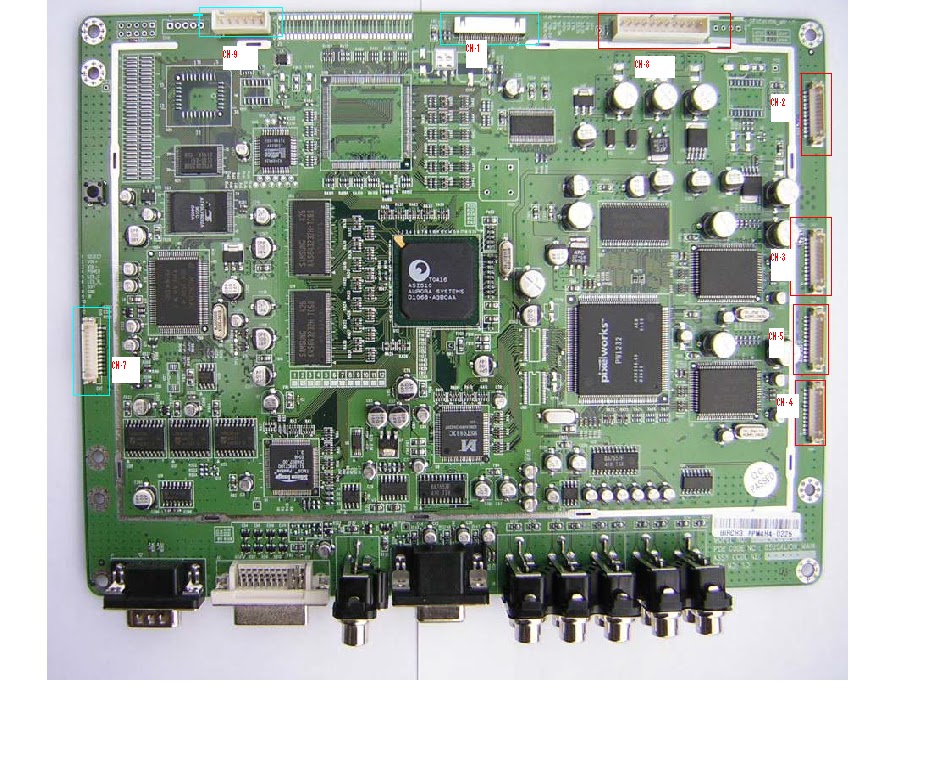
    Location of connections.

    Wednesday, 13 February 2019

    HARSPER - HL-32XXB LCD TV MONITOR [PAL]_FIRMWARE DOWNLOAD AND UPGRADE & LED BLINKING CODES

    HARSPER - HL-32XXB LCD TV MONITOR [PAL]_FIRMWARE DOWNLOAD AND UPGRADE & LED Blinking Codes


    FIRMWARE DOWNLOAD

    • First, copy download program (.exe file) in the proper folder of the operating system to the upper folder which contains this document and firmware data.  ("/Windows 98 for Windows 95/98/ME" and "/Windows 2000 XP" for Windows 2000 and XP.)
    • Firmware upgrade before start upgrade, read whole guide carefully.  The Upgrade Program needs Microsoft Windows 2000 of XP.
    Run file name : Birch Download Win2K.exe.

    Setup menu

    Setup 'Com Port' : Select connected Serial Port between COM-1 and COM-10 [ex: COM-1 or Com-2]


    Baud Rate is 57600. [Default is 57600]


    PORT SETUP
    After setup Com Port, click "Port Setup" and can see the below notice.  Choose Firmware Folder and Load the File.


    Select the target file, which format is only binary file.


    After select the Firmware file, click the 'Run Download'
    Status bar is waiting for Download process like a 'Ready Signal ....'


    If download fails, can find message "Fail to Communication"  If so, close the window and back to step 1 again.

    After click "Run Download", it is ready to download.  Connect the AC Power cord.  Then it starts download.  NB:  If AC power is already connected, pull it out and re-connect after 30 seconds. The it starts download.


    When it starts download, existing memory in Flash Memory will be deleted.  It will start to copy Book Block. Herewith LED shows Amber color for 2 seconds.
    Have to copy very careful"Power Off" and disconnection of  Serial Port at this time. 
    [LED color process: Green On (power On) -> Amber On (Erase) -> Red Blinking (Data Copy)

                    <Window shows the new program is being downloaded into the Flash IC>

    After download, can see "Wait Initialize" message. [This is not applicable to Win95/98]


    After download, ROM will be reset.  During Reset, LED shows Green and Red color alternately.  It takes about five minutes to download the software.  If it takes over ten minutes, disconnect AC Power Cord for about one minute, and Upgrade again.

    Initialize process will be carried out after download.  During the initialize process, the LED blinks Green and red alternately.   If it is old version, LED shows Orange color during initialize process.  "Do Not Power Off during the initialize process, wait for about one minute. After initialize the LED shows normal Green color.  Then it is ready to watch the TV.  If do make an upgrade again, make sure below issues the Download Process.

    When initialize is complete, "Download Complete" will be displayed.


    Be careful below items during download:

    1. During Erase and Boot Copy:  do not cut the Power or Disconnect Serial Port.  If it happens, the Main Board have to be replaced.
    2. Normal Data Copy:  When serial port is disconnected; LED will change from Red to green color for Standby Status.  Re-connect Serial Port again when LED is Red.  It starts download again.
    3. When Power is Off:  Close the window, and start download process from the beginning. 
    4.    
      No
      LED lighting
      Status

      1
      Standby mode
      Lighting Red
      2
      Normal operation
      Lighting Green
      3
      No input
      Blinking Green
      4
      Remote control IR signal input
      Blinking Green
      6
      Firmware upgrading
      Green => amber => Red blinking => Standby
      7
      In system initializing
      Blinking Red and Green
      8
      Aging mode [Factory only]
      Blinking red
      9
      Sensing remote control input
      Blink off and Green in 0.5 second