Apple iPad 4 - How to disassemble Apple iPad 4 - Battery removal - lcd serene removal – Camera removal - Ipads and Ipods repair and service

Category: iPad and Ipod Repair and service
Contents of this article
- Removing the battery
- Removing the lcd and touch screen
- Wifi Antenna removal
Apple iPad 4
DISASSEMBLING PROCEDURE
LCD Screen removal
Before starting to disassemble the iPad 4, we need to
bring to your attention an area where the need for extreme caution is necessary
to prevent irreversible damage.
On the left side of the tablet, approximately 2 inches from the bottom, is the touch screen digitizer ribbon cable. When you are separating the touch screen from the bezel with the plastic opening tool below in Step Three, make sure to avoid using excessive force on that part of the tablet.
On the left side of the tablet, approximately 2 inches from the bottom, is the touch screen digitizer ribbon cable. When you are separating the touch screen from the bezel with the plastic opening tool below in Step Three, make sure to avoid using excessive force on that part of the tablet.

Utilizing the heat gun or blow dryer, commence heating
the outer edges of the tablet to soften the adhesive that is securing the front
panel to the unit. Normally 1-2 minutes will suffice.

Using the plastic opening tool, begin to create separation
between the trim bezel and the touch screen digitizer.
Start sliding the opening tool around the display assembly to release the adhesive around the entire tablet.
The support of the heat gun or blow dryer might be needed to continue softening the adhesive while working all the way around the touch screen digitizer.
Start sliding the opening tool around the display assembly to release the adhesive around the entire tablet.
The support of the heat gun or blow dryer might be needed to continue softening the adhesive while working all the way around the touch screen digitizer.

When the adhesive has been released all the way around
the tablet, rotate the touch screen away from the base. This will be similar to
opening a book. Make sure you are mindful of the ribbon cable in the bottom
left corner.

Locate and remove the four small Phillips screws (#00)
that secure the LCD screen to the base.

Raise and rotate the LCD screen out of the base the same
way as you did the touch screen digitizer. You can then rest the LCD screen on
top of the digitizer.

The LCD screen ribbon cable is held in place with a FPC
style connector that has a locking tab. Unlock this tab before trying to unplug
the ribbon cable.
The lock is the tab on the opposite side of where the cable is inserted. Utilizing the spudger, flip the tab up 90 degrees to release the ribbon cable. Once the locking tab is flipped upward 90 degrees, slide the ribbon cable out from its connector. This will allow you to remove the LCD screen from the iPad 4.
The lock is the tab on the opposite side of where the cable is inserted. Utilizing the spudger, flip the tab up 90 degrees to release the ribbon cable. Once the locking tab is flipped upward 90 degrees, slide the ribbon cable out from its connector. This will allow you to remove the LCD screen from the iPad 4.

Touch screen removal
The touch screen digitizer ribbon cable is held in place
with the same locking style connectors as the LCD screen (see previous step).
You need to unlock these tabs before attempting to unplug the ribbon cables. When
the locking tabs are flipped upward 90 degrees, slide the ribbon cables out from
their connectors.

The home button ribbon cable is attached by a smaller
version of the same locking sockets; do not forget to unlock the tabs. Unplug
the small cable before removing the touch screen.

Home Button removal
Using the heat gun or blow dryer, heat the area of the home
button to soften the adhesive that secures the home button to the touch screen
digitizer. Normally 1-2 minutes will suffice.

Utilizing the plastic opening tool, separate the home
button assembly from the touch screen digitizer. The most efficient way to do
this is by sliding the plastic opening tool under the assembly and prying up
gently. This needs to be done on both sides of the assembly. You can now remove
the home button assembly from the touch screen digitizer.

Continuing with the plastic opening tool, slide it underneath
the home button retainer to release the adhesive carefully. You can now remove
the home button from the
touch screen digitizer.
touch screen digitizer.

Front Facing Camera removal
Using the spudger, unplug the push style plug for the camera
by lifting it up and out of its socket. Still working with the spudger, pry the
camera out of its socket/housing and remove it from the iPad 4.

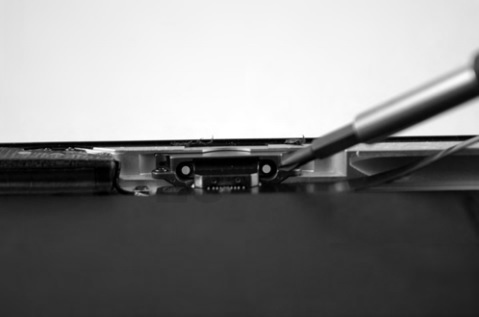
Port/Connector removal
Slide the spudger under the plastic spacer located by the
Wi-Fi antenna and lightening connector cable. Separate the spacer from the
adhesive that is keeping it secured to the iPad 4. You can now remove the
spacer from the iPad 4.

Utilizing the spudger, pry up gently on the dock connector
cable to release it from its push style plug socket.

Locate and remove the two small Phillips screws (#00)
that secure the lightening port/connector into the iPad 4. You can now remove
the lightening port/connector from the iPad 4.
Wi-Fi Antenna removal
Using the spudger, pry the connectors for the speaker and
Wi-Fi antenna from their sockets.

Locate and remove the four small Phillips screws (#00)
that secure the Wi-Fi antenna into the iPad 4.

Continuing with the spudger, release the Wi-Fi antenna
from the speaker below it. You can now separate the speaker and Wi-Fi cables from
each other to remove the Wi-Fi antenna from the iPad 4.

Battery removal
Locate and remove the four small Phillips screws (#00)
that secure the motherboard assembly into the iPad 4. Once the screws have been
removed, separate the motherboard assembly from the iPad 4. Slide the spudger or
metal opening tool under the battery to begin separating the battery from the metal
case of the iPad 4. The adhesive is very strong so be sure to take your time
during this step. Once you have worked your way all the way across the bottom of
the battery and separated the adhesive, remove the battery from the iPad 4.
