Kindle Fire HD 7.0 – Disassembling procedure –How to remove the battery – How to remove the case – Ipods and Ipads repair and service

Category: Ipods and Ipads Repair and Service
Contents of this article
- Removing battery
- Removing the case
- removing the camera and speaker
Kindle Fire HD 7.0
DISASSEMBLING PROCEDURE
Removing Battery
To begin disassembling the Kindle Fire HD 7” tablet, insert
the plastic opening tool in the seam around the perimeter of the back cover.
Work your way around the Kindle Fire to separate the clips that secure the back
cover to the body of the unit. Remove the back cover from the Kindle.
Next, locate and remove the five screws that secure the
battery to the body of the Kindle. Use the small Phillips screwdriver to remove
the four Phillips screws (#00).
Use the T5 torx screwdriver to remove the one T5 torx screw.
Use the T5 torx screwdriver to remove the one T5 torx screw.

Unplug the connection for the battery from the
motherboard with the spudger. There is a black antenna wire that runs the length
of the battery cover. Pry up the plug‘s connection and peel the wire out of the
channel. Remove the black antenna wire from the battery cover. You can now remove
the battery from the Kindle Fire HD.

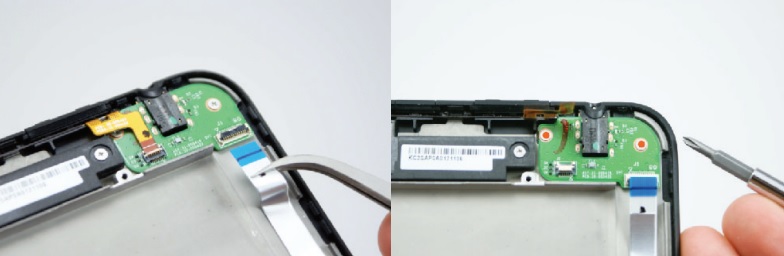
Removing Headphone
Jack Assembly
The headphone jack assembly has two locking sockets. Flip
the tab on the locks to release the connections, and then remove the ribbon cables
from their sockets.
Locate and remove the two Phillips (#00) screws with the appropriate screwdriver. This will release the headphone jack assembly from the tablet.
Locate and remove the two Phillips (#00) screws with the appropriate screwdriver. This will release the headphone jack assembly from the tablet.
Removing Front-Facing
Camera
A single connection secures the front-facing camera into
the Kindle. Use the plastic opening tool to pry up the connection and release
the camera. Remove the front-facing camera from the 7” Kindle.
There are seven connections on the motherboard that need
to be disconnected. The first is the antenna plug’s connection. It is located
in the lower left corner of the motherboard. Gently lift up and pry the connection
to remove it from the Kindle Fire.
The next two connections are the speaker connections. There are two wires going to both connections. These connections have delicate sockets. Be cautious as you lift up and pry the connections from their sockets. Remove the speaker connections from the Kindle. The next connection contains a locking socket. Flip the lock to release and remove the cable from its socket.
The last three connections are easily removed. Pry the connections to release and remove the cables from the motherboard.

Locate and remove the six Phillips screws (#00) that
secure the motherboard into the Kindle Fire HD.
You can now remove the motherboard from the Kindle.

Removing Speaker Assembly
Locate and remove the single Phillips screw (#00) that
secures the first of two speakers into
the Kindle. Locate and remove the two Phillips screws (#00) that secure the second speaker assembly into the Kindle. Remove this speaker assembly from the tablet. Remove the second speaker assembly from the Kindle Fire HD.
the Kindle. Locate and remove the two Phillips screws (#00) that secure the second speaker assembly into the Kindle. Remove this speaker assembly from the tablet. Remove the second speaker assembly from the Kindle Fire HD.

Next, locate and remove the two Phillips screws (#00) that
secure the metal frame to the body of the Kindle. Peel back the Wi-Fi antenna
to fully release the framework from the Kindle.
With the securing screws removed and the Wi-Fi antenna
peeled back, the metal frame is free to be lifted and removed from the Amazon
Kindle Fire HD.
