Lenovo IdeaTab A3000 – How to test the battery charger – How to test the Battery pack – How to remove the back cover – how to remove the battery – Ipads and ipods repair and service

Category: Ipads and Ipods repair and Service
Contents of this article
- How to check the charger
- How to test the battery
- How to remove the case
Lenovo IdeaTab A3000
Power system checkout
If you suspect a power problem, see the appropriate one of the following power
supply checkouts:
“Checking the AC adapter”
“Checking the battery pack”
Checking the AC adapter
You are here because the computer fails only when the AC adapter is used.
If the power-on indicator does not turn on, check the power cord of the AC adapter for correct continuity and installation.
To check the AC adapter, follow the steps below:
1. Unplug the AC adapter cable from the tablet.
2. Measure the output voltage at the plug of the AC adapter cable. See the following figure:
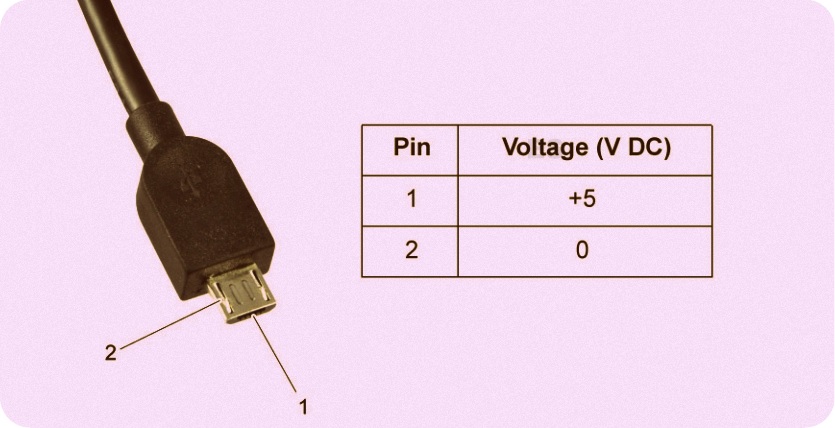
Note: Output voltage for the AC adapter pin No. 2 may differ from the
one you are servicing.
3. If the voltage is not correct, replace the AC adapter.
4. If the voltage is acceptable, do the following:
Replace the system board.
Note: Noise from the AC adapter does not always indicate a defect.
3. If the voltage is not correct, replace the AC adapter.
4. If the voltage is acceptable, do the following:
Replace the system board.
Note: Noise from the AC adapter does not always indicate a defect.
Checking the battery pack
Battery charging does not start until the Power Meter shows that less than 95% of the total power remains; under this condition the battery pack can charge to 100% of its capacity. This protects the battery pack from being overcharged or from having a shortened life. Tap the battery icon in the icon tray, and the percentage of battery power remaining is displayed. To get detailed information about the battery, tap Battery under Settings In the applications list, to enter the battery information interface.
Note: If the battery pack becomes hot, it may not be able to be charged. Remove it from the computer and leave it at room temperature for a while. After it cools down, reinstall and recharge it.
To check the battery pack, follow the steps below:
1. Turn off the computer.
2. Measure the voltage between battery terminals 1 (+) and 6 (-). See the following figure:

3. If the voltage is less than +3.4 V DC, the
battery pack has been discharged.
Note: Recharging will be continued for at least 3 hours, even though the indicator does not light on. If the voltage is still less than +3.4 V DC after recharging, replace the battery.
Note: Recharging will be continued for at least 3 hours, even though the indicator does not light on. If the voltage is still less than +3.4 V DC after recharging, replace the battery.
DISASSEMBLING PROCEDURE
How to remove Rear cover
Note: Turn off the IdeaTab before you begin. Failure to do so may cause
permanent damage to the IdeaTab.
Remove the battery cover from the corner 1 .
permanent damage to the IdeaTab.
Remove the battery cover from the corner 1 .

Remove the battery cover in the direction
shown by arrow 2 .

Remove the fifteen screws 3 .

Insert a plastic plate tool 4 and gently
disassemble the rear cover by the tool in
the direction shown by arrows 5 , then remove the rear cover in the direction
shown by arrow 6 .
shown by arrow 6 .

How to remove Battery pack
Disconnect the battery connector in the
direction shown by arrow 1 . Gently
disassemble the battery pack by the plastic plate tool.
disassemble the battery pack by the plastic plate tool.

Remove the battery pack in the direction
shown by arrow 2 .
