REPAIRING AND NOT THROWING AWAY

Richtige Fernseher haben Röhren!

Richtige Fernseher haben Röhren!

In Brief: On this site you will find pictures and technical information about Service Modes, Circuit Diagrams, Firmware Update procedure, Disassemble procedure, Universal remote control set-up codes, Troubleshooting and more....

If you go into the profession, you will obtain or have access to a variety of tech tips databases HERE IT IS Master Electronics Repair !.

These are an excellent investment where the saying: 'time-is-money' rules. However, to learn, you need to develop a general troubleshooting approach - a logical, methodical, method of narrowing down the problem. A tech tip database might suggest: 'Replace C536' for a particular symptom. This is good advice for a specific problem on one model. However, what you really want to understand is why C536 was the cause and how to pinpoint the culprit in general even if you don't have a service manual or schematic and your tech tip database doesn't have an entry for your sick TV or VCR.

While schematics are nice, you won't always have them or be able to justify the purchase for a one-of repair. Therefore, in many cases, some reverse engineering will be necessary. The time will be well spent since even if you don't see another instance of the same model in your entire lifetime, you will have learned something in the process that can be applied to other equipment problems.
As always, when you get stuck, checking out a tech-tips database may quickly identify your problem and solution.In that case, you can greatly simplify your troubleshooting or at least confirm a diagnosis before ordering parts.

Happy repairing!
Today, the West is headed for the abyss. For the ultimate fate of our disposable society is for that society itself to be disposed of. And this will happen sooner, rather than later.

How to use the site:

- If you landed here via any Search Engine, you will get what you searched for and you can search more using the search this blog feature provided by Google. You can visit more posts scrolling the left blog archive of all posts of the month/year,
or you can click on the main photo-page to start from the main page. Doing so it starts from the most recent post to the older post simple clicking on the Older Post button on the bottom of each page after reading , post after post.

You can even visit all posts, time to time, when reaching the bottom end of each page and click on the Older Post button.

- If you arrived here at the main page via bookmark you can visit all the site scrolling the left blog archive of all posts of the month/year pointing were you want , or more simple You can even visit all blog posts, from newer to older, clicking at the end of each bottom page on the Older Post button.
So you can see all the blog/site content surfing all pages in it.

- The search this blog feature provided by Google is a real search engine. If you're pointing particular things it will search IT for you; or you can place a brand name in the search query at your choice and visit all results page by page. It's useful since the content of the site is very large.

Note that if you don't find what you searched for, try it after a period of time; the site is a never ending job !

..............The bitterness of poor quality is remembered long after the sweetness of todays funny gadgets low price has faded from memory........ . . . . . .....
Don't forget the past, the end of the world is upon us! Pretty soon it will all turn to dust!

©2010, 2011, 2012, 2013, 2014 Frank Sharp - You do not have permission to copy photos and words from this blog, and any content may be never used it for auctions or commercial purposes, however feel free to post anything you see here with a courtesy link back, btw a link to the original post here , is mandatory.
All posts are presented here for informative, historical and educative purposes as applicable within fair use. NOTHING HERE IS FOR SALE !

Monday 18 March 2019

MARANTZ CD6002 DVD PLAYER - HOW TO UPGRADE FIRMWARE [SOFTWARE UPGRADE PROCEDURE]

MARANTZ CD6002 DVD PLAYER - HOW TO UPGRADE FIRMWARE [Software Upgrade Procedure]


SOFTWARE UPDATE
Necessary equipment
Windows PC (OS: Windows2000 or WindowsXP) with Serial port.
RS-232C Dsub-9 pin cable (female to female/straight type).
Connection JIG (90M-SR4500JIG)
Update tool (FlashProg.exe, other files and folders in Flash Programmer folder)
Update data (CD6002_yymmdd_x.s24)
NOTE :The yy is two digits of year. The mm is month. The dd is date. The x is release number.
  • Put the "Flash Programmer" and "software" folder into anywhere on your PC’s hard disc.
  • Double click the "Flash Programmer" folder.
  • Double click FlashProg.exe, and launch the Flash Programmer.  When a Flash Programmer does not launch even if double-clicked FlashProg.exe, please refer to "[B] When a Flash Programmer did not launch".
  • Click OK.
Since Flash Programmer communicates with the unit automatically, the following dialog box appears when it fails in communication.
  • Click the Setup in the menu bar and select the Object file.
  • Click Browse
  • Choose the Motorola S Format(*.s16,*.s24,*.s32)in Files of type.
  • Choose the CD6002_yymmdd_x.s24, and click Open.
  • Click Device tab.
NOTE: The yy is two digits of year. The mm is month. The dd is date. The x is release number.
  • Choose the TMP91FW60in the Device, and choose the 900/L1in the Series.
  • And click Communication tab.
  • Choose  the Serial port number in the COM Port.
  • Check the Data Rate Manual, and choose the 38400 in the Data Rate.
  • And Click OK
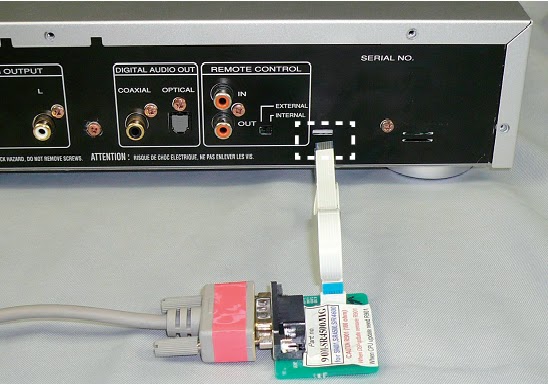
  • Disconnect the mains cord from the unit.
  • Connect the RS-232C on the connection JIG and the Serial Port of windows PC with RS-232C cable.
  • Connect FFC (upside contact) to the rear panel of the unit from connection JIG.
  • Connect the mains cord into the unit.
  • If the connection with the Flash Programmer is successfully made, a dialogue box saying "Erase All data in this devise? (Y/N)" appears automatically. If the connection fails, error message will appear. (Ex.: E000)
  • Click Yes.
  • Click OK.
  • Click P (Program) to start update.
  • Software is written into the microprocessor.
  • The writing of software takes about 50 seconds.
  • If the software is updated successfully, a dialog box saying "R006: Programming completed successfully." appears.
  • Click OK.
  • Click  the File in the menu bar and select the Exit.
  • Disconnect mains cord from the unit, and then disconnect FFC of connection JIG from the unit.

When a Flash Programmer did not launch
  • Open the FlashProg.ini in the Flash Programmer folder by text editor. (EX.: Notepad, etc)
  • Delete the text "OpenFile=C:\...(your PC setting)...\???.s24"
  • Save the FlashProg.ini.
  • Close the text editor.
  • Probably you can launch the Flash Programmer.