Motorola Nexus 6 – Disassembling procedure – How to remove the battery – How to remove the cameras – How to remove the earpiece – Mobiles and smartphones repair and service

Category: Mobiles and Smartphones Repair and Service
Contents of this article
- How to remove the battery
- How to remove the wireless charger unit
- How to remove the cameras
Motorola Nexus 6
DISASSEMBLING PROCEDURE
Insert the SIM card ejection tool into the small hole located
next to the headphone jack. Remove the Nano-SIM card tray from the Motorola
Nexus 6.

How to remove Rear Battery Cover
Use a heat gun or blow dryer to lightly heat and soften the
adhesive securing the rear battery cover to the Nexus 6 midframe.
With the plastic opening tool, or a spudger, free the rear cover from the adhesive and remove it from the Motorola handset.
Be mindful of the power and volume buttons ribbon cable located on the left side of the device.
With the plastic opening tool, or a spudger, free the rear cover from the adhesive and remove it from the Motorola handset.
Be mindful of the power and volume buttons ribbon cable located on the left side of the device.

How to remove Display/Motherboard Assembly &
Midframe/Battery Assembly
To begin separating the midframe from the display assembly (LCD and Touch
Screen) locate and remove the twenty-two T4 torx screws.
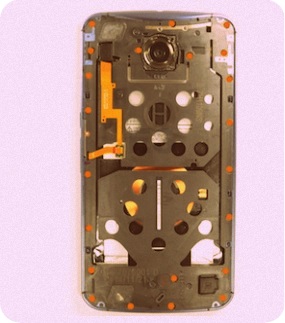
Next, insert an iSesamo opening tool, or plastic triangle
opening tool, into the seam between the display assembly and the midframe.
Once you have a small gap, work your way around the entire Nexus 6 freeing the
clips that hold the display assembly and midframe together.

How to remove Power and Volume Buttons
On the left side of the device, locate and remove the single T4 torx screw.
Next, use the fine-tip curved tweezers to remove the silver bracket. Now, slide the power and volume buttons out from the side of the Nexus 6 smartphone.
Next, use the fine-tip curved tweezers to remove the silver bracket. Now, slide the power and volume buttons out from the side of the Nexus 6 smartphone.

How to remove Interconnect Cable (Connects the Power and
Volume Button Ribbon Cable to the Motherboard)
Remove the black rubber cover from the top left corner of
the device to reveal and disconnect the interconnect cable’s connection to the
motherboard.
Next, use the spudger to lift the clasp and disconnect the power and volume buttons ribbon cable from the bottom of the interconnect cable.
You can now carefully pry up the interconnect ribbon cable from the adhesive securing it to the midframe, and then remove it from the Motorola Nexus 6.
Next, use the spudger to lift the clasp and disconnect the power and volume buttons ribbon cable from the bottom of the interconnect cable.
You can now carefully pry up the interconnect ribbon cable from the adhesive securing it to the midframe, and then remove it from the Motorola Nexus 6.

How to remove Battery and Inductive Charger
With the fine-tip curved tweezers remove the black rubber cover protecting the
battery’s connection.
With the cover removed, use the nylon spudger to disconnect the Nexus 6 battery.
With the cover removed, use the nylon spudger to disconnect the Nexus 6 battery.

Next, lift the black tape and inductive charger ribbon cable
away from the Nexus 6 battery. Then with the nylon spudger gently pry the
battery away from the inductive charger and midframe.

Now, use the fine-tip tweezers to remove the inductive charger
connection from the adhesive securing it to the top of the midframe.
With the connection freed, carefully separate the inductive charger from the
Nexus 6 midframe.

How to remove Earpiece Speaker and Headphone Jack
Use the fine-tip curved tweezers to pry the earpiece speaker up and out of the
midframe.
Next, insert the fine-tip curved tweezers into the headphone jack and apply upward pressure. This will free the headphone jack from the adhesive securing it to the Nexus 6 midframe.
Next, insert the fine-tip curved tweezers into the headphone jack and apply upward pressure. This will free the headphone jack from the adhesive securing it to the Nexus 6 midframe.

How to remove Rear-Facing Camera Lens Cover and Flash
Ribbon Cable
With the iSesamo opening tool, start at the top of the rear-facing camera lens cover
and carefully pry it away from the midframe.
Next, lift up both flash LED’s from the adhesive securing them in place. Then, turn the midframe over and use the fine-tip curved tweezers to lift up the contacts.
You can now slide the contact side of the ribbon cable through the slot and remove it from the Nexus 6 midframe.
Next, lift up both flash LED’s from the adhesive securing them in place. Then, turn the midframe over and use the fine-tip curved tweezers to lift up the contacts.
You can now slide the contact side of the ribbon cable through the slot and remove it from the Nexus 6 midframe.

Lift up the metal bracket holding the power and volume
button ribbon cable in place.
Now, with the fine-tip curved tweezers, remove the
Nexus 6 power and volume buttons ribbon cable from the midframe.
Nexus 6 power and volume buttons ribbon cable from the midframe.

How to remove Rear-Facing and Front-Facing Cameras
With the fine-tip curved tweezers disconnect and remove the front-facing camera
from the back of the
Nexus 6 display assembly.
Next, remove the Kapton tape from over the top of the rear-facing camera connection. Now, use the nylon spudger to lift the clasp up and the slide the ribbon cable out of the connection.
You can now remove the rear-facing camera from the Nexus 6 handset.
Nexus 6 display assembly.
Next, remove the Kapton tape from over the top of the rear-facing camera connection. Now, use the nylon spudger to lift the clasp up and the slide the ribbon cable out of the connection.
You can now remove the rear-facing camera from the Nexus 6 handset.


How to remove Display Assembly (LCD and Touch Screen) and
Motherboard
Locate and remove the T4 torx screw and small metal bracket that secure the
motherboard to the Nexus 6 LCD Assembly.

Locate and remove the piece of kapton tape that covers
the touch screen digitizer connection.
Next, use the nylon spudger to lift the clasp up and slide the ribbon cable out
of the connection. Gently pry up the digitizer ribbon cable from the
motherboard.
Now, remove the piece of kapton tape that covers the
LCD connection, it is located on the left side of the motherboard. With the nylon spudger, lift the clasp up and slide the ribbon cable out of the connection.
You can now carefully separate the motherboard from the display assembly. Make sure to maneuver the motherboard around the touch screen digitizer and
LCD ribbon cables when separating it from the display assembly.


How to remove Loudspeaker
With the iSesamo opening tool pry the Nexus 6 loudspeaker
from the bottom of the motherboard.
