REPAIRING AND NOT THROWING AWAY

Richtige Fernseher haben Röhren!

Richtige Fernseher haben Röhren!

In Brief: On this site you will find pictures and technical information about Service Modes, Circuit Diagrams, Firmware Update procedure, Disassemble procedure, Universal remote control set-up codes, Troubleshooting and more....

If you go into the profession, you will obtain or have access to a variety of tech tips databases HERE IT IS Master Electronics Repair !.

These are an excellent investment where the saying: 'time-is-money' rules. However, to learn, you need to develop a general troubleshooting approach - a logical, methodical, method of narrowing down the problem. A tech tip database might suggest: 'Replace C536' for a particular symptom. This is good advice for a specific problem on one model. However, what you really want to understand is why C536 was the cause and how to pinpoint the culprit in general even if you don't have a service manual or schematic and your tech tip database doesn't have an entry for your sick TV or VCR.

While schematics are nice, you won't always have them or be able to justify the purchase for a one-of repair. Therefore, in many cases, some reverse engineering will be necessary. The time will be well spent since even if you don't see another instance of the same model in your entire lifetime, you will have learned something in the process that can be applied to other equipment problems.
As always, when you get stuck, checking out a tech-tips database may quickly identify your problem and solution.In that case, you can greatly simplify your troubleshooting or at least confirm a diagnosis before ordering parts.

Happy repairing!
Today, the West is headed for the abyss. For the ultimate fate of our disposable society is for that society itself to be disposed of. And this will happen sooner, rather than later.

How to use the site:

- If you landed here via any Search Engine, you will get what you searched for and you can search more using the search this blog feature provided by Google. You can visit more posts scrolling the left blog archive of all posts of the month/year,
or you can click on the main photo-page to start from the main page. Doing so it starts from the most recent post to the older post simple clicking on the Older Post button on the bottom of each page after reading , post after post.

You can even visit all posts, time to time, when reaching the bottom end of each page and click on the Older Post button.

- If you arrived here at the main page via bookmark you can visit all the site scrolling the left blog archive of all posts of the month/year pointing were you want , or more simple You can even visit all blog posts, from newer to older, clicking at the end of each bottom page on the Older Post button.
So you can see all the blog/site content surfing all pages in it.

- The search this blog feature provided by Google is a real search engine. If you're pointing particular things it will search IT for you; or you can place a brand name in the search query at your choice and visit all results page by page. It's useful since the content of the site is very large.

Note that if you don't find what you searched for, try it after a period of time; the site is a never ending job !

..............The bitterness of poor quality is remembered long after the sweetness of todays funny gadgets low price has faded from memory........ . . . . . .....
Don't forget the past, the end of the world is upon us! Pretty soon it will all turn to dust!

©2010, 2011, 2012, 2013, 2014 Frank Sharp - You do not have permission to copy photos and words from this blog, and any content may be never used it for auctions or commercial purposes, however feel free to post anything you see here with a courtesy link back, btw a link to the original post here , is mandatory.
All posts are presented here for informative, historical and educative purposes as applicable within fair use. NOTHING HERE IS FOR SALE !

Monday 25 March 2019

SHARP LC - 20S4E _ SOFTWARE LOADING PROCEDURE

SHARP LC - 20S4E _ SOFTWARE LOADING PROCEDURE


SOFTWARE LOADING
  • Upgrading the software or after replacement of IC151, IC501 or Main PWB, make sure to upload the processors with updated software.
  • Use the dedicated Interface JIG (JIGINF-001) and supplied programs for upgrading the software.
This model employs two software;
  1. SCALER microprocessor software
  2. MAIN microprocessor software
Upload the SCALER microprocessor software first follow by MAIN microprocessor software.
SCALER MICROPROCESSOR
  • Set Interface JIG switch to position "SCALER".
  • Power ON the set and plug Interface JIG connector to P2002.
  • Run the ISP_Tool.exe program.
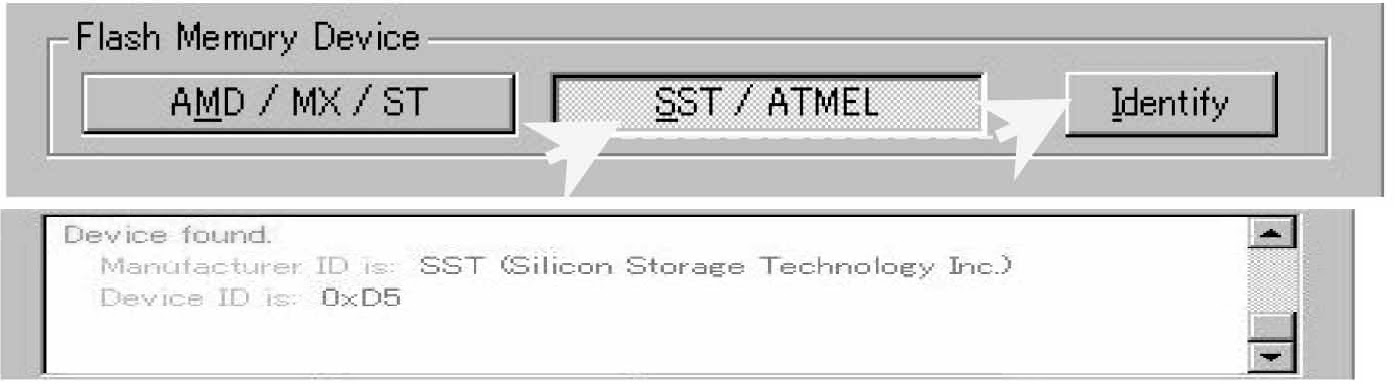
  • First click [SST / ATMEL] and then follow by [Identify] to identify the flash memory.  Confirm the item below in Comment Window.
  • Click [Select Intel HEX File …] to open the source files. The source file name are "Sedna_Release_****.hex".  Confirm the source file is loaded correctly.
  • Next click the [Erase] to erase all the data in the flash memory. Confirm the erase process is complete without any error.
  • Then click [Program] to start uploading the source file into the flash memory. After uploading process is complete, confirm there are no error.
  • Click [Verify] to verify the uploaded data and confirm there are no error.
  • inally click [Restart System] to initialize. Confirm "Reset done" in Comment Window.
  • Power OFF the set by unplugging AC Cord, remove the JIG from the plug and wait for 1 minute before power ON again. [[If any error occur during any process, power OFF the set and repeat the all the process again. If these still fail, please erase Main Software and repeat the whole process again. To erase Main software, refer to MAIN microprocessor step No. 1) to 5) only.]]

MAIN MICROPROCESSOR
  • Set JIG switch to position "LOC".
  • Power ON the set and plug Interface JIG connector to P2002.
  • Run the WISP.exe program.
  • First click [Enter ISP Mode] then click [Send]. If the following window appear, click [Yes]
  • Confirm ISP status "Ready".
  • If "Entering ISP is not successful" occur, repeat step No. 4) again. If still fail, unplug the AC cord and repeat from step No. 2) again.
  • Then click [Erase Flash], follow by [Send]. Confirm the Program, PK26 & Character are all "OK" and ISP status is "Ready".
  • If "Failed" occur, unplug the AC cord and repeat the whole process again from beginning.
  • Next click [Write Flash] and load the source file by clicking [Browse]. The source file name are "LC20S4E_****.hex". Once the data is loaded successfully click [Send]. Confirm the Program, PK26 & Character are all "OK" and ISP status is "Ready".
  • If "Failed" occur, unplug the AC cord and repeat the whole process again from beginning.
  • Click [Verify Flash] and [Send] to verify the flash memory. Confirm the Program, PK26 & Character are all "OK" and ISP status is "Ready". If "Failed" occur, unplug the AC cord and repeat the whole process again from beginning.
  • Power OFF the set and remove the JIG.