PANASONIC PT-43LC14 _ PT-50LC14 _ PT-60LC14 _ RESET & CLEANING METHODS_

Be sure
to reset the user’s memory:
- After replacing the Main C.B.A. (included in the TV/Tuner Unit)
- If the secret code of V-chip is forgotten.
- When moving the unit to a new location.
- Turn on the power.
- Press the MENU key on the remote to display the MENU screen.
- Select LOCK by pressing CH UP/DOWN key on the remote.
- Then, press the OK key.

- Press and hold the VOLUME DOWN button on the unit and the OK key on the remote for more than 5 seconds while this LOCK menu is displayed.
- When reset is finished, power shuts off automatically (the user’s memory is reset).
CLOGGED AIR FILTER DETECTION
- When a dirty or clogged air filter is detected, the OSD display appears for 1 minute. And then the Lamp is turned OFF.
- When this OSD display appears, remove the Projection Unit from rear, and clean the air filters gently on the Projection Unit.
==========================
AIR FILTER CLEANING
IS RECOMMANDED AT THIS
TIME. FIRST TURN THE
UNIT OFF.
PLEASE CALL FOR
SERVICE.
UNIT WILL BE TURNED
OFF AFTER 1 MINUTE.
=========================
CLEANING METHOD {SCREEN UNIT & MIRROR}
SCREEN UNIT [LENTICULAR SCREEN, FRESNEL LENS]
- It is strongly recommended that the Lenticular Screen surface (outside) and the Fresnel Lens surface (inside) should be wiped gently with a clean, soft, dry cloth to remove the dirt.
- If the dirt cannot be removed by wiping with a clean, soft, dry cloth, use a clean, soft, dry cloth moistened with diluted neutral pH liquid cleanser or a lens cleaner (usually containing a small amount of ethyl alcohol) and wipe lightly.
- Take care not to leave any streaks.
- Do not use cleaning materials containing methyl alcohol, acetone, or dichloromethane.
- Use an air blower to clean the inner surface of the Lenticular Screen and the outer surface of the Fresnel Lens (the surfaces that one another). These surfaces must not be wiped with a cloth.
THE MIRROR
- Remove any dirt with an air blower or wipe with a clean, soft, dry cloth. If wiped too forcefully, the surface of the Mirror can be damaged. If wiping with a clean, dry cloth does not remove the dirt, the Mirror must be replaced.
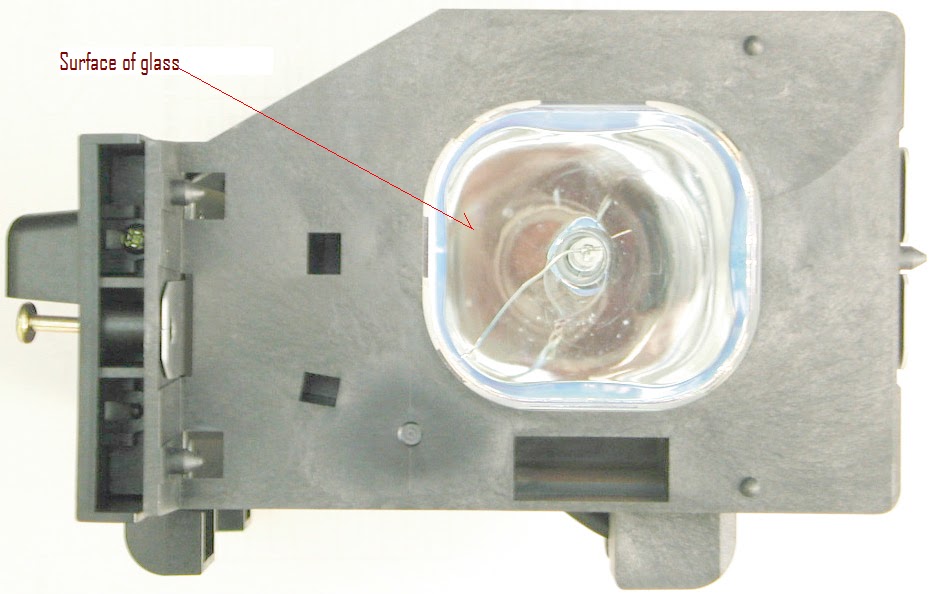
THE LAMP
- Gently wipe the surface of the glass of the Lamp with cleaning paper or soft cloth.
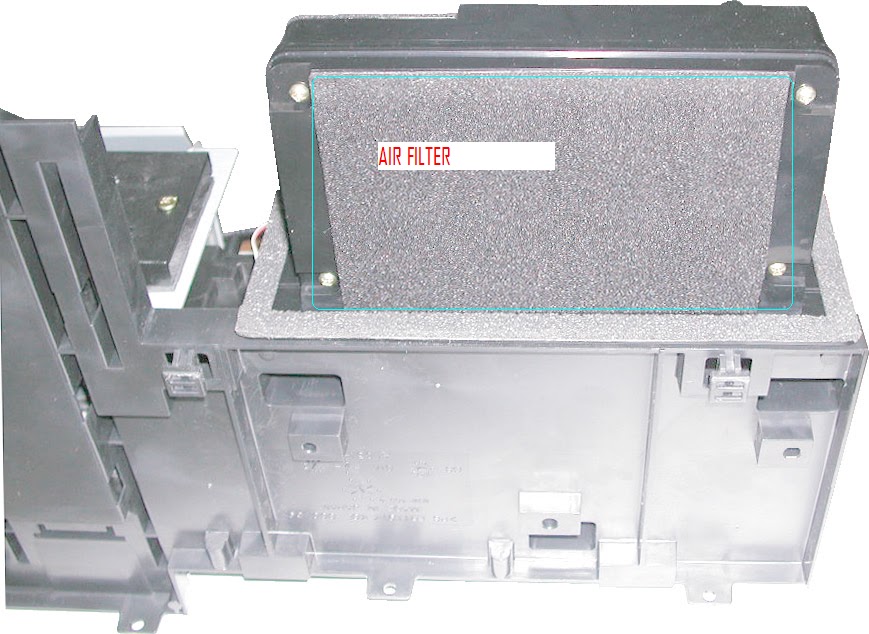
THE FILTER ON THE PROJECTION UNIT
CAUTION: Operating with torn or damaged Air
Filter may cause damage to the Projection unit.
Remove
the Projection Unit from rear. Then, clean the filters on the Projection Unit.
Gently remove any accumulated dust from filter with a vacuum cleaner.

BOTTOM VIEW
PROJECTION LENS
- Use lens cleaning paper and cleaner available at your local camera shop, etc.
- Dampen the cleaning paper with cleaner and gently wipe the surface of the lens from the center outward to remove dust.
THE POLARIZER
UNIT, THE FIELD LENS, THE RELAY LENS, THE CONDENSER LENS, THE DICHROIC MIRROR,
THE FULL MIRRORS, THE INTEGRATOR AND THE P/S CONVERTER
- Make sure that no dust gets on the optical components such as the Polarizer Unit, the Field Lens, the Relay Lens, the Condenser Lens, the Dichroic Mirror, the Full Mirrors, the Integrator and the P/S Converter. Clean these optical components with cleaning paper moistened with pure ethyl alcohol or a lens cleaner which contains no water or oil.
LCD PANEL OF THE LCD / PRISM UNIT
- Clean the surface of the LCD Panel of the LCD/Prism Unit with an air blower or wipe with a clean, or soft blush lightly.
- If any dirt remains, lightly wipe the surface with a cotton swab moistened with pure ethyl alcohol or a lens cleaner which contains no water or oil. Use a new swab after each wiping so that dirt will not be re-deposited on the surface.
TO DISTINGUISH THE PROJECTION LENS UNIT / PROJECTION UNIT
- The only difference between the 43 inch model and the 50 inch model of the Projection Unit is the Projection Lens.
- To distinguish, see marking (Z or A) on the Projection Lens.
- And the 60 inch model of the Projection Unit is placed label on the Projection Lens.
43 | 50 INCH MODEL

- [Z with red: for 43 inch model]
- {A with black: for 50 inch model}
LSDL0248
with Yellowish green label: for 60 inch model.
LSDL0248 is not the part numbers of the
Projection Lens as a replacement part.
- When removing the Projection Unit, remove the Lamp from the Projection Unit and keep it. Then, reinstall this Lamp into the new Projection Unit.
- When removing the Projection Unit, remove the Fan 3 Unit, the Top Duct 3 Unit and the 20-pin Cable from the Projection Unit and keep them. Then, reinstall the Fan 3 Unit, the Top
- Duct 3 Unit and the 20-pin Cable into the new Projection Unit.
- The lamp cooling fan will continue to operate for approximately 1 minute after the power is turned off.
- At the same time, the POWER LED will flash red.
- Do not disconnect the AC Cord from the power outlet and do not open any circuit breakers while the cooling fan is still operating.
- Primary circuit exists on the Audio Amp C.B.A., the Ballast C.B.A. and the Power C.B.A.
- This circuit is identified as "HOT" on the C.B.A.
- Use extreme care to prevent accidental shock when servicing.
MODEL NUMBER IDENTIFICATION MARK
Use Marks shown in
the chart below to distinguish the different models
MODEL
|
MARK
|
PT-43LC14
PT-50LC14
PT-60LC14
NOT
USED
|
A
B
C
PT
|
Refer
to Item 3 of Schematic Diagram Notes of Schematic Diagram and Circuit Board
Layout Notes, for mark "PT."