
LC-48CFG4042E, LC-49CFG4041E, LC-49CFE4042E – Sharp LCD TV-service mode, service mode adjustments, software update, Panel and EMC setting and more
MSD3463 Factory Menu Specification
How to Enter Factory Menu
Press
the RC buttons in this sequence: “Menu 1 1 4 7” to enter the factory
menu.
INTRODUCTION
SHIPPING INIT: TV Initialization to set default TV
parameters. Designed for Shipment.
AGING MODE: TV aging
mode switch.
ADC ADJUST: Change ADC
parameters
PICTURE SETTING: Change
Picture Setting
SOUND SETTING: Change
Sound Setting
GENERAL SETTING: Some
other settings usually used, and also for Debug.
PANNEL SETTING: Change
panel parameters like BitMap, ODD.EVEN and Etc.
EMC SETTING: Some
settings may affect EMC.
SYSTEM INFO: Display
system information.
BOARD INIT: Factory
reset.
SW UPGRADE: Software
update item.
ADC ADJUST & WHITE BALANCE AUTO ADJUST
It’s for adjusting
the YPBPR and PC color. Press key “right” or “ok” to enter the subpage.
Auto Adjust: Start
to auto color to get ADC value.
Source: Set source
for adjusting
R-Gain: Display
current ADC R value.
G-Gain: Display
current ADC G value.
B-Gain: Display
current ADC B value.
R-Offset: Display
current ADC R offset value.
G-Offset: Display
current ADC G offset value.
B-Offset: Display
current ADC B offset value
Reset: Reset to
default values.

PICTURE
Source: Choose
source
Picture Mode: Change
picture mode parameters
Picture Curve: Picture
mode parameter curve.
WB Adjust: White
Balance parameter setting
Over scan: Over scan
setting
PQ Advanced: For
PQ Adjustment.
Gamma: Preset
several Gamma Curves, for PQ debug.
DLC: Preset
several Curves, for PQ debug.
HDMI RGB Range: Change
Limit range or Full Range.

PICTURE MODE
Source: Choose sources
Picture Mode: Select picture
mode which is same with main menu.
Contrast: Adjust contrast which
is same with main menu.
Brightness: Adjust brightness
which is same with main menu.
Color: Adjust Color which is
same with main menu.
Sharpness: Adjust Sharpness
which is same with main menu.
Tint: Adjust tint which is same
with main menu.

PICTURE CURVE
Adjust
the real value of main menu from 0 to 100
Source: Choose source
Contrast: Adjust the real
contrast for main menu from OSD 0 to OSD 100.
Brightness: Adjust the real
brightness for main menu from OSD 0 to OSD 100.
Color: Adjust the real color
for main menu from OSD 0 to OSD 100.
Sharpness: Adjust the real
sharpness for main menu from OSD 0 to OSD 100.
Tint: Adjust the real tint for
main menu from OSD 0 to OSD 100.
CONTRAST
Contrast-0: The real value of main menu contrast OSD 0
Contrast-25: The real value of
main menu contrast OSD 25
Contrast-50: The real value of
main menu contrast OSD 50
Contrast-75: The real value of
main menu contrast OSD 75
Contrast-100: The real value of
main menu contrast OSD 100
The Brightness, Color, Sharpness, Tint are same with the contrast.
WB [White Balance] ADJUST
White-Balance
Adjustment
This page only for current source White Balance Adjustment. Different source may have different values.
There are Warm, Cool, Normal modes and save every separate source. We can change
the R-GAIN, G-GAIN, B-GAIN, R-OFFSET, G-OFFSET, B-OFFSET.
SYNC ALL: SYNC the white balance
of the current source to all other sources.
White Balance
Load 80% White pattern from signal generator
Enter Factory Menu by pressing MENU + 1147
Choose 3 PICTURE SETTING
Choose 3 WB ADJUST
Change 0 SOURCE to HDMI
In 1 COLOUR TEMP choose
Warm/Normal/Cold
Change R-GAIN/G-GAIN/B-GAIN to
meet specification

OVERSCAN
This
page can adjust over scan.
Note: Over scan should check with
every timing.

PQ ADVANCED
PQ
Adjustment Page
Adjust luminance, Colors, peaking, NR and etc.
SOUND
Source: Choose
source
Sound Mode: BASS,
TREBLE, EQ-Settings.
Volume Curve: Adjust
volume curve.
Audio Pre-scale: Adjust
the power of current source.
Audio AVC: For Software
Designer Only
PEQ: For Software
Designer Only
Audio DRC: For Software
Designer Only
Treble/Bass Range: Adjust
the Treble/Bass range
SPDIF Audio Delay: Adjust
the SPDIF Audio delay.

VOLUME CURVE
Volume Offset: User overall volume control, every source has a unique value.
VOL1–VOL100: All sources share a
same value, make sure the next value bigger than the before.

GENERAL SETTING
Power Mode: On/Standby/Last boot status.
LOGO: Set boot
logo on or off.
Test Pattern: Test
pictures from IC which can help to judge panel issue or not.
Channel Export: Export
channel table.
Channel Import: Import
channels table to TV.
Watch Dog: watch dog
switch.
DEBUG
UART Debug: For Software Designer only
QMAP: Map
adjustment
Timer Test: Speed up
timer
PANEL and EMC SETTING

SYSTEM INFORMATION

SW UPGRADE
Upgrade TV: update item
Bin Name: Software bin
name.
Upgrading the software
MSD3463 has two
kinds of chips: MSD3463GSA and MSD3463GU. Please make sure that you get
the correct upgrading file for a
certain chipset (refer to the chart below). Introducing 4
upgrading methods one by one: User menu Upgrading, Power on Upgrading, Factory Setting
Upgrading, ISP Upgrading. The former three are most commonly-used.
Preparation
This step only
applies to power integrated board.
Prepare mini power board(CN.UPGRADE01)
for upgrading.
Connect the mini board with main board as below:

Make sure connect the
12V to 12V and GND to GND, or it will cause hardware damage.
The main board should be connected to mains to
work if we do not use the CN.UPGRADE01 board. The power module of main board
have more than thousands of volts at working. It is easily leads personal
injury or damage to equipment if mistakenly touch the main board or some
objects fallen into the main board during the upgrading procedure. So use
the CN.UPGRADE01 board to reduce the risk of upgrading.
Please keep the
electricity ON in the upgrade process.
Operation Procedure
Copy
the Upgrading File (SW) to a USB disk and then insert it to the USB port. Search
for the SETUP and select Software Update by Left or Right remote control key on User OSD
Menu. The pictures below are the upgrading procedure for your reference:

Upgrade Prompt
When
upgrading, the TV set will light panel according to the panel parameter, and
display the progress bar. If the panel parameter of board matches the panel,
you will see the following image:
100% indicates the
upgrade finished, and TV will auto reboot after user menu upgrading finished.
Upgrade
Flashing Status
You
can judge the upgrade progress by flashing of the remote control LED light:
Upgrading:
Red 1000ms Green 1000ms alternates, the TV set will turn to Upgrade
succeed or Upgrade Failed status after the upgrading process.
Main program upgrade succeed:
Red 250ms Green 250ms alternates, flashing before power off.
Main program upgrade Failed:
Red 1750ms Green 250ms alternates, flashing before power off.
Notes: In the upgrade
process, as timer software is used to control flashing, situations such as LED
light stuck when creating partition of flash, is normal phenomenon.
Power On Upgrading
Copy
the SW to a USB disk, link it to the USB port, Re-power on, if the LED
blinks continually, it means the upgrading is on process, while the LED light
off means the upgrading has been completed.
Factory Setting Upgrading
Press <MENU>+1147 to enter the factory setting, search
for the “Upgrade” item by the remote control, just like the picture below, then
you can follow the steps in the screen.


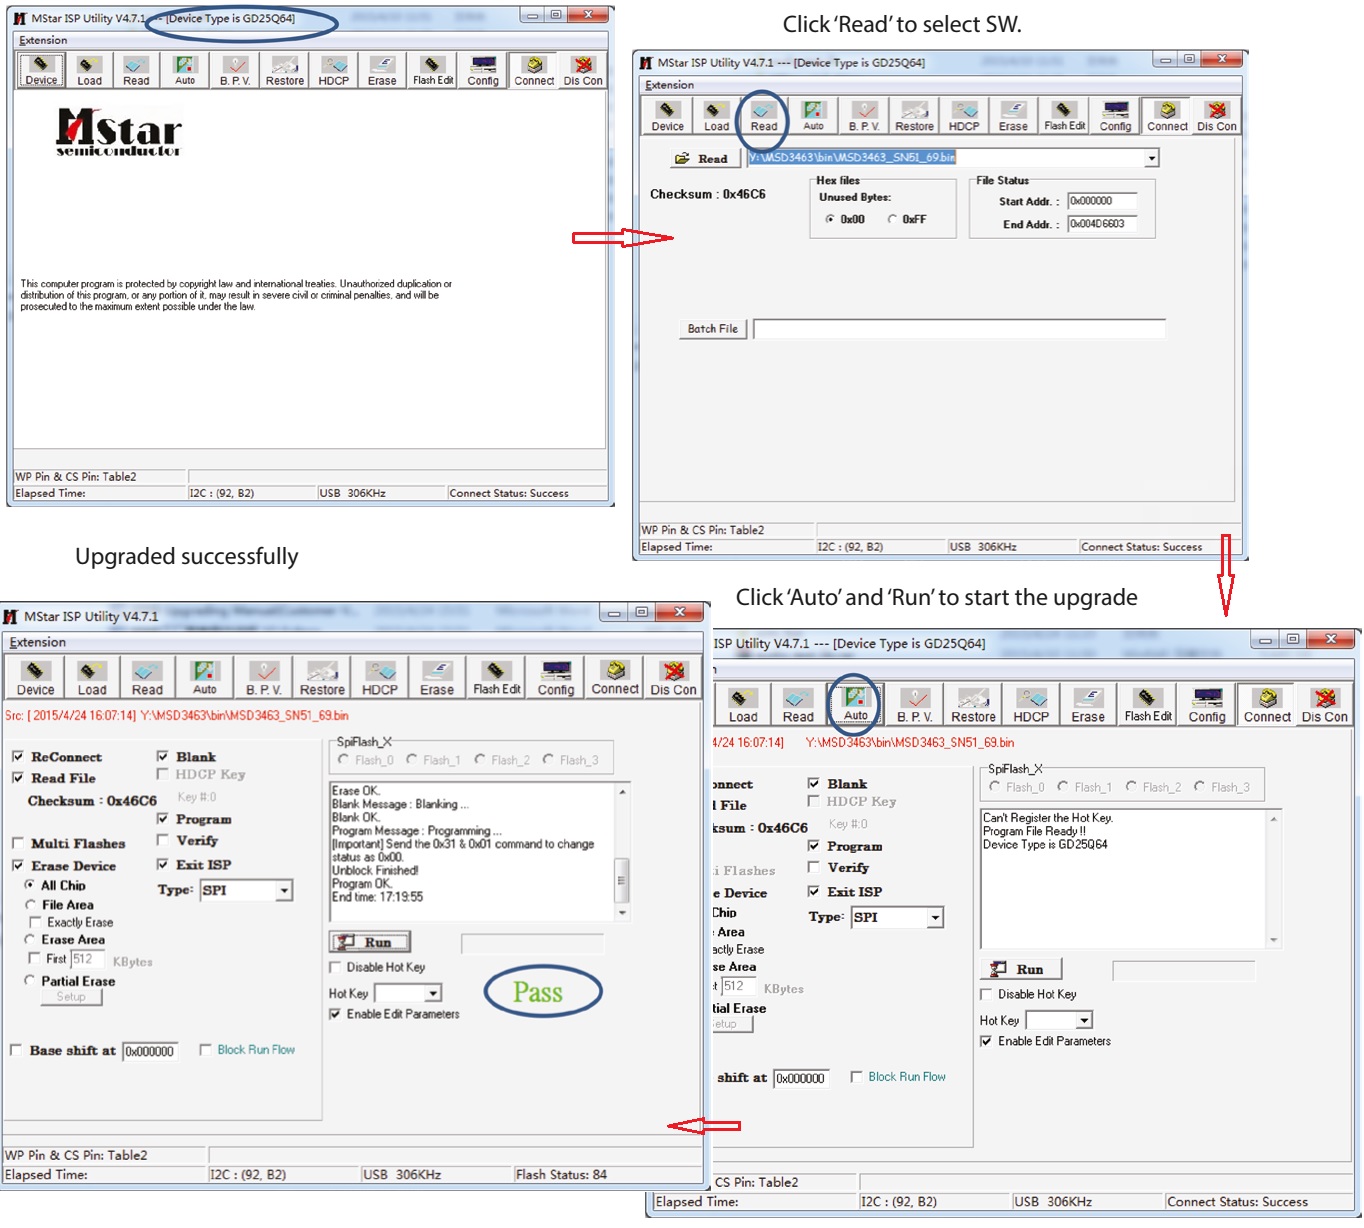
Install USB driver. Make sure the USB ISP tool is connected to PC before setup


HOTEL MODE
To
enter Hotel mode you need press buttons on RC in following sequence: MENU 7 9 0 6.
Structure of Hotel menu:
1. Hotel Mode – on/off hotel mode
2. Source Lock – you can lock any source
3. Default Source – source which appears after turn on TV
4. Default Prog – channel which appears after turn on TV
5. DTV channel type – type of channel which appears after turn on TV
6. Default volume – volume which will be set itself after turn on TV
7. Max volume – maximum volume which can be set
8. Import Database – import all channels and settings from USB
9. Export Database – export all channels and setting to USB
10. Clear Lock – reset all hotel mode settings.