REPAIRING AND NOT THROWING AWAY

Richtige Fernseher haben Röhren!

Richtige Fernseher haben Röhren!

In Brief: On this site you will find pictures and technical information about Service Modes, Circuit Diagrams, Firmware Update procedure, Disassemble procedure, Universal remote control set-up codes, Troubleshooting and more....

If you go into the profession, you will obtain or have access to a variety of tech tips databases HERE IT IS Master Electronics Repair !.

These are an excellent investment where the saying: 'time-is-money' rules. However, to learn, you need to develop a general troubleshooting approach - a logical, methodical, method of narrowing down the problem. A tech tip database might suggest: 'Replace C536' for a particular symptom. This is good advice for a specific problem on one model. However, what you really want to understand is why C536 was the cause and how to pinpoint the culprit in general even if you don't have a service manual or schematic and your tech tip database doesn't have an entry for your sick TV or VCR.

While schematics are nice, you won't always have them or be able to justify the purchase for a one-of repair. Therefore, in many cases, some reverse engineering will be necessary. The time will be well spent since even if you don't see another instance of the same model in your entire lifetime, you will have learned something in the process that can be applied to other equipment problems.
As always, when you get stuck, checking out a tech-tips database may quickly identify your problem and solution.In that case, you can greatly simplify your troubleshooting or at least confirm a diagnosis before ordering parts.

Happy repairing!
Today, the West is headed for the abyss. For the ultimate fate of our disposable society is for that society itself to be disposed of. And this will happen sooner, rather than later.

How to use the site:

- If you landed here via any Search Engine, you will get what you searched for and you can search more using the search this blog feature provided by Google. You can visit more posts scrolling the left blog archive of all posts of the month/year,
or you can click on the main photo-page to start from the main page. Doing so it starts from the most recent post to the older post simple clicking on the Older Post button on the bottom of each page after reading , post after post.

You can even visit all posts, time to time, when reaching the bottom end of each page and click on the Older Post button.

- If you arrived here at the main page via bookmark you can visit all the site scrolling the left blog archive of all posts of the month/year pointing were you want , or more simple You can even visit all blog posts, from newer to older, clicking at the end of each bottom page on the Older Post button.
So you can see all the blog/site content surfing all pages in it.

- The search this blog feature provided by Google is a real search engine. If you're pointing particular things it will search IT for you; or you can place a brand name in the search query at your choice and visit all results page by page. It's useful since the content of the site is very large.

Note that if you don't find what you searched for, try it after a period of time; the site is a never ending job !

..............The bitterness of poor quality is remembered long after the sweetness of todays funny gadgets low price has faded from memory........ . . . . . .....
Don't forget the past, the end of the world is upon us! Pretty soon it will all turn to dust!

©2010, 2011, 2012, 2013, 2014 Frank Sharp - You do not have permission to copy photos and words from this blog, and any content may be never used it for auctions or commercial purposes, however feel free to post anything you see here with a courtesy link back, btw a link to the original post here , is mandatory.
All posts are presented here for informative, historical and educative purposes as applicable within fair use. NOTHING HERE IS FOR SALE !

Wednesday 2 December 2020

PHILIPS HTD5570 – HOME THEATRE DVD PLAYER DISASSEMBLE, SMPS AND AMPLIFIER ELECTRIC CIRCUIT DIAGRAM, CONNECTOR PIN VOLTAGE DETAILS TROUBLESHOOTING, SOFTWARE UPGRADE PROCEDURE


Safety regulations require that during a repair:
Connect the unit to the mains via an isolation transformer.
Replace safety components indicated by the symbol , only by components identical to the original ones. Any other component substitution (other than original type) may increase risk of fire or electrical shock hazard.


Be careful during measurements in the live voltage section. The primary side of the power supply , including the heat sink, carries live mains voltage when you connect the player to the mains (even when the player is “off”!). It is possible to touch copper tracks and/or components in this unshielded primary area, when you service the player. Service personnel must take precautions to prevent touching this area or components in this area.

A “lighting stroke” and a stripe-marked printing on the printed wiring board, indicate the primary side of the power supply.

This unit employs a laser. Only qualified service personnel may remove the cover, or attempt to service this device (due to possible eye injury).

Note: Never replace modules, or components, while the unit is “on”

Centre speaker:

Output power: 166 W RMS (30% THD)

Speaker impedance: 4 ohm
Speaker drivers: 1 x 78 mm (3") full range
Dimensions (WxHxD): 223 x 100 x 80 mm
 Weight: 0.65 kg

Front/Rear speaker:
Output power: 4 x 166 W RMS (30% THD)
Speaker impedance: 4 ohm
Speaker drivers: 1 x 78 mm (3") full range
Dimensions (WxHxD):
HTD5510: 90 x 185 x 82 mm (front/ rear)

Subwoofer
Output power: 166 W RMS (30% THD)
Impedance: 4 ohm
Speaker drivers: 165 mm (6.5") woofer
Dimensions (WxHxD): 178 x 300 x 343 mm
Weight: 3.66 kg
Cable length: 3.3 m

Procedure of replacing the defective loader.

Solder the ESD protection point.

Put a paper clip on the flex foil to short circuit the contacts [see the fig]

Replace the defective loader with new loader

Remove paper clip from the flex foil and connect it to the new loader

Remove solder joint on ESD protection point

[The laser diode of this loader is protected against ESD by a solder  a point short-circuits the laser diode to ground.  For proper functionality of the loader this solder joint must be removed after connecting loader to the set.

Dismantling

Open the top cover. Remove 2 screws on both sides and 4 screws on back panel, then open the cover.

Dismantle the loader. Open the tray, dismantle the CD door, remove 2 screws beside the loader. disconnect connectors(XP100,XP135,XP136),then pull up the loader.

Dismantle the main board. Disconnect connectors(XP221,XP82,XS751),remove 2 screws on the board and 6 screws on back panel.

Dismantle the power board. Remove 4 screws on the board.


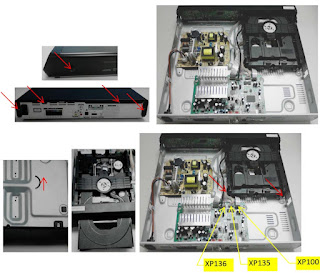
Dismantle the front panel and the front control board. Loosen the 2 buckles on both sides and 2 buckles under bottom cover, then remove 5 screws on the front control board.

Software Upgrade

There are 2 ways to software upgrade:
First:
Upgrade from USB:
Copy the upgrade file HTD5510_X X.BIN to USB then press the USB key on RC or SOURCE key on front panel.
When upgrade file detected, select "Yes" to upgrade, select "Cancel" to cancel.
After upgrading begins, a message “DO NOT POWER OFF” will show, or the product will hang up and upgrading failed.

Second:
Upgrade from Disc:
Copy the upgrade file HTD5510_X X.BIN to disc then read the disc.
When upgrade file detected, select "Yes" to upgrade, select “Cancel “to cancel.
After upgrading begins, a message “DO NOT POWER OFF” will show, or the product will hang up and upgrading failed.
2. Check the version information after upgraded.
Press the setup key on RC , select Preference Setup, and then Version info , press OK Key you will see a interface below:

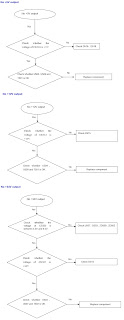
Troubleshooting chart


Power board schematic


Amplifier board circuit diagram TAS 5342 and TAS 5252

CONNECTOR PIN VOLTAGES