HP Notebook PC - HP Stream Notebook – Disassembling procedure – how to remove the key board - how to remove the built in battery – How to remove and replace the touchpad – Laptop repair and service

Category: Laptop Repair and Service
Contents of this article
- How to remove the Top cover and key board
- How to remove the built in battery
- How to remove the power button and touch pad
HP Stream Notebook
DISASSEMBLING PROCEDURE
How to remove Keyboard/top cover
Before removing the disassembling the computer, follow
these steps:
1. Turn off the computer. If you are unsure whether the computer is off or in Hibernation, turn the computer on, and then shut it down through the operating system.
2. Disconnect the power from the computer by unplugging the power cord from the computer.
3. Disconnect all external devices from the computer.
Remove the keyboard/top cover:
1. Close the computer.
2. Turn the computer upside down with the front toward you.
3. Remove the two rear rubber feet (1).
1. Close the computer.
2. Turn the computer upside down with the front toward you.
3. Remove the two rear rubber feet (1).
4. Remove the two rubber screw
covers (2).

5. Remove the eleven Phillips
PM1.9×5.6 screws that secure the keyboard/top cover to the base enclosure.

6. Turn the computer right side
up with the front toward you.
7. Open the computer as far as it will open.
8. Lift the front edge (1) of the keyboard/top cover until it separates from the front edge of the base enclosure.
9. Swing the keyboard/top cover (2) up and back until the power button board cable, TouchPad cable, battery cable, and keyboard cable are accessible.
10. Disconnect the battery cable (3) from the system board.
11. Release the zero insertion
force (ZIF) connector (4) to which the keyboard cable is attached, and
then disconnect the keyboard cable from the system board.
12. Release the ZIF connector (5) to which the power button board cable is attached, and then disconnect the power button board cable from the system board.
13. Release the ZIF connector (6) to which the TouchPad cable is attached, and then disconnect the TouchPad cable from the system board.
14. Remove the keyboard/top cover (7) by sliding it up and forward at an angle.

The following illustration shows the replacement thermal
material locations on the system board (1) and the heat sink (2).

How to remove TouchPad
Before removing the TouchPad, follow these steps:
1. Turn off the computer. If you are unsure whether the computer is off or in Hibernation, turn the computer on, and then shut it down through the operating system.
2. Disconnect the power from the computer by unplugging the power cord from the computer.
3. Disconnect all external devices from the computer.
4. Remove the keyboard/top cover).
Remove the TouchPad:
1. Turn the keyboard/top cover upside down with the front toward you.
2. Detach the TouchPad cable (1) from the keyboard/top cover. (The TouchPad cable is attached to the keyboard/top cover with double-sided adhesive.)
3. Remove the two Phillips PM1.9×2.0 broad head screws (2) that secure the TouchPad to the keyboard/top cover.
4. Release the TouchPad (3) by pressing it through the opening in the keyboard/top cover.
5. Remove the TouchPad (4) and cable.

How to remove Heat sink
Before removing the heat sink, follow these steps:
1. Turn off the computer. If you are unsure whether the computer is off or in Hibernation, turn the computer on, and then shut it down through the operating system.
2. Disconnect the power from the computer by unplugging the power cord from the computer.
3. Disconnect all external devices from the computer.
4. Remove the keyboard/top cover.
Remove the heat sink:
1. Turn the keyboard/top cover upside down with the front toward you.
2. Following the 1, 2, 3, 4 sequence etched into the heat sink, remove the four Phillips PM1.9×2.4 screws (1) that secure the heat sink to the system board.
3. Remove the heat sink (2).

How to remove Power button board
Before removing the power button board, follow these
steps:
1. Turn off the computer. If you are unsure whether the computer is off or in Hibernation, turn the computer on, and then shut it down through the operating system.
2. Disconnect the power from the computer by unplugging the power cord from the computer.
3. Disconnect all external devices from the computer.
4. Remove the keyboard/top cover
Remove the power button board:
1. Turn the keyboard/top cover upside down with the front toward you.
2. Detach the power button board cable (1) from the keyboard/top cover. (The power button board cable is attached to the keyboard/top cover with double-sided adhesive.)
3. Release the shielding (2) that covers the power button board.
4. Remove the two Phillips PM1.9×2.9 screws (3) that secure the power button board to the keyboard/ top cover.
5. Remove the power button board (4).

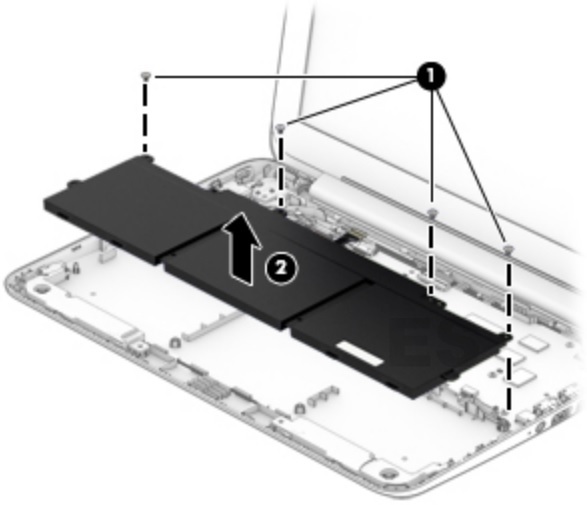
How to remove Battery
Before removing the battery, follow these steps:
1. Turn off the computer. If you are unsure whether the computer is off or in Hibernation, turn the computer on, and then shut it down through the operating system.
2. Disconnect the power from the computer by unplugging the power cord from the computer.
3. Disconnect all external devices from the computer.
4. Remove the keyboard/top cover
Remove the battery:
1. Remove the four Phillips PM1.9×3.3 screws (1) that secure the battery to the base enclosure.
2. Remove the battery (2)