REPAIRING AND NOT THROWING AWAY

Richtige Fernseher haben Röhren!

Richtige Fernseher haben Röhren!

In Brief: On this site you will find pictures and technical information about Service Modes, Circuit Diagrams, Firmware Update procedure, Disassemble procedure, Universal remote control set-up codes, Troubleshooting and more....

If you go into the profession, you will obtain or have access to a variety of tech tips databases HERE IT IS Master Electronics Repair !.

These are an excellent investment where the saying: 'time-is-money' rules. However, to learn, you need to develop a general troubleshooting approach - a logical, methodical, method of narrowing down the problem. A tech tip database might suggest: 'Replace C536' for a particular symptom. This is good advice for a specific problem on one model. However, what you really want to understand is why C536 was the cause and how to pinpoint the culprit in general even if you don't have a service manual or schematic and your tech tip database doesn't have an entry for your sick TV or VCR.

While schematics are nice, you won't always have them or be able to justify the purchase for a one-of repair. Therefore, in many cases, some reverse engineering will be necessary. The time will be well spent since even if you don't see another instance of the same model in your entire lifetime, you will have learned something in the process that can be applied to other equipment problems.
As always, when you get stuck, checking out a tech-tips database may quickly identify your problem and solution.In that case, you can greatly simplify your troubleshooting or at least confirm a diagnosis before ordering parts.

Happy repairing!
Today, the West is headed for the abyss. For the ultimate fate of our disposable society is for that society itself to be disposed of. And this will happen sooner, rather than later.

How to use the site:

- If you landed here via any Search Engine, you will get what you searched for and you can search more using the search this blog feature provided by Google. You can visit more posts scrolling the left blog archive of all posts of the month/year,
or you can click on the main photo-page to start from the main page. Doing so it starts from the most recent post to the older post simple clicking on the Older Post button on the bottom of each page after reading , post after post.

You can even visit all posts, time to time, when reaching the bottom end of each page and click on the Older Post button.

- If you arrived here at the main page via bookmark you can visit all the site scrolling the left blog archive of all posts of the month/year pointing were you want , or more simple You can even visit all blog posts, from newer to older, clicking at the end of each bottom page on the Older Post button.
So you can see all the blog/site content surfing all pages in it.

- The search this blog feature provided by Google is a real search engine. If you're pointing particular things it will search IT for you; or you can place a brand name in the search query at your choice and visit all results page by page. It's useful since the content of the site is very large.

Note that if you don't find what you searched for, try it after a period of time; the site is a never ending job !

..............The bitterness of poor quality is remembered long after the sweetness of todays funny gadgets low price has faded from memory........ . . . . . .....
Don't forget the past, the end of the world is upon us! Pretty soon it will all turn to dust!

©2010, 2011, 2012, 2013, 2014 Frank Sharp - You do not have permission to copy photos and words from this blog, and any content may be never used it for auctions or commercial purposes, however feel free to post anything you see here with a courtesy link back, btw a link to the original post here , is mandatory.
All posts are presented here for informative, historical and educative purposes as applicable within fair use. NOTHING HERE IS FOR SALE !

Wednesday 20 March 2019

JBL MS-8 - 8 CHANNEL SYSTEM INTEGRATION DIGITAL PROCESSOR - SCHEMATICS - CONFIGURATION - CONNECTIONS - UPGRADING - RESETTING

JBL MS-8 - 8 CHANNEL SYSTEM INTEGRATION DIGITAL PROCESSOR - SCHEMATICS - CONFIGURATION - CONNECTIONS - UPGRADING - RESETTING

AUDIO OUTPUT CONFIGURATIONS 
  • Can configure the MS-8’s eight outputs in a variety of ways, depending on the speakers that are installed in your vehicle. You can configure the MS-8 for a system with one-way (full-range), two-way or three-way front speakers, a one-way or two-way center speaker, side speakers, rear speakers and one or two subwoofers. Remember, however, that the total number of available channels is eight, so any combination of front, center, side, rear and subwoofer channels cannot total more than eight. For example, if you are allocating six channels for a pair of triamped, three-way front speakers, there will be only two remaining channels, which will not accommodate a pair of rear speakers and a subwoofer.
  • If your system will include more than eight channels, use additional separate amplifiers (connected to the MS-8’s line outputs) for the additional channels. For example, if you want to build a 7.1-channel system that includes bi-amped or tri-amped front speakers, use the MS-8 to generate the 7.1-channel outputs (seven full-range and one subwoofer). Connect the MS-8’s front line outputs to the inputs of an additional crossover (or amplifier containing an additional crossover) that will provide the separate channels required to drive the front midbass, midrange and/or tweeters separately.
Use the Configuration Chart below to record which of your system’s speakers you have connected to which of the MS-8’s outputs. Keeping this record will simplify channel assignment during the setup procedure.
CONNECTIONS [SPEAKER OUTPUTS]
  • If you’ll use the MS-8’s built-in power amplifiers to drive your system’s speakers, connect the speakers to the MS-8’s speaker outputs. Insert the included speaker-output wiring harness into the MS-8’s speaker output until it locks into place.
IMPORTANT: The MS-8’s speaker-output wiring harness’s wires have clear insulation. Each channel has a copper (positive or “+”) conductor and a silver (negative or “–”) conductor. We have labeled each conductor with its channel number and polarity, and pre-stripped it for easy connection to your system’s speakers. Make sure that the ( + ) and ( – ) wires do not touch each other. Touching wires can cause a short circuit that can damage the MS-8.
  • To ensure proper polarity, connect each MS-8 positive (+) terminal to the respective “+” terminal on the speaker. Connect the negative (–) terminals in a similar way.
NOTE: You can power some of the system's speakers by the MS-8's amplifiers and some by outboard amplifiers, but you should use only one connection type per output. For example, output channel 1 may use the MS-8's amplifer OR an outboard amplifier, but not both. Be sure to use the chart above to note which speakers are connected to which MS-8 channels.
LINE OUTPUTS
  • If you’ll be using additional outboard power amplifiers to drive your system’s speakers, connect their inputs to the MS-8’s line-output connectors. You can power some of the system’s speakers by the MS-8’s amplifiers and some by outboard amplifiers, but you should use only one connection type per output. For example, Output Channel 1 may use the MS-8’s amplifier OR an outboard amplifier, but not both. Be sure to use the chart above to note which speakers you have connected to which of the MS-8’s channels.
DISPLAY CONNECTIONS
  • Use the included 6m (19.7 ft) cable to connect the display unit to the MS-8’s main unit’s display connection. Insert the cable’s straight connector into the main unit and the right-angle connector into the display.
NOTE: The display unit must be connected during setup but may be disconnected after setup and after you’ve made any additional adjustments in the Audio Controls menu.  If the display unit is disconnected after setup and final adjustment, you will not be able to make any additional MS-8 adjustments, and the remote control will not function.
MICROPHONE
  • The included binaural microphone headset must be connected to the MS-8’s Mic connection during the calibration/setup process. Once setup is complete, unplug the microphone headset and store it in a safe place. 
IMPORTANT: Do not use any other microphone with the MS-8.
UPGRADE
  • Use the Update port only for firmware upgrades. We have covered it with a sticker that you should leave in place until you are ready to install a firmware upgrade that you will download from JBL website.
  • After downloading a firmware upgrade into your PC, remove the sticker and connect the Update port to a USB port on your PC. Follow the directions that accompany the upgraded firmware to upload the new firmware from your PC to the MS-8.
MICROPROCESSOR RESET
  • If the MS-8 stops responding to the remote control (even after you’ve replaced the remote’s battery) or fails to operate in the way this manual describes, use a pen or similar pointed object to press the Reset button on the main unit
  •  Pressing this Reset button will NOT erase the calibration settings.
To erase all settings and set the unit back to factory defaults, this should be done in the system menu.
SCHEMATICS
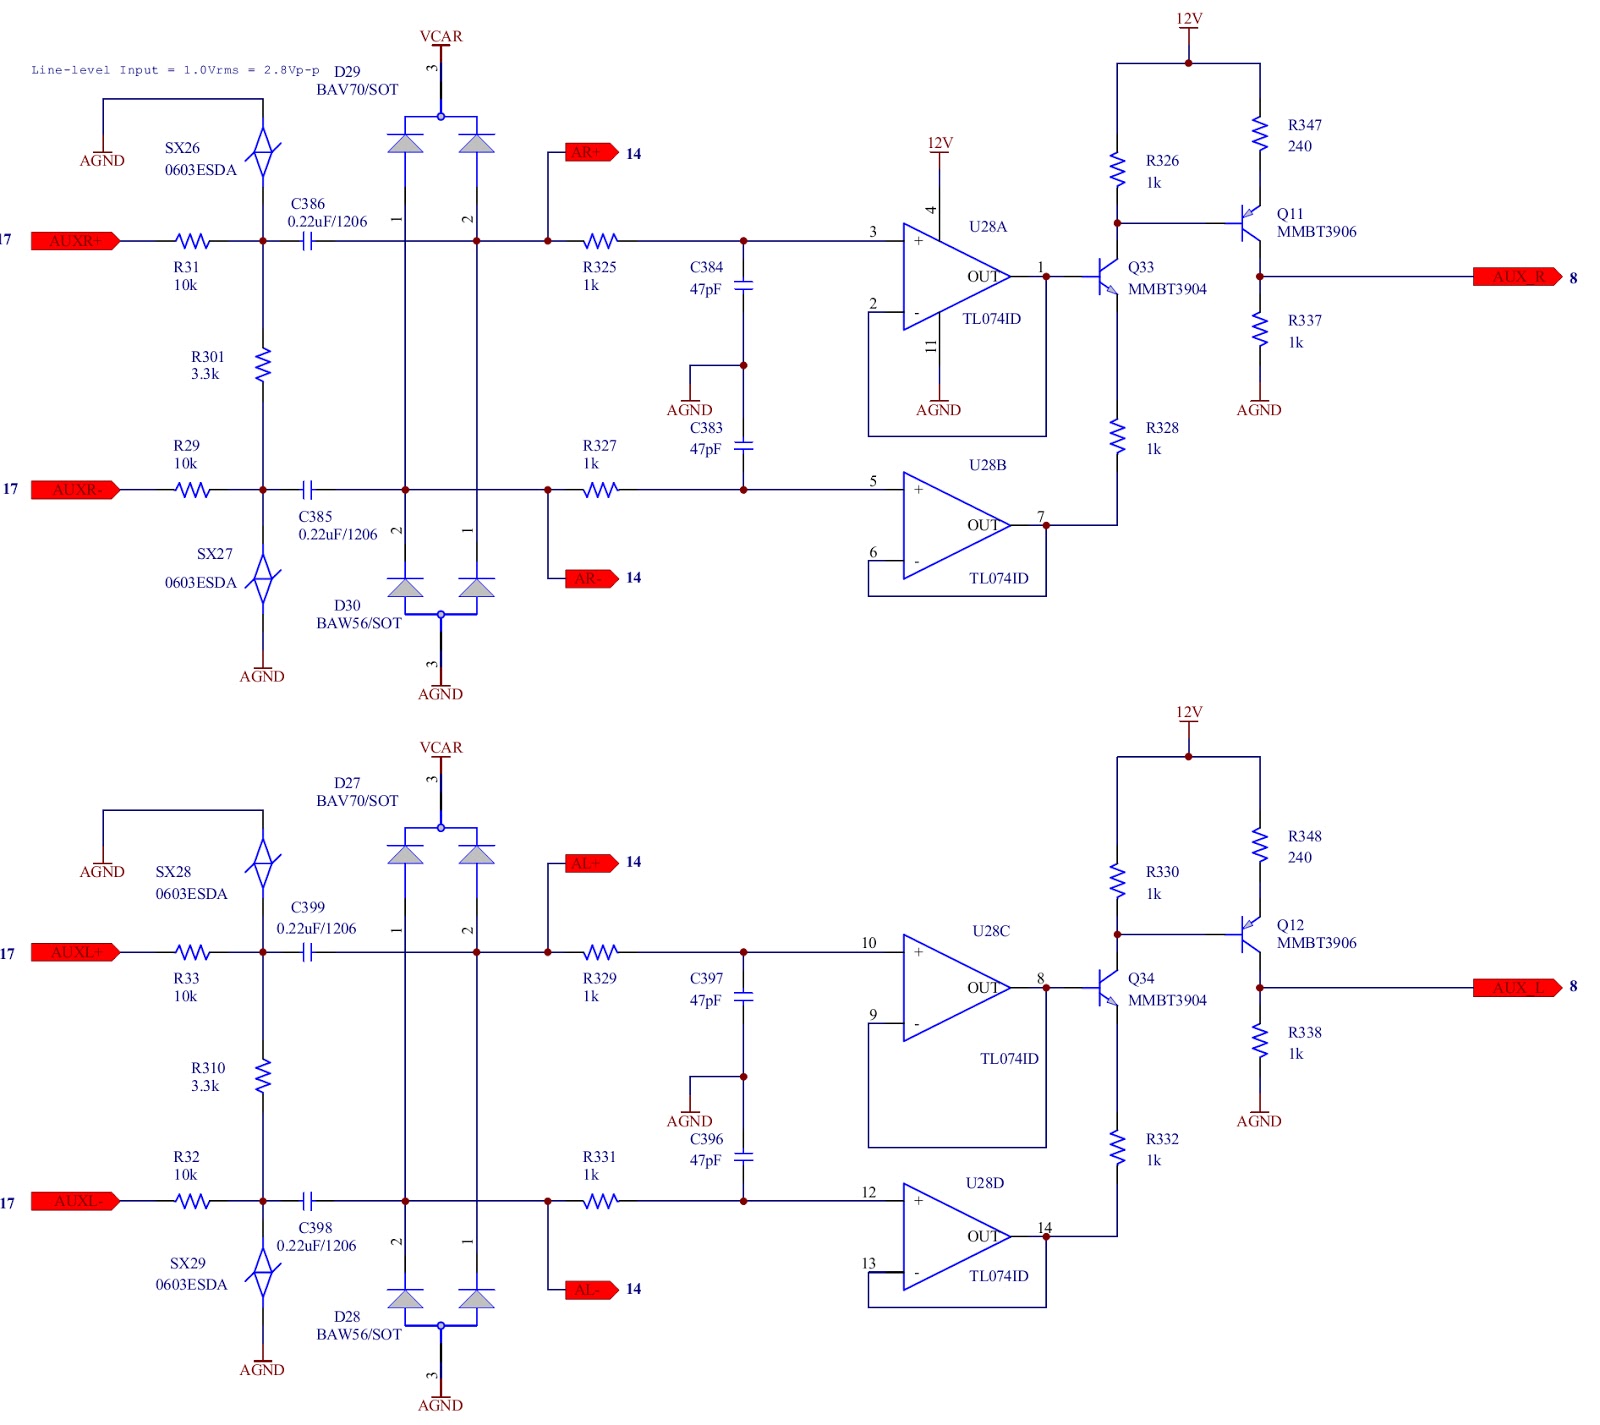
{Click on images to Enlarge}