 JVC LT-37X688 SERVICE MODE AND POWER SUPPLY CIRCUIT

JVC LT-37X688
SERVICE MODE AND POWER SUPPLY CIRCUIT
SPECIFIC SERVICE INSTRUCTIONS
Be sure to carry out the following operation
at the end of the procedure.
(1) Set to "0 minutes" using the
[SLEEP] key.
(2) While "0 minutes" is displayed, press the [VIDEO] key and [DISPLAY] key simultaneously, then enter the SERVICE MODE.
(3) Press the [1] key in the SERVICE MODE SCREEN.
(4) Press the [2] key in the TV-MICRO SERVICE MODE screen
(5) The SELF CHECK MODE screen is displayed.
(6) Turn off the power by pressing the [POWER] key on the remote control unit.
FEATURES
Built in ATSC (Advanced Television Systems Committee)
TUNER
This TV can receive both Digital broadcasting (ATSC) and Analog broadcasting.
D.I.S.T. (Digital Image Scaling Technology)
This system uses line interpolation to double the number of scanning lines and achieve high resolution, flicker-free picture. Color Management
This function ensures dull colors are compensated to produce natural hues.
Picture Management
This function makes it easier to see the dark areas when a picture has many dark areas, and makes it easier to see the bright areas when a picture has many bright areas. Smart Picture This function detects the APL (Average Picture Level) and adjusts the contrast suitable for what you are watching.
DIGITAL VNR
This function cuts down the amount of noise in the original picture.
MPEG Noise Reduction
This function effects the block noise removal and mosquito NR simultaneously.
Sensor Effect
With Sensor Effect ON, a "leaf" icon will appear on your TV screen when Smart Sensor brightness adjustment occurs.
MEMORY IC REPLACEMENT
• This model uses the memory IC.
• This memory IC stores data for proper operation of the video and drive circuits.
• When replacing, be sure to use an IC containing this (initial value) data.
• This model uses the memory IC.
• This memory IC stores data for proper operation of the video and drive circuits.
• When replacing, be sure to use an IC containing this (initial value) data.
MEMORY IC REPLACEMENT PROCEDURE
1. Power off
Switch off the power and disconnect the power plug.
2. Replace the memory IC
Be sure to use a memory IC written with the initial setting data.
3. Power on
Connect the power cord to the wall outlet and switch on the power.
4. Receiving channel setting
Refer to the OPERATING INSTRUCTIONS (USER'S GUIDE) and set the receive channels (Channels Preset) as described.
5. User settings
Check the user setting items according to the "FACTORY
SETTING ITEM".
Where these do not agree, refer to the OPERATING INSTRUCTIONS (USER'S GUIDE) and set the items as described.
6. SERVICE MODE setting
Verify what to set in the SERVICE MODE, and set whatever is necessary.
ADJUSTMENT PREPARATION
(1) This TV is adjusted by using REMOTE CONTROL UNIT.
(2) The adjustment using the REMOTE CONTROL UNIT is made on the basis of the initial setting values. The setting values which adjust the screen to the optimum condition can be different from the initial setting values.
(3) Make sure that connection is correctly made AC to AC power source.
(4) Turn on the power of the TV and measuring instruments for warming up for at least 30 minutes before starting adjustments.
(5) If the receive or input signal is not specified, use the most appropriate signal for adjustment.
(6) Never touch the parts (such as variable resistors, transformers and condensers) not shown in the adjustment items of this service adjustment.
SERVICE MODE
BASIC OPERATION OF SERVICE MODE
Operate the SERVICE MODE with the REMOTE CONTROL UNIT.
HOW TO ENTER THE SERVICE MODE
(1) Set to "0 minutes" using the [SLEEP] key.
(2) While "0 minutes" is displayed, press the [VIDEO STATUS] key and [DISPLAY] key simultaneously.
(3) Enter the SERVICE MODE.
BASIC OPERATION OF SERVICE MODE
Operate the SERVICE MODE with the REMOTE CONTROL UNIT.
HOW TO ENTER THE SERVICE MODE
(1) Set to "0 minutes" using the [SLEEP] key.
(2) While "0 minutes" is displayed, press the [VIDEO STATUS] key and [DISPLAY] key simultaneously.
(3) Enter the SERVICE MODE.
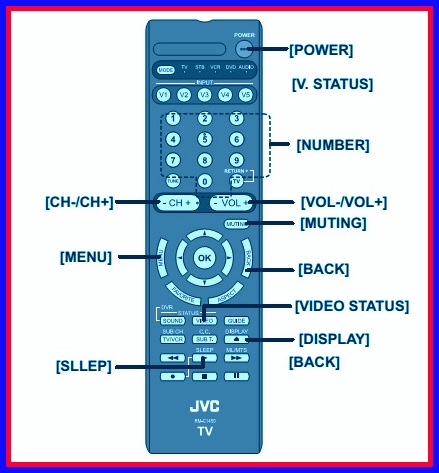
SERVICE MODE SELECT KEY LOCATION
HOW TO EXIT THE SERVICE MODE
Press the [MENU] key to exit the SERVICE MODE.
HOW TO STORE OF SETTING VALUE
When adjustment is completed, press the [MUTING] key to memorize the adjustment value.
NOTE: If not to do it, adjustment data is not memorized to the memory IC. And if exit the adjustment mode before memorize the data, the adjustment value which you change is canceled.
WHITE BALANCE (HIGHLIGHT)
(1) Receive a NTSC 75% all white signal.
(2) Set "VIDEO STATUS" to "STANDARD".
(3) Set "ASPECT" to "FULL".
(4) Select "COLOR TEMPERATURE" to "LOW".
(5) Select the 1.TV-Micro Service from the SERVICE MODE.
(6) Select the 1.Adjust.
(7) Adjust to keep one of <S002> (Red drive), <S003> (Green drive) or <S004> (Blue drive) unchanged, then lower the other two so that the all-white screen is equally white throughout.
NOTE: Set one or more of <S002>, <S003> and <S004> to "137".
(8) Check that white balance is properly tracked from low light to high light. If the white balance tracking is deviated, adjust to correct it.
(9) Press the [MUTING] key to memorize the set value.
SELF CHECK FEATURE
OUTLINE
This unit comes with the "Self check" feature, which checks the operational state of the circuit and displays/saves it during failure.Diagnosis is performed when power is turned on, and information input to the main microcomputer is monitored at all time. Diagnosis is displayed in 2 ways via screen display and LED flashes. Failure detection is based on input state of I2C bus and the various control lines connected to the main microcomputer.
This unit comes with the "Self check" feature, which checks the operational state of the circuit and displays/saves it during failure.Diagnosis is performed when power is turned on, and information input to the main microcomputer is monitored at all time. Diagnosis is displayed in 2 ways via screen display and LED flashes. Failure detection is based on input state of I2C bus and the various control lines connected to the main microcomputer.
HOW TO ENTER THE SELF CHECK MODE
Before entering the Self check Display mode, confirm that the setting of MODE SW of the REMOTE CONTROL UNIT is at the "TV" side. If the switches have not been properly set, you cannot enter the Self check Display mode.
Before entering the Self check Display mode, confirm that the setting of MODE SW of the REMOTE CONTROL UNIT is at the "TV" side. If the switches have not been properly set, you cannot enter the Self check Display mode.
<SELF CHECK MODE(TV-MICRO)>
(1) Set to "0 minutes" using the [SLEEP] key.
(2) Press the [VIDEO STATUS] key and [DISPLAY] key simultaneously, then enter the SERVICE MODE.
(3) Press the [1] key in the TV-MICRO SERVICE MODE.
(4) Press the [2] key in the SELF CHECK MODE(TV-MICRO).
(1) Set to "0 minutes" using the [SLEEP] key.
(2) Press the [VIDEO STATUS] key and [DISPLAY] key simultaneously, then enter the SERVICE MODE.
(3) Press the [1] key in the TV-MICRO SERVICE MODE.
(4) Press the [2] key in the SELF CHECK MODE(TV-MICRO).
<SELF CHECK MODE(DIGITAL)>
(1) Set to "0 minutes" using the [SLEEP] key.
(2) Press the [VIDEO STATUS] key and [DISPLAY] key simultaneously, then enter the service mode.
(3) Press the [3] key in the DIAGNOSTICS MODE.
(4) Press the [2] key in the SELF CHECK MODE(DIGITAL).
(1) Set to "0 minutes" using the [SLEEP] key.
(2) Press the [VIDEO STATUS] key and [DISPLAY] key simultaneously, then enter the service mode.
(3) Press the [3] key in the DIAGNOSTICS MODE.
(4) Press the [2] key in the SELF CHECK MODE(DIGITAL).
HOW TO EXIT THE SELF CHECK MODE
TO SAVE FAILURE HISTORY:
Turn off the power by unplugging the AC power cord plug when in the Self check display mode.
TO CLEAR (RESET) FAILURE HISTORY: Turn off the power by pressing the [POWER] key on the remote control unit when in the Self check display mode.
FAILURE HISTORY
Failure history can be counted up to 9 times for each item. When the number exceeds 9, display will remain as 9. Failure history will be stored in the memory unless it has been deleted.
NOTE: Only SYNC (with/without sync signals) will be neither counted nor stored.
POINTS TO NOTE WHEN USING THE SELF CHECK FEATURE
In addition to circuit failures (abnormal operation), the following cases may also be diagnosed as "Abnormal" and counted.
(1) Temporary defective transmissions across circuits due to pulse interruptions.
(2) Misalignment in the on/off timing of power for I2C bus (Vcc) when turning on/off the main power. Therefore, turn on the main power, and then wait for about 3 seconds before starting Self check. If recurrences are expected, ensure to clear (reset) the failure history and record the new diagnosis results.
POWER SUPPLY CIRCUIT


CLICK ON THE IMAGE TO ZOOM IN