REPAIRING AND NOT THROWING AWAY

Richtige Fernseher haben Röhren!

Richtige Fernseher haben Röhren!

In Brief: On this site you will find pictures and technical information about Service Modes, Circuit Diagrams, Firmware Update procedure, Disassemble procedure, Universal remote control set-up codes, Troubleshooting and more....

If you go into the profession, you will obtain or have access to a variety of tech tips databases HERE IT IS Master Electronics Repair !.

These are an excellent investment where the saying: 'time-is-money' rules. However, to learn, you need to develop a general troubleshooting approach - a logical, methodical, method of narrowing down the problem. A tech tip database might suggest: 'Replace C536' for a particular symptom. This is good advice for a specific problem on one model. However, what you really want to understand is why C536 was the cause and how to pinpoint the culprit in general even if you don't have a service manual or schematic and your tech tip database doesn't have an entry for your sick TV or VCR.

While schematics are nice, you won't always have them or be able to justify the purchase for a one-of repair. Therefore, in many cases, some reverse engineering will be necessary. The time will be well spent since even if you don't see another instance of the same model in your entire lifetime, you will have learned something in the process that can be applied to other equipment problems.
As always, when you get stuck, checking out a tech-tips database may quickly identify your problem and solution.In that case, you can greatly simplify your troubleshooting or at least confirm a diagnosis before ordering parts.

Happy repairing!
Today, the West is headed for the abyss. For the ultimate fate of our disposable society is for that society itself to be disposed of. And this will happen sooner, rather than later.

How to use the site:

- If you landed here via any Search Engine, you will get what you searched for and you can search more using the search this blog feature provided by Google. You can visit more posts scrolling the left blog archive of all posts of the month/year,
or you can click on the main photo-page to start from the main page. Doing so it starts from the most recent post to the older post simple clicking on the Older Post button on the bottom of each page after reading , post after post.

You can even visit all posts, time to time, when reaching the bottom end of each page and click on the Older Post button.

- If you arrived here at the main page via bookmark you can visit all the site scrolling the left blog archive of all posts of the month/year pointing were you want , or more simple You can even visit all blog posts, from newer to older, clicking at the end of each bottom page on the Older Post button.
So you can see all the blog/site content surfing all pages in it.

- The search this blog feature provided by Google is a real search engine. If you're pointing particular things it will search IT for you; or you can place a brand name in the search query at your choice and visit all results page by page. It's useful since the content of the site is very large.

Note that if you don't find what you searched for, try it after a period of time; the site is a never ending job !

..............The bitterness of poor quality is remembered long after the sweetness of todays funny gadgets low price has faded from memory........ . . . . . .....
Don't forget the past, the end of the world is upon us! Pretty soon it will all turn to dust!

©2010, 2011, 2012, 2013, 2014 Frank Sharp - You do not have permission to copy photos and words from this blog, and any content may be never used it for auctions or commercial purposes, however feel free to post anything you see here with a courtesy link back, btw a link to the original post here , is mandatory.
All posts are presented here for informative, historical and educative purposes as applicable within fair use. NOTHING HERE IS FOR SALE !

Wednesday 27 March 2019

SHIVAKI STV-20L6 - STV-19L6 - STV-LM18 - _ LCD TV_ SERVICE MODE _ PCB DETAILS _ FIRMWARE UPGRADE PROCEDURE

SHIVAKI STV-20L6 - STV-19L6 - STV-LM18 -  _ LCD TV_ SERVICE MODE _ PCB DETAILS _ FIRMWARE UPGRADE PROCEDURE


PCB DETAILS
  • L2M18 is a control board of Color Active Matrix Liquid Crystal Display, It is designed to be applied to LVDS (Low Voltage Differential Signaling) as the interface method to enable a simple  and low-cost implementation in both board and panel.  L2M18 is intended to support YPbPr&HDMI input and up to 1920x1080 FHD panel.  L2M18 also provides other very important functions, It supports PAL or SECAM color TV system for Europe.  Moreover. it can achieve Analog RGB input signal up to SXGA 1024 vertical /1280 horizontal pixel resolution. it also supports DVD(Option)/YPbPr /HDMI input.  L2M18 includes an audio amplifier which can support 2×3W(or 2x5W) audio power output. it supports NICAM/A2 stereo input and selects audio channels according to the input signal detection. OSD pictures are smooth and manual operating is very simple.
                                       L2M18 with 9E19/9U19 chipset; LCD TV control board.

CONNECTION PIN DETAIL


No
Description
No
Description

1
HDMI input
9
Speaker jack
2
DC input
10
DTV FPC interface
3
SCART
11
LVDS interface
4
PC audio output
12
Key jack
5
VGA input
13
DVD power supply jack
6
YPbPr input
14
IR jack
7
Headphone output
15
Inverter jack
9
RF input
16
DVD YpbPr jack.


Supported OSD language:
  • Arabian/Spanish/Portuguese/Swedish/German/French/Russian/Italian/Danish/Finnish/Greek/Norwegian/Dutch/Polish/Turkish/Lithuanian/Serbian/Chinese/Romanian/Blugarian/Lettish/Estonian Hungarian/Slovenian/Slovakian/Czech
  • L2M18 chassis only can support 8 countries OSD language caused by the flash rom size limitation. Please indicate which OSD language you needed when you place purchase order.
SOFTWARE UPGRADE PROCEDURE
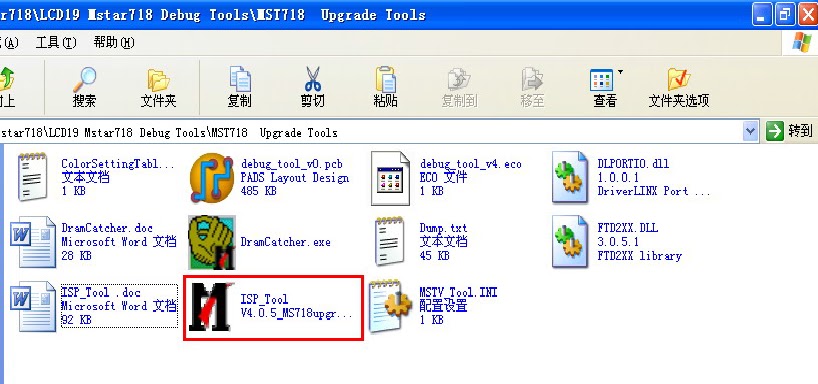
  • Open 'Update Tools' - Mstar ISP utility.
  • Click “Device” button and double click select correctly type (For MST9E19 chassis select Pm25LV040 normally)
  • Click “Config” button and click “Auto Detect” button confirm that the PC and ISP tool connect properly. adjust the LPT port speed to 138K,in order to speed up update process.
  • Click “Read” button then select the binary file of firmware.
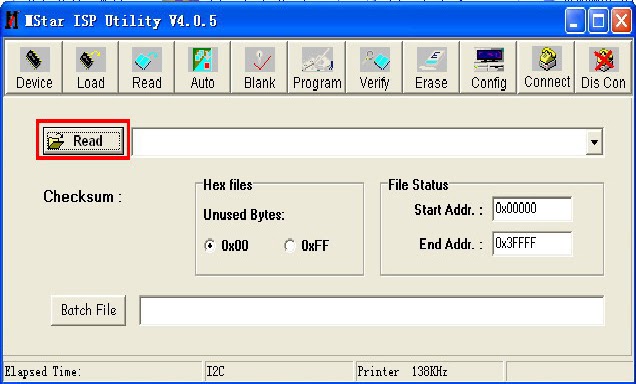
  • Click “Auto” button and remove the marker of “Blank” and “Verify” items. then click “Run”, after several seconds the update process will be finish.

SERVICE MODE DETAILS
  • Press “green” button on the remote control, the sound menu will be appear on the picture, then press and hold “OK” 3s,the service menu will be display on the picture.


Color Temp: select a color temperature mode that you want to adjust;
  • R Gain: red gain for white balance adjusting;
  • G Gain: green gain for white balance adjusting;
  • B Gain: blue gain for white balance adjusting;
  • R Offset: red offset for white balance adjusting ;
  • G Gain: green offset for white balance adjusting;
  • B Gain: blue offset for white balance adjusting;
  • Aging: to turn on or off aging mode, optional setting: On Off;
  • Auto config: auto adjust ADC channel difference, only available in VGA mode.
  • EEprom clear: reset EEPROM data to default value, all user’s program and setting will be lost.
  • Panel: select different panel for factory.
  • TTX language: select Teletext language, optional setting: West East Russia;
  • DVD source set: to turn on or off DVD source in the user menu, optional setting: On Off;
  • Hotel mode: to turn on or off hotel mode, optional setting: On Off;
  • Key mode:to turn on or off local keyboard, optional setting: On Off;
  • Power on: to setting the power on source, optional setting: TV Other;
  • Power mode: to setting the power on mode, optional setting: Force on Memory standby;
  • Volume:to setting the max sound volume when hotel mode is active;
  • AGC: to setting tuner’s RF AGC value;
  • Color temperature adjusting:in different source the white balance can be adjust separated.the details as below:
  1. DVD&YpbPr source use same group color temperature value.
  2. TV&Scart source use same group color temperature value.
  3. VGA&HDMI source use separated color temperature value.
  • Auto Config:please change source to VGA mode and with grey scale pattern then enter service mode to do this item.