 SONY HBD-E470 SERVICE MODE FACTORY RESET AND POWER SUPPLY CIRCUIT

SONY HBD-E470
SERVICE MODE FACTORY RESET AND POWER SUPPLY CIRCUIT
BD SERVICE MODE
Note: The operation in this mode must use a remote commander.
Setting method of the BD service mode:
1. Press the [POWER] button to turn the power on.
2. Press button in order of the [RETURN] > [0] > [2] > [1] > [SUBTITLE] on the remote commander. (Make the interval when each button is pressed within two seconds)3. Enter the BD service mode
Setting method of the BD service mode:
1. Press the [POWER] button to turn the power on.
2. Press button in order of the [RETURN] > [0] > [2] > [1] > [SUBTITLE] on the remote commander. (Make the interval when each button is pressed within two seconds)3. Enter the BD service mode
Factory Initialize (Factory Settings)
Return all of the player setting to their factory defaults.
Operation:
Screen 1
Press the [1] button in this screen when restoring the set to its factory settings.
All saved titles will also be deleted.
[1] Start Factory Initialize
[2] Start Factory Initialize for TV (Not used)
[UP]/[DOWN] Moves the cursor
[ENTER] Activate the selected cursor
[RETURN] Returns to the top menu of the service mode
Screen 2
It is a screen of the end of initialization.
[RETURN] Returns to the top menu of the service mode
To complete factory initialize, process COLD RESET subsequently.
Please disconnect AC power cord, and connect AC again. Then press the [POWER] button to turn the power on, and press the [STOP] and [VOLUME –] buttons simultaneously and hold down (around 5 seconds) to execute COLD RESET.
Remove the AC power cord and insert the AC power cord again.
RELEASING THE DISC TRAY LOCK
The disc tray lock function for the antitheft of an demonstration disc in the store is equipped.
Releasing Procedure:
1. Press the [POWER ] button to turn on the system.
2. Press the [FUNCTION] button to select “BD/DVD”.
3. Press the [STOP] and [EJECT] buttons simultaneously and hold down unit “DEMO OFF” displayed on the fluorescent indicator tube (around 5 seconds)
Note: When “DEMO ON” is displayed, the disc tray lock is not released by turning power on/off with the [POWER] button.
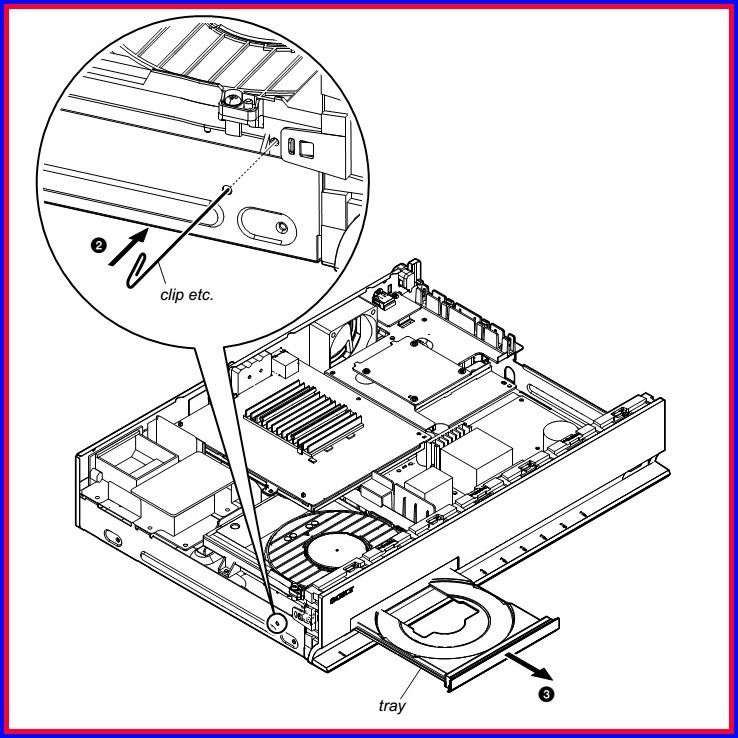
HOW TO OPEN THE TRAY WHEN POWER SWITCH TURN OFF
Note 1: After the case is removed, this mark is done.
Note 2: Please prepare the thin wire (clip etc.).
Note 1: After the case is removed, this mark is done.
Note 2: Please prepare the thin wire (clip etc.).
COLD RESET
The cold reset clears data except BD/DVD data stored in the RAM to initial conditions. Execute this mode when returning the set to the customers.
Procedure:
1. Press the [POWER] button to turn the power on.
2. Press the [STOP] and [VOLUME –] buttons simultaneously and hold down (around 5 seconds).
3. The message “COLD RESET” appears on fluorescent indicator tube, then becomes standby states.
HOW TO ACTIVATE DEMO MODE
This mode let you lock the disc tray. When this mode is activated, the disc will not eject when the [Z] button is pressed. The message “LOCKED” will be displayed on the fluorescent indicator tube.
Procedure:
1. Press the [POWER] button to turn the power on.
2. Press the [FUNCTION] button to select the “BD/DVD”.
3. Press the [STOP] and [EJECT] buttons simultaneously and hold down until “DEMO ON” or “DEMO OFF” displayed on the fluorescent indicator tube (around 5 seconds).
S-AIR ID SETTING CHANGE
Procedure:
1. Press the [POWER] button to turn the power on.
2. Press the [FUNCTION] and [VOLUME +] buttons simultaneously and hold down (around 5 seconds).
3. S-AIR ID setting is changed (A > B > C > A...).
Procedure:
1. Press the [POWER] button to turn the power on.
2. Press the [FUNCTION] and [VOLUME +] buttons simultaneously and hold down (around 5 seconds).
3. S-AIR ID setting is changed (A > B > C > A...).
HOW TO TEST THE PANEL
Procedure:
1. Press the [POWER ] button to turn the power on.
2. Press button in order of the [RETURN] > [0] > [0] > [1] > [SUBTITLE] on the remote commander (Make the interval when each button is pressed within two seconds).
3. All segments in fluorescent indicator tube are lighted up. And half segments in fluorescent indicator tube are lighted up, others half segments in fluorescent indicator tube are lighted up, then LEDs and all segments in fluorescent indicator tube are lighted up. This operation is repeated.
4. When all segments in fluorescent indicator tube are lighted up in the state of step 3, press the [VOLUME +] button on the remote commander and model information is displayed on the fluorescent indicator tube.
Each time the [VOLUME +] button on the remote commander is pressed, the display changes from destination information, STR version, SYS version, UI version, BDLIB version, ST version, TA version, DSP version, TM version, CEC version, SAIR version, PF version in this order, and returns to the model information display. Each time the [VOLUME –] button on the remote commander is pressed, the version and date are switched.
5. In the state of step 3, press the [FUNCTION] button on the remote commander and “K 0” is displayed on the fluorescent indicator tube. “K 0” value increases whenever a button on the set is pressed. However, once a button has been pressed, it is no longed taken into account.
All buttons on the set are pressed, “OK” and “K 7” are alternately displayed on the fluorescent indicator tube.
6. To release from this mode, press the [POWER ] button.
HOW TO TEST THE AMP
Procedure:
1. Press the [POWER] button to turn the power on.
2. Press button in order of the [RETURN] > [0] > [1] > [1] > [SUBTITLE] on the remote commander (Make the interval when each button is pressed within two seconds).
3. The message “MEASURE” appears on the fluorescent indicator tube and enter the AMP test mode.
4. Press the [BLUE] button on the remote commander, the state of D.C.A.C. microphone is displayed on the fluorescent indicator tube.
5.
Press the [MUTING] button on the remote commander, “VOL N” (The change
in the volume is usual)/“VOL MSM” (The change in the volume is a switch
of MIN/1/20/MAX) can be switched.
6. Press the [SUBTITLE] button on the remote commander, the message “VACS ON” or “VACS OFF” appears on the fluorescent indicator tube and thus the VACS on/off are changed.
7. To release from this mode, press the [POWER] button.
6. Press the [SUBTITLE] button on the remote commander, the message “VACS ON” or “VACS OFF” appears on the fluorescent indicator tube and thus the VACS on/off are changed.
7. To release from this mode, press the [POWER] button.
STREAM PROCESSOR

AUDIO AMPLIFIER

POWER SUPPLY CIRCUIT

POWER BOARD LAYOUT
