
Samsung HTZ210 – Initialization, update, full schematic with waveform display – Connector pin voltages - Digital Home Theater System
Samsung HT-Z210 DIGITAL HOME THEATER SYSTEM- Full circuit diagram, Initialization procedure, connector pin voltages
Used ICs: KA5Q1265RF
(power control), ES7108S (HDMI), CS5345, LA73054, LC87F5CC8A,
ES8391SCC, PS9829B, TAS5152 (power amp IC), BTEM39B2SB 9 (Bluetooth)
Always unplug the unit’s AC power
cord from the AC power source before attempting to: (a) Remove or
reinstall any component or assembly, (b) Disconnect an electrical plug
or connector, (c) Connect a test component in parallel with an
electrolytic capacitor.Some components are raised above the printed circuit board for safety. An insulation tube or tape is sometimes used. The internal wiring may be clamped to prevent contact with thermally hot components. Reinstall all such elements to their original position.
After servicing, always check that the screws, components and wiring have been correctly reinstalled. Make sure that the portion around the serviced part has not been damaged.
Check the insulation between the blades of the AC plug and accessible conductive parts (examples: metal panels, input terminals and earphone jacks).
Insulation Checking Procedure
Disconnect the power cord from the AC source and turn the power switch ON.
Connect an insulation resistance meter (500V) to the blades of the AC plug.
The insulation resistance between each blade of the AC plug and accessible conductive parts (see above) should be greater than 1 megohm.
Never defeat any of the B+ voltage interlocks. Do not apply AC power to the unit (or any of its assemblies) unless all solid-state heat sinks are correctly installed.
Always connect a test instrument’s ground lead to the instrument chassis ground before connecting the positive lead; always remove the instrument’s ground lead last.
Operation of Power Block Protection Circuit. The Condition of Power Protection Active.
1. Voltage of SMPS’s PVDD (+34.5V, J3) is higher or lower than Standards. Normal Condition Voltage Range: PVDD (+34.5V, J3): about +34.5V
2. Over-current occurs to AMP IC. (Over-output or Output short)
3. AMP IC’s temperature exceeds 150°C.
4. No supply voltage on GATE DRIVER.
Power
Protection
1. OTW: Active, IC’s inner temperature exceeds over 150°C. (Under 2.7V, Protection Circuit wills Active)
2. TAS5352 3TH PIN: Shout down. (Under 2.7V, Protection Circuit wills Active)
1. OTW: Active, IC’s inner temperature exceeds over 150°C. (Under 2.7V, Protection Circuit wills Active)
2. TAS5352 3TH PIN: Shout down. (Under 2.7V, Protection Circuit wills Active)
Initialization & Upgrade Methods
MICOM Initialization & Update
MICOM Initial
In STANDBY condition, press “STOP” button of Main Unit more than 5
seconds, STANDBY RED LED will turn off and turn on again. Then
Initialization complete.
MICOM Update
1. At Bottom side of Main Unit, Connecting 6 pin cable.
2. Wire to Update connector-look like an oval hole then update start.
Required Equipment
Computer, Rom Writer, Connecting Cable, Update Program.
Update is available Only OTP type MICOM.
Circuit diagram (Schematic)


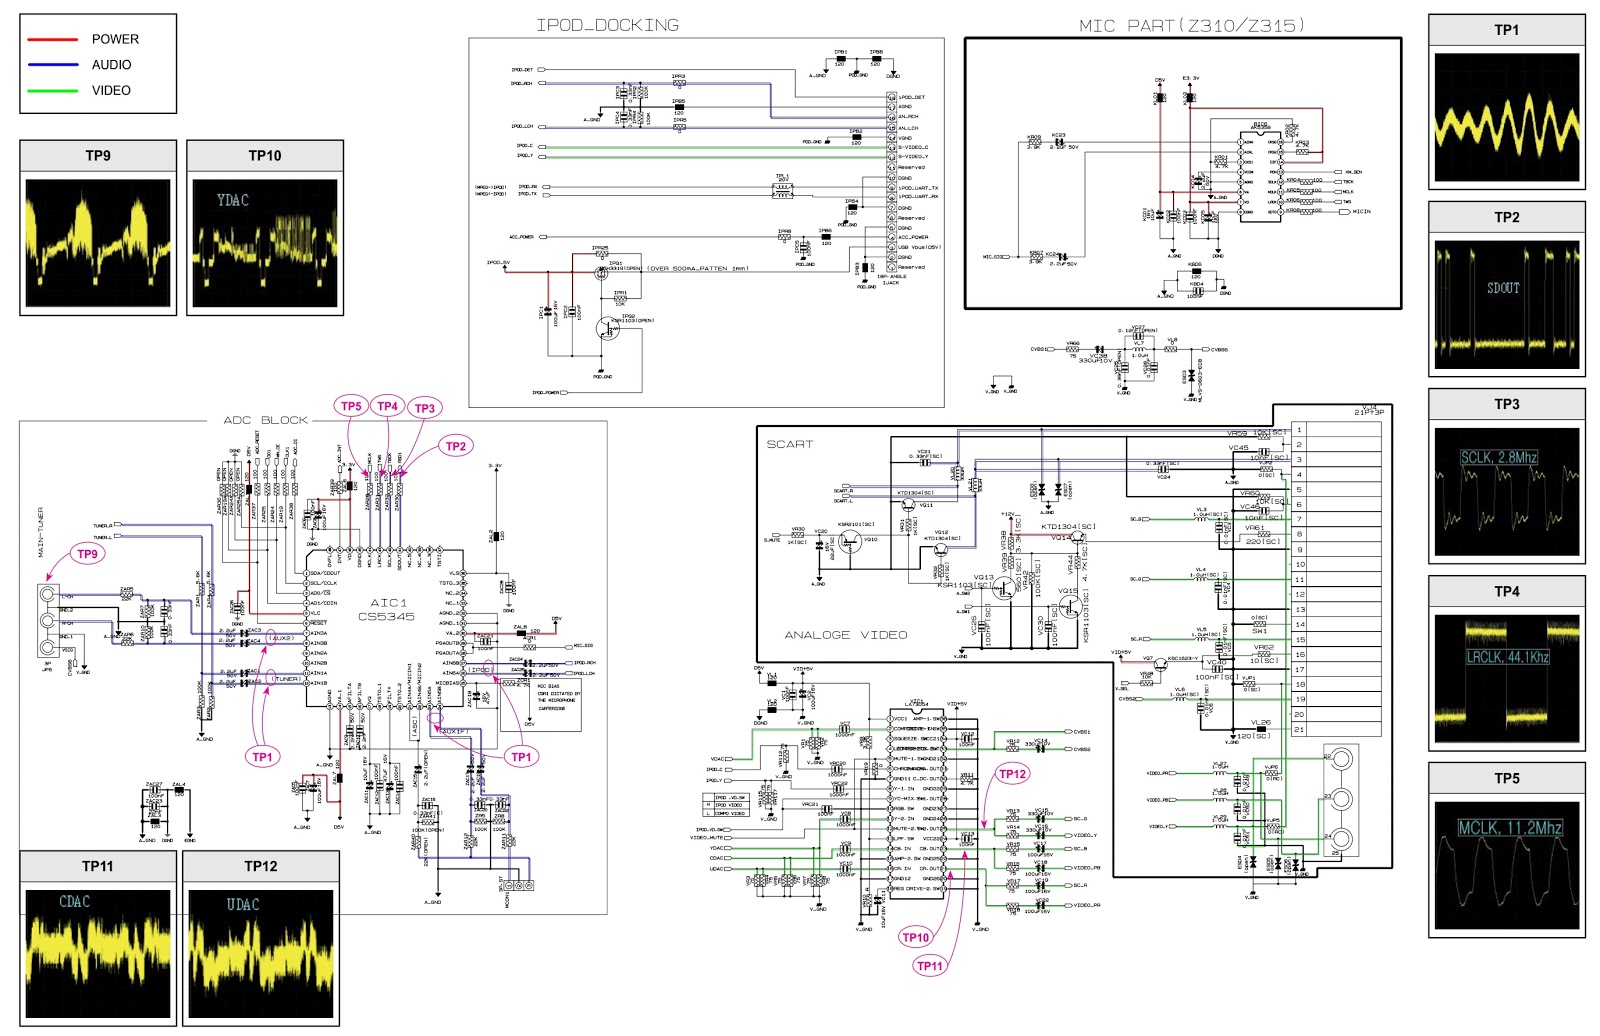


Connector pin voltages

DVD flash Initialization & Update
Checking out MICOM & MPEG flash Version
1. Open DISC-TRAY, Press "MENU" button on the Remote Control.
2. Press "8", "9", "5" one by one, then press “ENTER”.
DVD flash Initialization & Update (firmware)
1. Prepare or Making DISC-CD or DVD or USB that contains HEX file for Update.
2. Play the DISC or USB, then ‘Updating’ will appear on the screen, then Power will go out and on.
3. Then DISC-TRAY will OPEN, then remove DISC or USB, making Unit ‘NO DISC’ state.
4. Press ‘STOP’ button of Main Unit more than 5 seconds, Display Indicator shows ‘INITIALIZE’ then Power goes out.
5. Initialization complete