HP Pavilion G6 Notebook – Disassembling procedure – How to remove the key board – How to remove the cove – how to remove HDD – Laptop repair and service

Category: Laptop Repair and Service
Contents of this article
- How to remove the battery
- How to remove top cover
- How to remove Keyboard
HP Pavilion G6 Notebook
How to remove Computer feet
The computer feet are adhesive-backed rubber pads. The
feet attach to the base enclosure in the locations illustrated below.

How to remove Battery
Before disassembling the computer:
1. Shut down the computer. If you are unsure whether the computer is off or in Hibernation, turn on the computer, and then shut it down through the operating system.
2. Disconnect all external devices connected to the computer.
3. Disconnect the power from the computer by first disconnecting the power cord from the AC outlet and then disconnecting the AC adapter from the computer.
Remove the battery:
1. Position the computer upside down on a flat surface.
2. Slide the battery release latch (1) to release the battery.
3. Pivot the battery (2) upward and lift it out of the computer (3).

To insert the battery, insert the rear edge of the
battery into the battery bay and pivot the front edge downward until the
battery is seated. The battery release latch automatically locks the battery
into place.
How to remove Service access cover
Before removing the service access cover, remove the
battery
1. Position the computer upside down, with the front toward you.
2. Loosen the two Phillips 4.0×2.0 captive screws (1) that secure the service access cover to the computer.
3. Remove the service access cover (2).
1. Position the computer upside down, with the front toward you.
2. Loosen the two Phillips 4.0×2.0 captive screws (1) that secure the service access cover to the computer.
3. Remove the service access cover (2).

How to remove Hard drive
Before removing the hard drive, remove the following
components:
1. Battery
2. Service access cover
Remove the hard drive:
1. Disconnect the hard drive adapter cable from the system board (1) and then pull up on the Mylar tab (2) to remove the drive from the hard drive bay.
1. Battery
2. Service access cover
Remove the hard drive:
1. Disconnect the hard drive adapter cable from the system board (1) and then pull up on the Mylar tab (2) to remove the drive from the hard drive bay.

How to remove Optical drive
Before removing the optical drive:
1. Battery
2. Service access cover
Remove the optical drive:
1. Remove the Phillips 3.0×2.5 screw (1) that secures the optical drive to the computer.
2. Insert a thin tool, such as a screw driver (2), into the release access slot next to the hard drive bay.
3. Grasp the bezel and slide the optical drive out of the computer (3).

How to remove WLAN module
Before removing the WLAN module, remove the following
components:
1. Battery
2. Service access cover
Remove the WLAN module:
1. Disconnect the main antenna cable (1) and the auxiliary antenna cable (2) from the wireless module.
2. Remove the Phillips 3.0×2.0 screw (3) that secures the WLAN module to the computer. (The edge of the module opposite the slot rises away from the computer.)
3. Remove the WLAN module (4)
by pulling it away from the slot at an angle.

How to remove Memory module
Before removing the memory module, remove the following
components:
1. Battery
2. Service access cover
Remove the memory module:
1. Spread the retaining tabs (1) on each side of the memory module slot to release the memory module. (The edge of the module opposite the slot rises away from the computer.)
2. Remove the module (2) by pulling it away from the slot at an angle.

How to remove Keyboard
Before removing the keyboard, remove the following
components:
1. Battery
2. Service access cover
Remove the keyboard:
1. Remove the Phillips 5.0×2.5 screw that secures the keyboard to the computer.
1. Battery
2. Service access cover
Remove the keyboard:
1. Remove the Phillips 5.0×2.5 screw that secures the keyboard to the computer.

2. Open the display and stand
the computer on its side. Insert a small screwdriver through the keyboard
access hole in the bottom of the computer. (The keyboard access hole is the
same hole from which the keyboard screw was removed.) Push firmly on the bottom
of the keyboard until it is disengaged

3. Position the computer
display-side up, with the front toward you, and open the computer as far as
possible. Lift the rear edge of the keyboard and tilt the keyboard forward onto
the palm rest.

4. Release the zero insertion
force (ZIF) connector (1) to which the keyboard cable is attached, and then
disconnect the keyboard cable (2). Remove the keyboard (3).

How to remove Top cover
Before removing the top cover, remove the following
components:
1. Battery
2. Service access cover
3. Hard drive
4. Optical drive
5. WLAN module
6. Memory module
7. Keyboard
Remove the top cover:
1. Position the computer display-side up, with the front toward you, and open the computer as far as possible.
1. Battery
2. Service access cover
3. Hard drive
4. Optical drive
5. WLAN module
6. Memory module
7. Keyboard
Remove the top cover:
1. Position the computer display-side up, with the front toward you, and open the computer as far as possible.
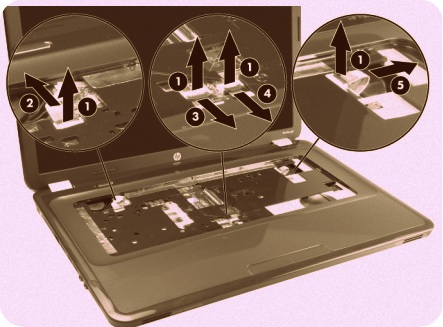
2. Release the three zero
insertion force (ZIF) connectors (1) to which the ZIF cables are
attached. Then disconnect the power button cable (2), the TouchPad cable
(3), the TouchPad button cable (4), and USB board cable (5) from
the system board.
3. Remove the two Phillips
5.0×2.5 screws that secure the top cover to the computer.

4. Turn the computer upside
down, with the front toward you.
5. Remove the three Phillips
5.0×2.5 screws in the battery bay, the two Phillips 5.0×2.5 screws near the
hard drive connector, and the nine Phillips 6.0×2.5 screws along the edges of
the base enclosure.

6. Lift the rear edge of the
top cover (1) until the top cover disengages from the base enclosure. Remove
the top cover (2).
