
Sony LCD Monitor LMD2450W - How to enter service mode, adjustments
Service mode entry and adjustments - Sony 24 inch LCD Monitors LMD2450W,
LMD2450MC, LMD2450MD, LMD2050W
Required tools and measuring equipmentLuminance meter :: Minolta CA-210, CA-110 or equivalent.
If equivalent is not available, make adjustment by comparing the LCD monitor with the reference monitor that has already been calibrated correctly.
Signal generator: VG-854 or equivalent.
Warm-up time
Before starting adjustment, allow a warm-up of minimum 120 minutes to stabilize the back light of the LCD panel.
How to enter service mode
1 Press the [MENU] button to display the MENU screen.
2 Press the [CONTROL] and [RETURN] buttons simultaneously.
Preparing the power supply and signals
1 Connect the supplied AC cord of this unit. Power voltage: 100 to 240 V AC, 50/60Hz
2 Turn on the power of this unit.
White Balance Adjustment
If the LCD panel is changed, perform the white balance adjustment.
1 Move the cursor to SIGNAL using the Down key and press the [ENTER] button to enter the SIGNAL layer.
2 Move the cursor to WHITE BALANCE using the Down key and press the [ENTER] button to enter the SIGNAL/WHITE BALANCE layer.
To move the cursor to select an item, use the Up or Down key. To set the selected item, press the [ENTER] button.
D93 adjustment
1 Select D93 from COLOR TEMP and set it by pressing [ENTER] button.
Target value : x = 0.283, y = 0.298
2 Select ADJUST GAIN, and adjust the GAIN. Adjust using R and B while G is fixed.
3 Select ADJUST BIAS, and adjust the BIAS. Adjust using R and B while G is fixed.
4 Repeat steps 2 and 3 until all of the required specifications are met all at the same time.

1 Select D65 from COLOR TEMP and set it by pressing [ENTER] button.
Target value : x = 0.313, y = 0.329
2 Select ADJUST GAIN, and adjust the GAIN.
Adjust using R and B while G is fixed.
3 Select ADJUST BIAS, and adjust the BIAS.
Adjust using R and B while G is fixed.
4 Repeat steps 2 and 3 until all of the required specifications are met all at the same time.
D56 adjustment (LMD-2450MD/2450MC)
1 Select D56 from COLOR TEMP and set it by pressing [ENTER] button.
Target value : x = 0.330, y = 0.345
2 Select ADJUST GAIN, and adjust the GAIN.
Adjust using R and B while G is fixed.
3 Select ADJUST BIAS, and adjust the BIAS.
Adjust using R and B while G is fixed.
4 Repeat steps 2 and 3 until all of the required specifications are met all at the same time.
A/D Adjustment (COMPONENT)
1 Input the 575/50I 100% 8 color-bar COMPONENT signal to this unit.
2 Press the input switch to accept the COMPONENT input signal.
3 Enter the Service menu, then select SIGNAL > SIGNAL LEVEL > AUTO ADJ.
1 Input the 575/50I 100% 8 color-bar COMPONENT signal to this unit.
2 Press the input switch to accept the COMPONENT input signal.
3 Enter the Service menu, then select SIGNAL > SIGNAL LEVEL > AUTO ADJ.
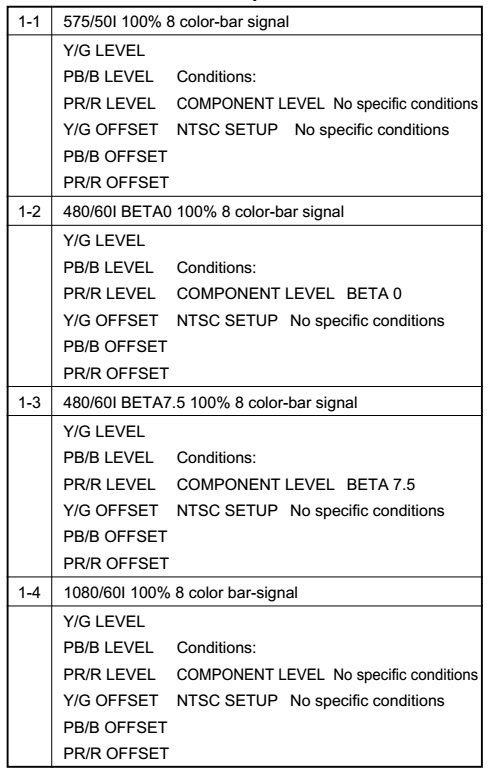
Perform the following automatic adjustments.
Y/G LEVEL
PB LEVEL
PR LEVEL
Y OFFSET
PB OFFSET
PR OFFSET
Y/G LEVEL
PB LEVEL
PR LEVEL
Y OFFSET
PB OFFSET
PR OFFSET
4
Perform the adjustments of items 1-2 to 1-4 in table shown below by repeating
the above described procedures. However,
before performing AUTO ADJ, adjust the COMPONENT level or NTSC SETUP
appropriately according to the respective conditions described in the table.
A/D Adjustment (RGB)
1 Input the 480/60I 100% 8 color-bar RGB signal to this unit.
2 Press the input switch to accept the RGB input signal.
3 Enter the Service menu, then select SIGNAL > SIGNAL LEVEL > AUTO ADJ. Perform the following automatic adjustments.
Y LEVEL
PB LEVEL
PR LEVEL
Y OFFSET
PB OFFSET
PR OFFSET
4. Perform the adjustment of item 1-6 in table shown below by repeating the above described procedures.

A/D
Adjustment (COMPOSITE)
1 Input the NTSC 100% 8 color-bar COMPOSITE signal to this unit.
2 Press the input switch to accept the COMPOSITE input signal.
3 Enter the Service menu, then select SIGNAL > SIGNAL LEVEL > AUTO ADJ. Perform the following automatic adjustments.
Y/G LEVEL
PB LEVEL
PR LEVEL
4 Perform the adjustments of items 1-8 and 1-9 in table shown below by repeating the above described procedures.
A/D Adjustment (Y/C)
1 Input the NTSC 100% 8 color-bar Y/C signal to this unit.
2 Press the input switch to accept the Y/C input signal.
3 Enter the Service menu, then select SIGNAL > SIGNAL LEVEL > AUTO ADJ. Perform the following automatic adjustments.
Y/G LEVEL
PB LEVEL
PR LEVEL
4 Perform the adjustments of items 1-11 and 1-12 in table 4 shown below by repeating the above described procedures.

A/D Adjustment (COMPUTER)

1 Input the COMPUTER HD15 640 x 480 60 Hz 100% 8 color-bar signal to this unit.
2 Press the input switch to accept the COMPUTER (HD15) input signal.
3 Enter the Service menu, then select SIGNAL > SIGNAL LEVEL > AUTO ADJ. Perform the following automatic adjustments.
Y/G LEVEL
PB LEVEL
PR LEVEL
Y OFFSET
PB OFFSET
PR OFFSET