REPAIRING AND NOT THROWING AWAY

Richtige Fernseher haben Röhren!

Richtige Fernseher haben Röhren!

In Brief: On this site you will find pictures and technical information about Service Modes, Circuit Diagrams, Firmware Update procedure, Disassemble procedure, Universal remote control set-up codes, Troubleshooting and more....

If you go into the profession, you will obtain or have access to a variety of tech tips databases HERE IT IS Master Electronics Repair !.

These are an excellent investment where the saying: 'time-is-money' rules. However, to learn, you need to develop a general troubleshooting approach - a logical, methodical, method of narrowing down the problem. A tech tip database might suggest: 'Replace C536' for a particular symptom. This is good advice for a specific problem on one model. However, what you really want to understand is why C536 was the cause and how to pinpoint the culprit in general even if you don't have a service manual or schematic and your tech tip database doesn't have an entry for your sick TV or VCR.

While schematics are nice, you won't always have them or be able to justify the purchase for a one-of repair. Therefore, in many cases, some reverse engineering will be necessary. The time will be well spent since even if you don't see another instance of the same model in your entire lifetime, you will have learned something in the process that can be applied to other equipment problems.
As always, when you get stuck, checking out a tech-tips database may quickly identify your problem and solution.In that case, you can greatly simplify your troubleshooting or at least confirm a diagnosis before ordering parts.

Happy repairing!
Today, the West is headed for the abyss. For the ultimate fate of our disposable society is for that society itself to be disposed of. And this will happen sooner, rather than later.

How to use the site:

- If you landed here via any Search Engine, you will get what you searched for and you can search more using the search this blog feature provided by Google. You can visit more posts scrolling the left blog archive of all posts of the month/year,
or you can click on the main photo-page to start from the main page. Doing so it starts from the most recent post to the older post simple clicking on the Older Post button on the bottom of each page after reading , post after post.

You can even visit all posts, time to time, when reaching the bottom end of each page and click on the Older Post button.

- If you arrived here at the main page via bookmark you can visit all the site scrolling the left blog archive of all posts of the month/year pointing were you want , or more simple You can even visit all blog posts, from newer to older, clicking at the end of each bottom page on the Older Post button.
So you can see all the blog/site content surfing all pages in it.

- The search this blog feature provided by Google is a real search engine. If you're pointing particular things it will search IT for you; or you can place a brand name in the search query at your choice and visit all results page by page. It's useful since the content of the site is very large.

Note that if you don't find what you searched for, try it after a period of time; the site is a never ending job !

..............The bitterness of poor quality is remembered long after the sweetness of todays funny gadgets low price has faded from memory........ . . . . . .....
Don't forget the past, the end of the world is upon us! Pretty soon it will all turn to dust!

©2010, 2011, 2012, 2013, 2014 Frank Sharp - You do not have permission to copy photos and words from this blog, and any content may be never used it for auctions or commercial purposes, however feel free to post anything you see here with a courtesy link back, btw a link to the original post here , is mandatory.
All posts are presented here for informative, historical and educative purposes as applicable within fair use. NOTHING HERE IS FOR SALE !

Tuesday 19 March 2019

TOSHIBA 52HM84 - HOW TO REPLACE LAMP TO TOSHIBA-52HM84 - PARTS REPLACEMENT IN LIGHT ENGINE - SERVICE MODE & LED INDICATIONS - PROJECTION TV

TOSHIBA 52HM84 - HOW TO REPLACE LAMP TO TOSHIBA-52HM84 - PARTS REPLACEMENT IN LIGHT ENGINE - Service Mode & LED Indications - PROJECTION TV


LAMP REPLACEMENT
LIGHT ENGINE is a heart of TV which emits high heat.
Make sure to replace it after turning off the TV and wait for sufficient cool down. (More than one hour is recommended.)
Do not add any impact during replacement; otherwise, some parts may be damaged.
Do not touch any optical lens. Adhesion of dirt may deteriorate its performance.
Do not loosen any screw other than those to be removed for adjustment or replacement.
LIGHT ENGINE emits ultraviolet rays when the TV is ON. Make sure to be careful.
  • When Light Engine Unit is replaced with a new one, the adjustment is required. Adjusted values are described in bar code, and the values of bar code must be converted to the adjusted values for the setup. There are 2 types of bar code.
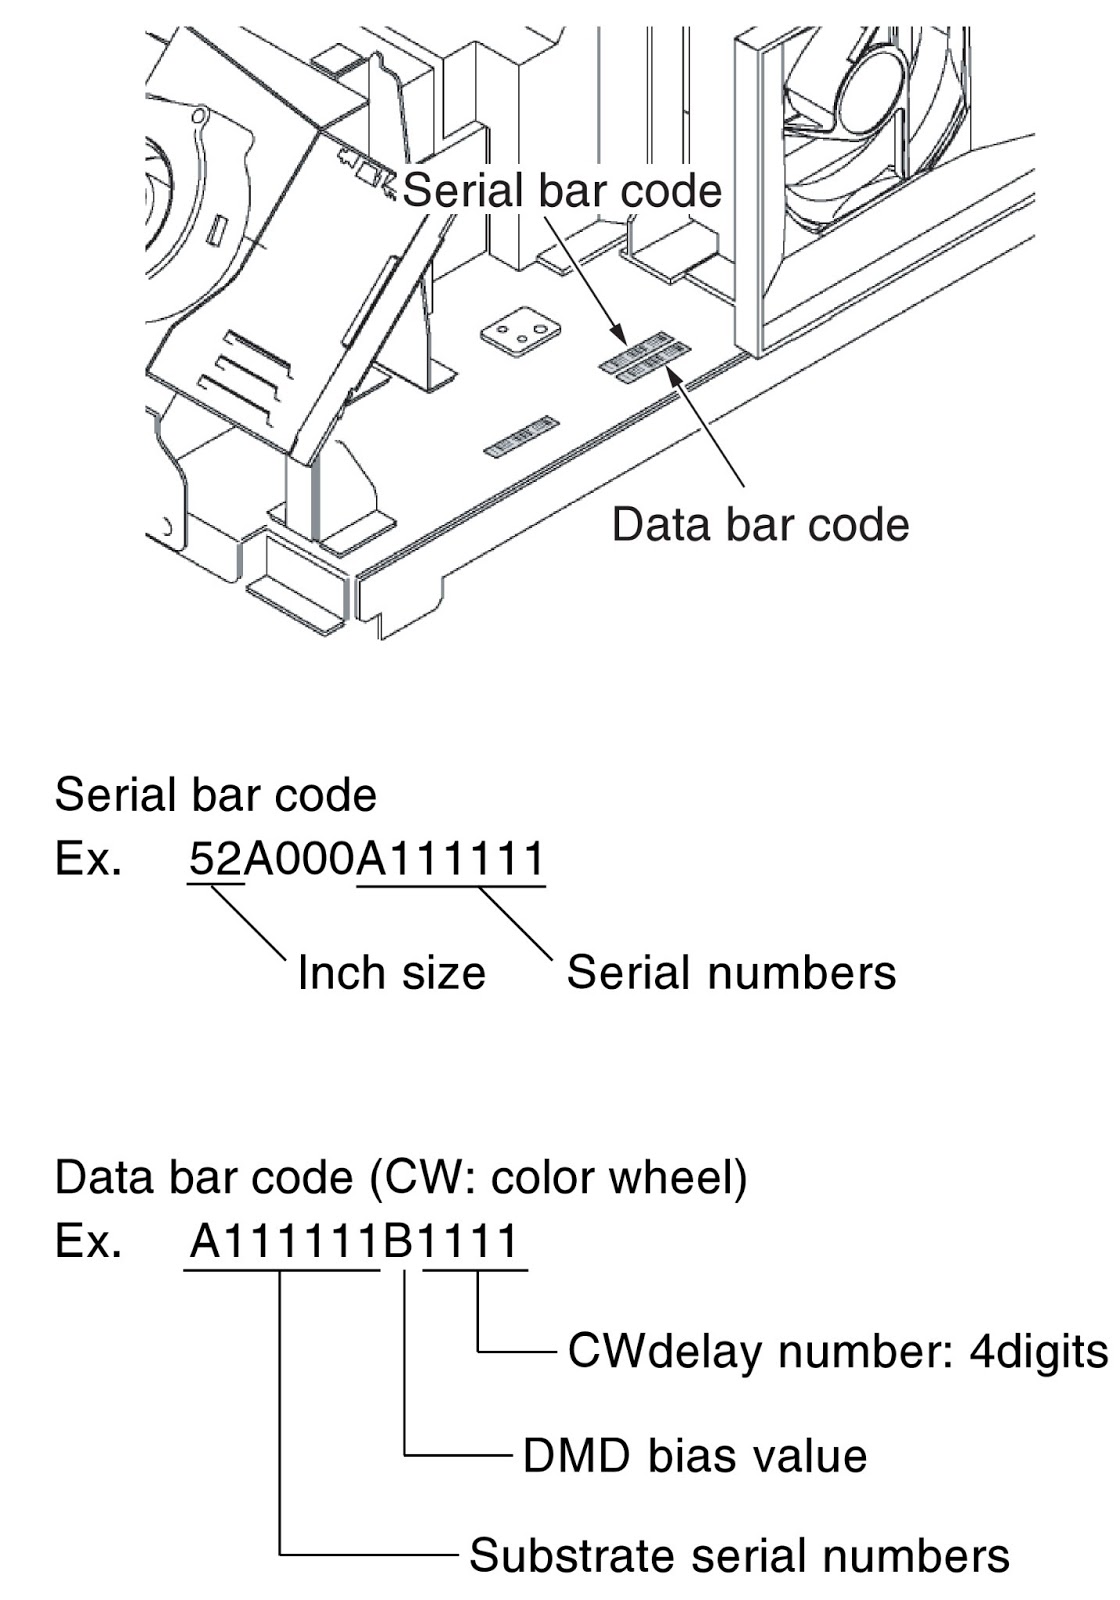
  • Adjustment is made by service mode. The adjusting items consist of CWDL, CWDH and DMDB.
CWDL  CWDH
  • When CW delay number of the data bar code is 0450:  0450 indicates => 450 => 45.0
  • Double 45.0 to form hexadecimal number (HEX).  45.0 x 2 = 90 => 5A Hexadecimal.
  • The adjusted value becomes “5A” for CWDL and “00” for CWDH.
  • If hexadecimal number forms 3 or 4 digits, the latter 2 digits indicate CWDL while the first 2 digits indicate CWDH (For 3 digits, CWDH=0*)
LIGHT ENGINE PARTS REPLACEMENT
Fan Replacement
For replacing FAN for cooling heat sink, remove 2 screws.  For replacing FAN for cooling lamp, detach FAN hood located on LIGHT ENGINE by removing 2 screws and then remove 4 screws.
Replacement of Ballast Power Unit

  • Detach the ballast power unit by removing 4 substrate stoppers that hold the ballast power unit.
Precautions:   When Exchanging Ballast Power Units When you install a new ballast power unit, install it while pushing the four corners of the board directly.
Installation while pressing the heat sink may cause the pattern crack.
Replacement of Temperature Breaker
  • Remove 2 screws for replacing the temperature breaker for lamp.
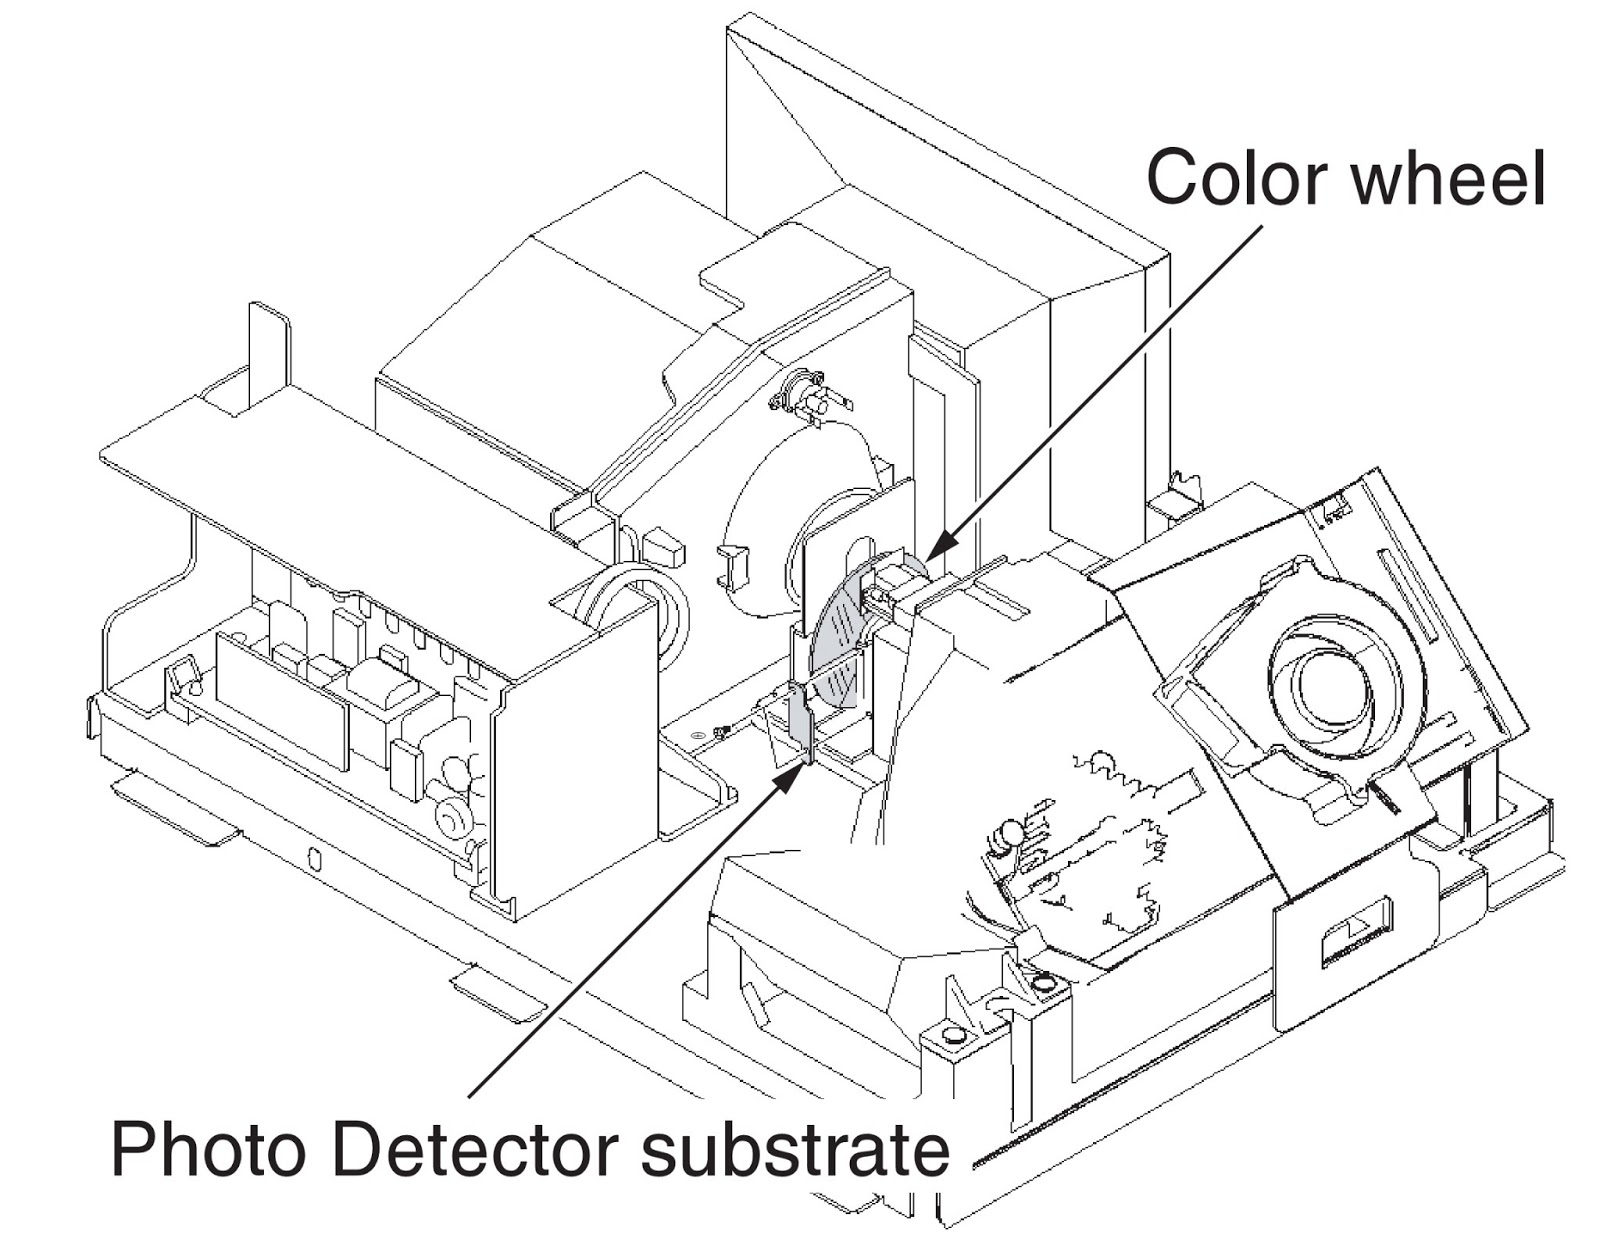
Replacement of Sensor Unit
  • Remove 2 screws fixing a color wheel cover and UV filter box.
  • Remove one screw for motor unit.
  • Remove 2 screws holding Photo Detector substrate.
CLICK ON PICTURES TO MAGNIFY
Caution:  When removing screws, do not damage the color wheel with drivers, etc. Even a small impact may damage the color wheel.  Make sure not to touch the color wheel.  Don’t remove other screws by any means.
ENTERING TO SERVICE MODE
  • Press MUTE button twice on Remote Control.
  • Press MUTE button again to keep pressing.
  • While pressing the MUTE button, press MENU button on TV set.
DISPLAYING THE ADJUSTMENT MENU
  • Press MENU button on TV
SELECTING THE ADJUSTING ITEMS
  • Every pressing of CHANNEL ▲  button in the service mode changes the adjustment items.  (▼ button for reverse order).
  • Pressing of VOLUME ▲/▼  button will change the value of data in the range from 00H to FFH. The variable range depends on the adjusting item.
  • To EXIT press POWER button to turn off the TV once
LED indications