* Remove the
seven outer case screws on the left (2), bottom (3), and right (2) side of the camera.
* Pry open the
case from its bottom left side. There will be a little resistance. Just use a
butter knife at the bottom left (screen side) edge to pry it open. Note
how/where the AV cover attaches to the case.
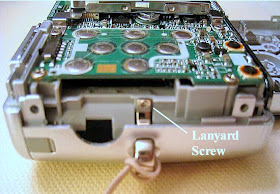
* Remove the
single small screw on the silver lanyard connector.
* Loosen the
center electronics assembly from the front case by prying with a small screwdriver
along the gray plastic on the left side of the camera.
* Remove the
center electronics assembly from the front case by lifting it up and out from
its bottom.
Note the
front face with the battery compartment, lens assembly (note that mine is
crooked/damaged), auto-focus illuminator, and flash assembly. Especially take note of the large green flash
capacitor. DO NOT short the terminals of the capacitor to discharge it as you
will damage it. Instead recommend slowly draining the capacitor of electricity
by applying a voltmeter or some other resistive load until its voltage is
discharged.
Now examine
the top face of the assembly. Note the tape, and the three exposed screws. Remove
and temporarily store these three screws.
* Peel back
the center portion of the tape. You may have to tear a portion of the tape. You'll see two electrical contact points
labeled C4+ and C4-. Use these to discharge the capacitor. You'll also notice a single screw that
attaches the flash bulb to the camera. Leave this screw alone as it is unrelated
to the disassembly of the camera. Reattach the tape.
COOLPIX L-10 NIKON DIGITAL CAMERA - DISASSEMBLE PROCEDURE
* Now examine
the back face of the assembly , taking note of the six exposed screws. Remove these
screws, and store them.
* Gently flip
the LCD screen and its metal holding bracket up and over to expose the circuitry
beneath it. Do not disconnect the LCD screen's large ribbon cable. But do
notice the three small recessed screws, and the smaller ribbon cable and its
connector. Remove the three screws.
* Now notice
the black hinge on the small ribbon connector. Swivel this black hinge upward with
your finger nail. The small ribbon should now easily pull free. Note that the
cable has no connector on its end once it's pulled free.
* Very
carefully tug and lift the bottom of the circuit board. It should hinge upward
as the battery leads bend and serve as the hinge point.
* Remove the
three screws on the metal cover plate over the lens assembly. Take extra care not
to damage any circuit board components, especially the exposed CCD. After the
screws are removed, the cover plate and lens assembly should now easily lift
out.
* Pry the
metal cover plate from the lens assembly. Do this by inserting a small screw driver
under one of its three clips, and then twist it. The clip should pop free.
Repeat on the other two clips until the plate is removed.
* Remove the
four screws that hold its back cover on. Remove the back cover.
*Examine the
interior of the lens assembly for any anomalies that may indicate its malfunction.
In the below example, two things are apparent. First is that the assembly's
guide pins have been dislocated from their intended guide grooves (look at the
4 and 8 O’clock positions). The second problem is that some of the teeth on the
lens assembly's primary gear are missing and damaged (as seen at the 2 O’clock
position).
Repair is
possible by forcing the guide pins back into their grooves. However, camera
operation would still be degraded due to the missing gear teeth. It would be
necessary to physically help the lens extend and retract during power
up/shutdown by pulling or pushing it. Because of this, it was decided to withhold
repair and reassembly until acquiring another broken L10. The intent would to salvage
and replace the lens assembly with an undamaged one.

.jpg)


