 FISHER & PAYKEL _ DEIX1 AA WW _ INTUITIVE DRYER _ FAULT CODES

FAULT DIAGNOSTICS
- If a fault occurs that prevents correct operation of the dryer, and is detected by the controllers, the dryer is stopped, the LCD shows a fault code and the beeper is continuously turned on and off.
- Pressing any button once will disable the beeping. The fault code information will remain on the LCD screen until the power supply to the dryer is turned off
- If the Dryer has been either turned off or isolated from the power supply the fault code can be recalled from memory by entering diagnostic mode.
- To enter the Diagnostic Mode press and hold the Lifecycles button and then the Power button. The machine will give 2 short beeps and the LCD screen will go blank. Make sure that the buttons are released after the beeps. Note: Provided the power supply to the machine is switched on, diagnostic mode may be entered at any time.
DATA DISPLAY
To enter the Data Display screens, push the Lifecycles button again. One of
three displays will appear in the screen (detailed below). To scroll through
the different screens use the Options Up or Down buttons.
FAULT STATUS SCREEN
This screen will indicate the last
fault code that occurred. If a fault is registered the fault code is saved to
EEPROM, which retains its memory even when the power is switched off. The fault
code will remain visible until another fault code overwrites it.


FAULT CODE - 1: COMMUNICATIONS ERROR
Communications failure between the
sensor module and motor control module.
Remedy:
- Check the continuity of the module interconnecting harness.
- Replace the sensor module
- Replace the motor control module.
MOTOR CONTROL MODULE

SENSOR MODULE


FAULT CODE 2: DRUM GAP CANNOT BE LOCATED.
Remedy:
- Ensure the sensor module is correctly located and clipped into place.
- Replace the lens on the sensor module.
- Replace the sensor module.
- Remove the top deck and clean the drum sensing “bumps” on the outside of the drum end.
- Replace the drum.
FAULT CODE 3: DRUM STALLED
Remedy:
- If there is mechanical movement of the drum, but this fault code is appearing, follow the procedures for fault code 2.
- If there is no mechanical movement of the drum, check drum movement mechanisms: belt, motor and motor harness.
- Replace the motor control module.
- Replace the motor.
FAULT CODE 4: INVALID OPTION LINK READ
- The motor control module heat source option link read is invalid.
Remedy:
- Replace the motor control module.
FAULT CODE 6: DOOR JAMMED [USER WARNING]
The door is unable to close due to
either clothes catching or an excessive closing load.
Remedy:
- Remove the obstruction.
- Re position or remove some of the load.
- Fix the cause of binding in the door closing mechanism.
- Replace the motor.
FAULT CODE 7: MOTOR CURRENT EXCESSIVE
Remedy:
- Free up the dryer. Remove overload or cause of jamming.
- Replace the motor control module.
- Replace the motor.
FAULT CODE 7b: DISPLAY MODULE RAM CHECK ERROR.
- On power up, the display has checked its memory against a known reference and found differences.
- Replace the display module.
DISPLAY MODULE:

FAULT CODE 8: EXHAUST SENSOR OVER TEMPERATURE
- The exhaust sensor measures over temperature (element short circuit or low resistance).
- Check the integrity of the sensor circuit checking particularly for short circuits. Approximate resistances (+ 10%) at various temperatures are; 0oC = 33kOhms, 22oC = 11 kOhms, 40oC = 5 kOhms. Replace thermistor and harness if out of range.
- Check the element integrity in that it switches off when the dryer is stopped.
- Replace the motor control module.
- Replace the sensor module.
FAULT CODE 9: EXHAUST SENSOR UNDER TEMPERATURE
- The exhaust sensor measures under temperature (open circuit or not plugged in).
- Refer to steps for over temperature fault (fault code 8) above, but open circuit likely.
- The sensor module measures low voltage on actuator power supply.
- Replace the sensor module.
FAULT CODE 11: LID LOCK OPEN CIRCUIT
Remedy:
- Check the lid lock harness and coil. If there is continuity through these, replace the sensor module.
FAULT CODE 12: LID LOCK SWITCHING DEVICE FAILURE
Remedy:
- Check that there are no short circuits in the lid lock circuit which may have caused the failure in the sensor module. The resistance of the lid lock should be between 50 and 100 ohms. If the circuit is correct, replace the sensor module.
FAULT CODE 14: SENSOR MODULE FAULT. REPLACE SENSOR MODULE.
FAULT CODE 15: SENSOR MODULE FAULT. REPLACE SENSOR MODULE.
FISHER & PAYKEL _ DEIX1 AA WW _ INTUITIVE DRYER _ FAULT CODES
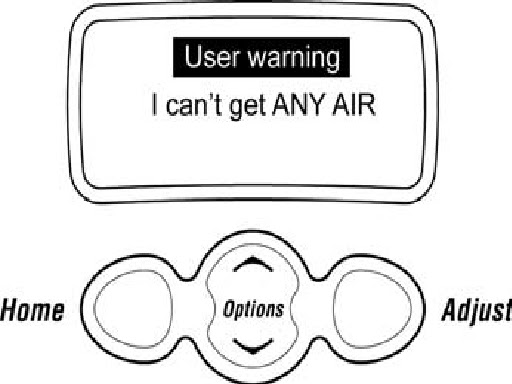
FAULT CODE 16: AIRFLOW RESTRICTION [USER WARNING]
Airflow restriction.
Remedy:
- Check that the lint bucket is empty and the filter is clear.
- Ensure that the exhaust duct is not restricted, blocked or kinked, preventing good airflow.
- Ensure that there is nothing inhibiting unrestricted airflow through the heater housing, through the drum, lint filter, lint collector and through the exhaust duct, and that the element has not shorted. If the dryer is located in a closet ensure there is adequate ventilation for air intake.
- Check that the voltage is not too high.
- Check for element shorts or low resistance.
- Replace the automatic thermostat.
- Replace the motor control module.
Element Assembly

- Two sets of Nichrome wire elements linked in parallel between Mica plates. A ceramic insulator is used to support the element assembly in the housing.
Cold Resistance 13.5 Ohms
Current 15 Amps
Power 3.6 kW
Voltage 240 Volts
Cold Resistance 37 Ohms
Current 5.8 Amps
Power 1.4 kW
Voltage
240 Volts
THERMOSTAT CUTOUT
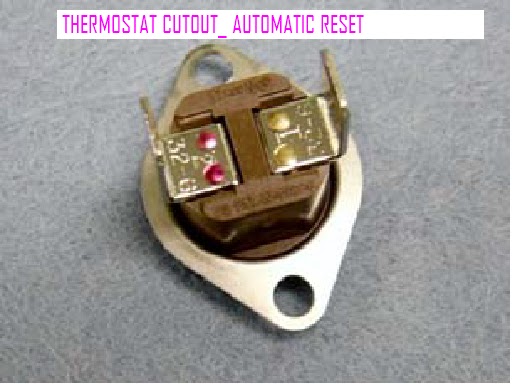
- Type SPST
- Trip Temperature 70°C ± 3o
- Reset Temperature 55°C ± 4o
FAULT CODE 20: DOOR ACTUATOR STALLED.
FAULT CODE 21: DOOR ACTUATOR REQUIRED EXCESS VOLTAGE
Remedy:
- Ensure there is no weight placed on the lid of the product (e.g. clothes basket). If so, remove the weight and retest.
- Inspect the installation, making sure that the cabinet sits evenly on the floor. If excess load is placed on the cabinet, it can cause the sub-deck assembly to twist.
- Inspect the front inside edge of the top deck for any signs of excessive inwards bowing as this can cause it to catch on the door grabber, resulting in excess current draw on activation. The bowing can be caused by a bowed top deck or by incorrect assembly of the top deck to the cabinet front.
- Ensure the user intervention tab is not inhibiting door grabber movement.
- Check that the actuator linkage is located correctly. There must be no gap between the linkage and the plastic moulding.
- Check that the actuator housing is in place, and that the four retaining lugs are correctly located. Early models may have aluminium tape holding the housing in place. If so, ensure that the tape is replaced when the housing is refitted.
- Remove the actuator housing and look for obvious signs of things that are out of position (can the worm drive be rotated freely both backwards and forwards by hand, is the actuator motor in place?)
- Replace the faulty door actuator mechanism.
- Replace the door grabber, linkage and housings.
- Replace the sensor module.
FAULT CODE 22: DOOR ACTUATOR OPEN CIRCUIT.
Remedy:
- Check that the actuator wiring is plugged into the sensor module and is not open circuit. If faulty, replace.
- Replace the sensor module.
Sensor Module

FAULT CODE 23: DOOR ACTUATOR MOVEMENT INTERRUPTED BY LOW VOLTAGE
The door actuator movement was
interrupted by low voltage (brown out).
Remedy:
- Ensure mains voltage is within +10% and –15% of nominal.
- Replace the sensor module, as voltage measurement circuit may be reading incorrectly.
- Replace the motor control module, as it may not be supplying sufficient power to the sensor module. When display is off, approximately 24V DC is supplied.
Motor control Module

FAULT CODE 24: DOOR ACTUATOR MOVEMENT TOOK TOO LONG
- Remedy: As per fault code 21.
FAULT CODE 28: DATA RETRIEVAL ERROR FOLLOWING LOSS OF POWER.
Remedy:
FAULT CODE 29: BROWN-OUT DATA RETRIEVAL ERROR
Remedy:
- If the fault occurs every time the dryer is turned on, replace the sensor module.
- Replace the motor control module
FAULT CODE 30: Lid Lock unable to Lock –
(User Warning).
Reason: The lid lock failed to lock.
(Not user displayed.)
Remedy:
- Ensure the lid is closed and the tongue engaged.
- Replace the lid lock harness.
- Replace the lid lock.
- Replace the sensor module.
FAULT CODE 45: Display
Module ROM Check Error.
On power up, the display has checked
its memory against a known reference and found differences.
Remedy:
- Replace display module.
Display Module

FAULT CODE 105: Comms
Error Time Out
Communications failure between the
sensor module and display module.
Remedy:
- Visually check the contacts on the RAST (edge) connector at each end on the harness between the sensor module and display module.
- Using a multimeter check for continuity of the wires on this harness.
- Replace display module.
- Replace sensor module.
Note: The green Air Dry LED illuminated
without the fault “beeps” indicates the dryer is in a low mains voltage (brown
out) state, and may be momentarily displayed when the supply power is turned
off.
- Switch off the mains power supply to the dryer for at least 10 seconds and confirm error.
- Replace the motor control module.