How to disassemble HP tablets - HP Pro x2 612 G1 – Step by step disassembling procedure – Battery removal – How to replace the backup battery – Tablet repair and service

Category: Laptop repair and Service
Contents of this article
- How to remove the back cover
- how to remove the battery
- SSD Removal
HP Pro x2 612 G1
DISASSEMBLING PROCEDURE
How to remove Back cover
Before disassembling the tablet, follow these steps:
1. Turn off the tablet. If you are unsure whether the tablet is off or in Hibernation, turn the tablet on, and then shut it down through the operating system.
2. Disconnect the power from the tablet by unplugging the power cord from the tablet.
3. Disconnect all external devices from the tablet
1. Turn off the tablet. If you are unsure whether the tablet is off or in Hibernation, turn the tablet on, and then shut it down through the operating system.
2. Disconnect the power from the tablet by unplugging the power cord from the tablet.
3. Disconnect all external devices from the tablet
Remove the back cover:
1. Turn the tablet upside down
with the bottom edge toward you.
2. Separate the adhesive cover strip (1) from the bottom edge of the tablet.
3. Remove the four Phillips PM1x4 screws (2).
2. Separate the adhesive cover strip (1) from the bottom edge of the tablet.
3. Remove the four Phillips PM1x4 screws (2).
4. Lift the back cover (3) slightly.

5. Use a case utility tool (1)
to separate the top edge of the back cover (2) from the display
panel assembly.
6. Separate the left (3) and right sides of the back cover from
the display panel assembly.
7. Separate the bottom edge (4)
of the back cover from the display panel assembly.

8. Lift the bottom edge of the
back cover (1), and then swing it up and to the left until it rests next
to the tablet.
9. Release the zero insertion force (ZIF) connector (2) to which
the button board cable is attached, and then disconnect the button board cable
from the system board.
10. Release the ZIF connector (3) to which the fingerprint reader board cable is attached (if present), and then disconnect the fingerprint reader board cable from the system board.
10. Release the ZIF connector (3) to which the fingerprint reader board cable is attached (if present), and then disconnect the fingerprint reader board cable from the system board.
11. Remove the back cover (4).

How to remove Fingerprint reader board
Before removing the fingerprint reader board, follow
these steps:
1. Turn off the tablet. If you are unsure whether the tablet is off or in Hibernation, turn the tablet on, and then shut it down through the operating system.
2. Disconnect the power from the tablet by unplugging the power cord from the tablet.
3. Disconnect all external devices from the tablet.
4. Remove the back cover
Remove the fingerprint reader board:
1. Remove the Philllips PM1.8×2.4 screw (1) that secures the fingerprint reader board and bracket to the back cover.
2. Slide the fingerprint reader board bracket away from the front edge of the back cover, and then remove the bracket (2).
3. Remove the fingerprint
reader board (3).

How to remove Button board
Before removing the button board, follow these steps:
1. Turn off the tablet. If you are unsure whether the tablet is off or in Hibernation, turn the tablet on, and then shut it down through the operating system.
2. Disconnect the power from the tablet by unplugging the power cord from the tablet.
3. Disconnect all external devices from the tablet.
4. Remove the back cover
Remove the button board:
1. Remove the two Philllips PM1.5×2.4 screws (1) that secure the button board to the back cover.
2. Remove the button board (2).


How to remove Tablet battery
Before removing the tablet battery, follow these steps:
1. Turn off the tablet. If you are unsure whether the tablet is off or in Hibernation, turn the tablet on, and then shut it down through the operating system.
2. Disconnect the power from the tablet by unplugging the power cord from the tablet.
3. Disconnect all external devices from the tablet.
4. Remove the back cover
Remove the tablet battery:
1. Disconnect the tablet battery cable from the tablet system board.
1. Disconnect the tablet battery cable from the tablet system board.
2. Release the ZIF connector (1)
to which the tablet I/O board cable is attached, and then disconnect the tablet
I/O board cable from the system board.
3. Remove the five Philllips
PM2.4×4.6 screws (2) that secure the tablet battery to the display panel
assembly.
4. Remove the tablet battery (3).
4. Remove the tablet battery (3).

How to remove Solid-state drive
Before removing the solid-state drive, follow these
steps:
1. Turn off the tablet. If you are unsure whether the tablet is off or in Hibernation, turn the tablet on, and then shut it down through the operating system.
2. Disconnect the power from the tablet by unplugging the power cord from the tablet.
3. Disconnect all external devices from the tablet.
4. Remove the back cover
5. Disconnect the tablet battery cable from the system board
Remove the solid-state drive:
1. Remove the Phillips PM1.9×2.5 screw (1) that secures the solid-state drive to the system board. (The solid-state drive tilts up.)
2. Remove the solid-state drive (2).
1. Remove the Phillips PM1.9×2.5 screw (1) that secures the solid-state drive to the system board. (The solid-state drive tilts up.)
2. Remove the solid-state drive (2).

How to remove RTC battery
Before removing the RTC battery, follow these steps:
1. Turn off the tablet. If you are unsure whether the tablet is off or in Hibernation, turn the tablet on, and then shut it down through the operating system.
2. Disconnect the power from the tablet by unplugging the power cord from the tablet.
3. Disconnect all external devices from the tablet.
4. Remove the back cover (see Back cover on page 39).
5. Disconnect the tablet battery cable from the system board (see Tablet battery on page 44).
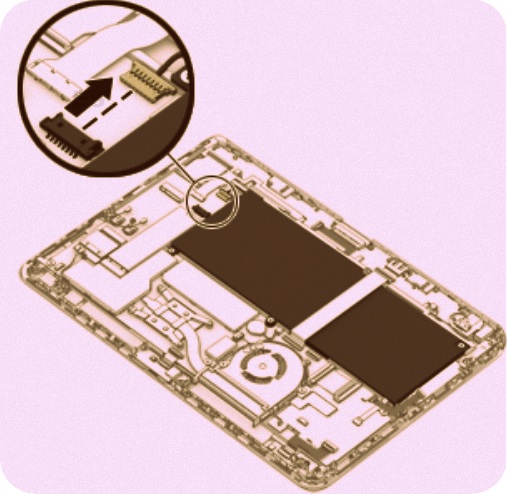
Remove the RTC battery:
1. Disconnect the RTC battery cable (1) from the system board.
2. Detach the RTC battery (2) from the system board. (The RTC battery is attached to the system board with double-sided adhesive.)
1. Turn off the tablet. If you are unsure whether the tablet is off or in Hibernation, turn the tablet on, and then shut it down through the operating system.
2. Disconnect the power from the tablet by unplugging the power cord from the tablet.
3. Disconnect all external devices from the tablet.
4. Remove the back cover (see Back cover on page 39).
5. Disconnect the tablet battery cable from the system board (see Tablet battery on page 44).
Remove the RTC battery:
1. Disconnect the RTC battery cable (1) from the system board.
2. Detach the RTC battery (2) from the system board. (The RTC battery is attached to the system board with double-sided adhesive.)

3. Remove the RTC battery.