 How to enter service mode to Panasonic TX42G30J Plasma TV, LED blinking codes and other service adjustments

Panasonic Plasma TV - TX-P42G30E, TX-P42G30J, TX-PF42G30
[GPF14D-E Chassis]
Replacement of ICs:
When Peaks IC (IC8000) is replaced, EEPROM (IC8902) should be also replaced with new one the same time.
When EEPROM (IC8902) is replaced, Peaks IC (IC8000) is not necessary to be replaced the same time.
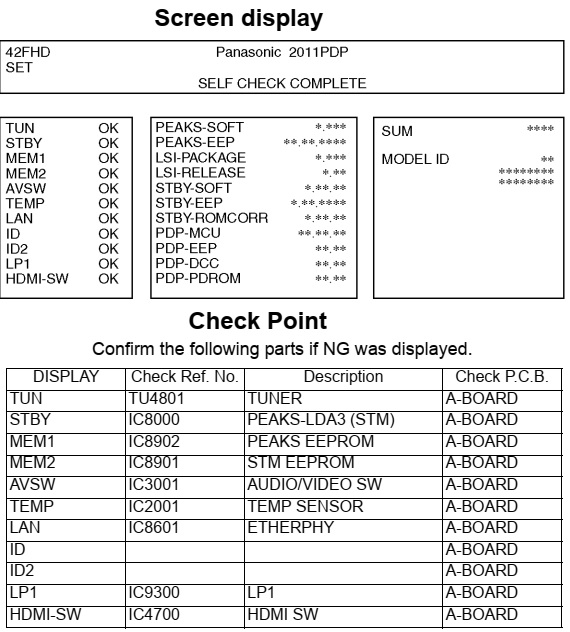
After the replacement of IC, SELF CHECK should be done to generate the final KEY data.
How to SELF CHECK: While pressing [VOLUME ( - )] button on the main unit, press [MENU] button on the remote control for more than 3 seconds.
TV will be forced to the factory shipment setting after this SELF CHECK.
When Peaks IC (IC8000) is replaced, EEPROM (IC8902) should be also replaced with new one the same time.
When EEPROM (IC8902) is replaced, Peaks IC (IC8000) is not necessary to be replaced the same time.
After the replacement of IC, SELF CHECK should be done to generate the final KEY data.
How to SELF CHECK: While pressing [VOLUME ( - )] button on the main unit, press [MENU] button on the remote control for more than 3 seconds.
TV will be forced to the factory shipment setting after this SELF CHECK.
How to enter into Service
Mode
While pressing [VOLUME ( -
)]
button of the main unit, press [0] button of the remote control three
times within 2 seconds.
Key command
[1] button...Main items Selection in forward direction
[2] button...Main items Selection in reverse direction
[3] button...Sub items Selection in forward direction
[4] button...Sub items Selection in reverse direction
[RED] button...All Sub items Selection in reverse direction
[GREEN] button...All Sub items Selection in forward direction
[VOL] button...Value of sub items change in forward direction ( + ), in reverse direction ( - )
To EXIT, Switch off the power with
the [POWER] button on the main unit or the [POWER] button on the remote control.

Contents of adjustment mode
• Value is shown as a hexadecimal number.
• Preset value differs depending on models.
• After entering the adjustment mode, take note of the value in each item before starting adjustment.
• Value is shown as a hexadecimal number.
• Preset value differs depending on models.
• After entering the adjustment mode, take note of the value in each item before starting adjustment.

Option - Mirror
Picture can be reversed left and right or up and down.
00 : Default (Normal picture is displayed)
01 : Picture is reversed left and right.
02 : Picture is reversed up and down.
[If the
defective symptom (e.g. Vertical bar or Horizontal bar) is moved by selection
of this mirror, the possible cause is in A-board]
Picture can be reversed left and right or up and down.
00 : Default (Normal picture is displayed)
01 : Picture is reversed left and right.
02 : Picture is reversed up and down.

Service Tool mode
1. Select [SRV-TOOL] in Service Mode.
2. Press [OK] button on the remote control.
2. Press [OK] button on the remote control.
Display
of SOS History
SOS History (Number of LED blinking) indication.
From left side; Last SOS, before Last, three occurrence before, 2nd occurrence after shipment, 1st occurrence after shipment.
This indication will be cleared by [Self-check indication and forced to factory shipment setting].
SOS History (Number of LED blinking) indication.
From left side; Last SOS, before Last, three occurrence before, 2nd occurrence after shipment, 1st occurrence after shipment.
This indication will be cleared by [Self-check indication and forced to factory shipment setting].
POWER
ON Time, On/Off
Note : To display TIME/COUNT menu, highlight position, then press MUTE for 3 sec.
Time : Cumulative power on time, indicated hour : minute by decimal
On/Off : Number of On/Off switching by decimal
Note : This indication will not be cleared by either of the self-checks or any other command.
Note : To display TIME/COUNT menu, highlight position, then press MUTE for 3 sec.
Time : Cumulative power on time, indicated hour : minute by decimal
On/Off : Number of On/Off switching by decimal
Note : This indication will not be cleared by either of the self-checks or any other command.
Exit
1. Disconnect the AC cord from wall outlet or switch off the power with [ Power ] button on the main unit.
1. Disconnect the AC cord from wall outlet or switch off the power with [ Power ] button on the main unit.

Hotel mode
To Restrict a function for hotels.
Access command to the Hotel mode setup menu
In order to display the Hotel mode setup menu:
While pressing [VOLUME (-)] button of the main unit, press [AV] button of the remote control three times within 2 seconds.
Access command to the Hotel mode setup menu
In order to display the Hotel mode setup menu:
While pressing [VOLUME (-)] button of the main unit, press [AV] button of the remote control three times within 2 seconds.
To exit the Hotel
mode setup menu
Disconnect AC power cord from wall outlet.
Disconnect AC power cord from wall outlet.
Data Copy by SD Card
Board replacement (Copy the
data when exchanging A-board):
When exchanging A-board, the data in original A-board can be copied to SD card and then copy to new A-board.
When exchanging A-board, the data in original A-board can be copied to SD card and then copy to new A-board.
(b) Hotel (Copy the data when
installing a number of units in hotel or any facility):
When installing a number of units in hotel or any facility, the data in master TV can be copied to SD card and then copy to other TVs
When installing a number of units in hotel or any facility, the data in master TV can be copied to SD card and then copy to other TVs
Make pwd file as startup file for
(a) or (b) in a empty SD card.
1. Insert a empty SD card to your PC.
2. Right-click a blank area in a SD card window, point to New, and then click text document. A new file is created by default (New Text Document.txt).
3. Right-click the new text document that you just created and select rename, and then change the name and extension of the file to the following file name for (a) or (b) and press ENTER.
File name:
(a) For Board replacement : boardreplace.pwd
(b) For Hotel : hotel.pwd
Note:
Please make only one file to prevent the operation error.
No any other file should not be in SD card.

Data
copy from TV set to SD Card
1. Turn on the TV set.
2. Insert SD card with a startup file (pwd file) to SD slot. On-screen Display will be appeared according to the startup file automatically.
3. Input a following password for (a) or (b) by using remote control.
(a) For Board replacement: 2770
(b) For Hotel : 4850
Data will be copied from TV set to SD card.
It takes around 2 to 6 minutes maximum for copying.
4. After the completion of copying to SD card, remove SD card from TV set.
5. Turn off the TV set.
Note:
Following new folder will be created in SD card for data from TV set.
(a) For Board replacement: user_setup
(b) For Hotel : hotel

Data
copy from SD Card to TV set
1. Turn on the TV set.
2. Insert SD card with Data to SD slot. On-screen Display will be appeared according to the Data folder automatically.
3. Input a following password for (a) or (b) by using remote control.
(a) For Board replacement: 2771
(b) For Hotel : 4851
Data will be copied from SD card to TV set.
4. After the completion of copying to SD card, remove SD card from TV set.
(a) For Board replacement: Data will be deleted after copying (Limited one copy).
(b) For Hotel : Data will not be deleted and can be used for other TVs.
5. Turn off the TV set.
Note:
1. Depending on the failure of boards, function of Data copy for board replacement does not work.
2. This function can be effective among the same model numbers.

Check of the IIC bus lines
Produce
TV reception screen, and while pressing [VOLUME
( - )] button on the main unit, press [OK] button on the remote
control for more than 3 seconds.
Self-check
indication and forced to factory shipment setting:
Caution:
New key will be generated and previous TV programmes recorded in USB HDD will not be viewed.
Produce TV reception screen, and while pressing [VOLUME ( - )] button on the main unit, press [MENU] button on the remote control for more than 3 seconds.
Caution:
New key will be generated and previous TV programmes recorded in USB HDD will not be viewed.
Produce TV reception screen, and while pressing [VOLUME ( - )] button on the main unit, press [MENU] button on the remote control for more than 3 seconds.
Exit
Disconnect the AC cord from wall outlet or switch off the power with [ Power ] button on the main unit.
Disconnect the AC cord from wall outlet or switch off the power with [ Power ] button on the main unit.
Power LED blinking timing
chart
Information of LED Flashing timing chart.
When an abnormality has occurred the unit, the protection circuit operates and reset to the standby mode. At this time, the
defective block can be identified by the number of blinks of the Power LED on the front panel of the unit.
Information of LED Flashing timing chart.
When an abnormality has occurred the unit, the protection circuit operates and reset to the standby mode. At this time, the
defective block can be identified by the number of blinks of the Power LED on the front panel of the unit.
