REPAIRING AND NOT THROWING AWAY

Richtige Fernseher haben Röhren!

Richtige Fernseher haben Röhren!

In Brief: On this site you will find pictures and technical information about Service Modes, Circuit Diagrams, Firmware Update procedure, Disassemble procedure, Universal remote control set-up codes, Troubleshooting and more....

If you go into the profession, you will obtain or have access to a variety of tech tips databases HERE IT IS Master Electronics Repair !.

These are an excellent investment where the saying: 'time-is-money' rules. However, to learn, you need to develop a general troubleshooting approach - a logical, methodical, method of narrowing down the problem. A tech tip database might suggest: 'Replace C536' for a particular symptom. This is good advice for a specific problem on one model. However, what you really want to understand is why C536 was the cause and how to pinpoint the culprit in general even if you don't have a service manual or schematic and your tech tip database doesn't have an entry for your sick TV or VCR.

While schematics are nice, you won't always have them or be able to justify the purchase for a one-of repair. Therefore, in many cases, some reverse engineering will be necessary. The time will be well spent since even if you don't see another instance of the same model in your entire lifetime, you will have learned something in the process that can be applied to other equipment problems.
As always, when you get stuck, checking out a tech-tips database may quickly identify your problem and solution.In that case, you can greatly simplify your troubleshooting or at least confirm a diagnosis before ordering parts.

Happy repairing!
Today, the West is headed for the abyss. For the ultimate fate of our disposable society is for that society itself to be disposed of. And this will happen sooner, rather than later.

How to use the site:

- If you landed here via any Search Engine, you will get what you searched for and you can search more using the search this blog feature provided by Google. You can visit more posts scrolling the left blog archive of all posts of the month/year,
or you can click on the main photo-page to start from the main page. Doing so it starts from the most recent post to the older post simple clicking on the Older Post button on the bottom of each page after reading , post after post.

You can even visit all posts, time to time, when reaching the bottom end of each page and click on the Older Post button.

- If you arrived here at the main page via bookmark you can visit all the site scrolling the left blog archive of all posts of the month/year pointing were you want , or more simple You can even visit all blog posts, from newer to older, clicking at the end of each bottom page on the Older Post button.
So you can see all the blog/site content surfing all pages in it.

- The search this blog feature provided by Google is a real search engine. If you're pointing particular things it will search IT for you; or you can place a brand name in the search query at your choice and visit all results page by page. It's useful since the content of the site is very large.

Note that if you don't find what you searched for, try it after a period of time; the site is a never ending job !

..............The bitterness of poor quality is remembered long after the sweetness of todays funny gadgets low price has faded from memory........ . . . . . .....
Don't forget the past, the end of the world is upon us! Pretty soon it will all turn to dust!

©2010, 2011, 2012, 2013, 2014 Frank Sharp - You do not have permission to copy photos and words from this blog, and any content may be never used it for auctions or commercial purposes, however feel free to post anything you see here with a courtesy link back, btw a link to the original post here , is mandatory.
All posts are presented here for informative, historical and educative purposes as applicable within fair use. NOTHING HERE IS FOR SALE !

Saturday 23 February 2019

KONKA K1373UM SERVICE MODE MAIN POWER SMPS SCHEMATIC DIAGRAM

KONKA K1373UM SERVICE MODE MAIN POWER SMPS SCHEMATIC DIAGRAM


TO ENTER SERVICE MODE
  1. Press [Mute, Timer & Picture] buttons on the remote control in the order, within '2' seconds, to enter service mode.
  2. Press [P“▲/▼”] buttons to select and item to adjust.
  3. Press [-“▲/▼”] buttons to change the data value to selected item.
  4. Press 'Menu' button to return to super menu.
  5. Under 'main menu' mode press 'Menu' button to 'Exit' form service menu mode.
AC power supply check and +B DC adjustment
  • Check  AC  power  supply  is  normal  or  not  (120V,  60Hz  and  Sine  Wave  are  normal)
  • Receive Television broadcast signal, set PICTURE to standard mode
  • Adjust RP950 so that voltages at two ends of C960 are +B.


Picture IF setting
Receive any signal, enter into VCJ    VCO  ADJà  VIF  VCO  AUTO  ADJ  menu under factory mode, then press VOL+/- button, when “END” displays on the screen, that means intermediate frequency has been adjusted to 45.75M in IC automatically.
RFAGC adjustment
Receive VH signal (Channel 7 or channel 10), apply 60dBμV gray scale signal
Enter  VDJ  ADJ à RF DELA Y ADJ  and  press  VOL“▲/▼”   button  to  adjust  it  until picture noise is just disappeared.
FOCUS adjustment
Receive five circles pattern, adjust the pattern to standard mode
Adjust  focus  potentiometer  (horizontal  output  transformer)  so  that  the center and four corners of pattern are the best focus.
Horizontal  scanning,  vertical  scanning  and  geometry  correction  adjustment
Receive  five  circles  pattern  signal,  enter  RASTER  ADJ  menu  to  adjust  the following parameters:
V POSITION Vertical Position
V SIZE Vertical Size
H POSITION Horizontal Position
Grid voltage adjustment and White Balance adjustment
Enter factory menu firstly and set PICTURE to STANDARD.
Enter into factory mode to set the following parameters:
PICTURE ADJ menu
SUB BRIGHTNESS 160
SUB CONTRAST 80
CRT ADJ menu
CUT OFF-R 127
CUT OFF-G 127
CUT OFF-B 127
DRIVE R 63
DRIVE B 63
Enter into  CRT  ADJ  menu,  press  0  button  to  display  one  horizontal  light line  on  the  screen,  adjust  grid  potentiometer  until  this  light  line  is  just
appeared. Press 0 button again to exit the horizontal light line status.  Insert  the  plug  for  automatic  adjustment,  running  white  balance  test program (WB37150.EXE)


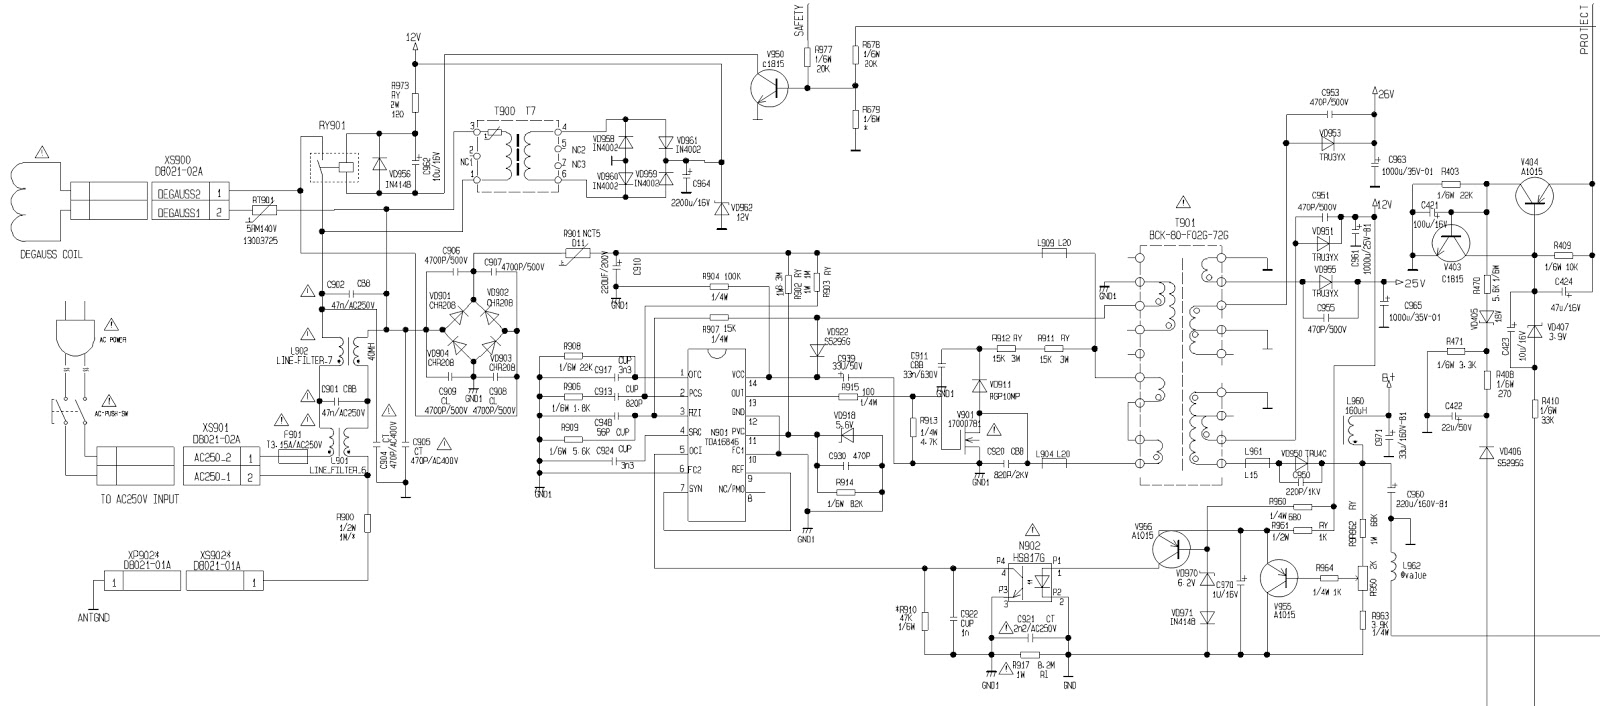
SMPS SCHEMATIC [Click on picture to Enlarge]