
PANASONIC PLASMA DISPLAY - 9th GENERATION - TROUBLESHOOTING
When a Plasma TV is plugged in, there is a few indications of normal operation.- There is a 'click' from the relays RL402 & RL403, when they are activated.
- The LED in the optical jack inside the 'DT' board turns ON for ~ 4 seconds.
- Immediately after that, one of the Tuner LEDs {Right} turns ON; solid Red, for ~ 20 seconds.
- The LED in the optical jack inside the 'DT' board turns ON again for ~ 1 second, and both LEDs; the tuner and the optical jack; turn OFF.
- Then an other click will be there from the relays RL402 & RL403 indicating that they are no-longer engaged. At this time, tuner and optical jack LED turn OFF.
CAUSES FOR SHUT DOWN.
- A short circuit on any of the voltage lines.
- An over-voltage condition.
- Abnormality in the Control Drive Pulse circut {SC, SU, SD & SS board}.
- Missing source voltage to the PA board. STB14V from the 'P' board.
- missing output voltage from the 'PA' board to the 'DG' board.
- Missing 15V of VSUS on either the SS or SC boards while the control drive pulses from D board are being provided.
'PA' VOLTAGE OUTPUT {BLOCK DIAGRAM]
- If any of the SUB or MAIN voltages that are high-lighted on the 'DG' board is missing, the unit goes to shut down. The power LED blinks TEN times.
- If any of the voltages created on the 'PA' board is excessive or shorted, the unit goes to shut down. The Power LED blinks 10 times.

SHUT DOWN DUE TO OVER VOLTAGE OR SHORT CIRCUIT.
- The base of [Q5642] being low indicates a short circuit in the { Main 1.8V, Main 9V or Main 5V output of the 'PA' board.
- The base of [Q5641] being low, indiates a short circuit on over-voltage condition in the NR14V, Main 1.8V, Main 3.3V, Sub 9V or Sub 5V of the 'PA' baord.

PA SOS detect circuit

P-A Board_loss of Sub-voltage.

PA Board _ Over Voltage Protection.

PANASONIC PLASMA 9th GENERATION TVs_FAULT FINDING METHODS
STB 5V test point {P Board}

STB 5V test point {PA Board}

F-STB 14V & PFC Test Points

STB 14V Block.

To Rule Out 'P' Board
Use a 'Peak Hold Meter' for voltage reading.
- Disconnect the connector {P10} in the 'P' board; make sure the TV is unplgged before disconnecting.
- Only have 2 to 3 seconds for the voltage measuring at STB 14V, place the meter probe at Pin-1 of connector P-10 on the 'P' board.
- Plug the TV to AC line, while still holding the meter probe at Pin-1.
- If the 14V comes up, determine which of the 'PA' or 'DG' board is defective. If no 14V comes up, 'P' board is defective.
POWER LED BLINKS 10 TIMES
When the power LED blinks 10 times right after the TV has been
plugged into AC, and the Power is OFF; P, PA, DG, H or the DT may be
defective.
The DT, DG and H boards are part of an assembly. For troubleshooting, the DT board must be removed.

SCREEN SHOTS AND DEFECTIVE BOARDS.
Defective DG Board.

Defective D board

Defective D board


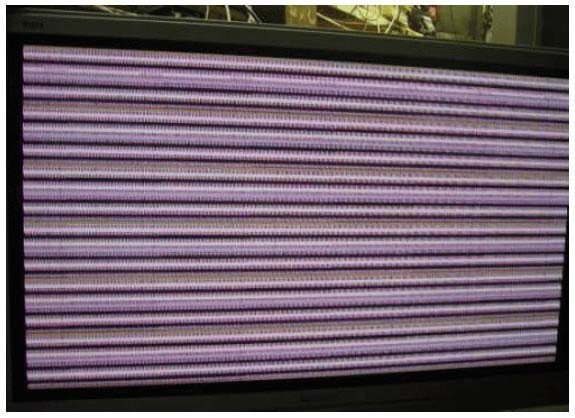
No output to SS board from D board

No output to SS board from D board

NO VIDEO - NO OSD
- Unplug the unit from AC outlet.
- Disconnect the connector 'DG-5' from the 'DG' board.
- Plug the unit into AC power socket.
- If the unit displays a white screen, it is a video processing problem.
- If the unit does not show a white screen, check panel drive circuits.

DG-5 {Close up view}

ISOLATION OF THE 'SC' AND 'SS' BOARDS.
- If any of the connectors providing the 15V or VSUS voltage to the SC or SS board is disconnected, while the connectors that provides the scan and Sustain Drive pulses from the D broad are still connected, the TV will shut down. {Do not let the TV run for more than 30 seconds while isolating any of the circuit board for testing.} The Scan Board [SC] and Sustain Board [SS] could be measly isolated. This can be useful to diagnose:
- Shutdown problems.
- Video problems.
ISOLATION OF THE [SC} BOARD.
Supply voltage =VSUS {connector SC2} 15V {Connector S23] from power supply 'P' board.
Scan control pulses = connector SC20 from the SC board.

SC board completely isolated from the sources 'P' & 'D' boards.
This is useful when Power LED blinks 6 or 7 times. Screenshot:

Form the above picture:
- If only SC is disconnected, while SC23 and SC20 are connected, the Power LED blinks 6 times.
- If only SC23 is disconnected, while SC2 and SC20 are connected, Power LED blinks 7 times.
- If both SC2 and SC23 are disconnected, while SC20 is still connected, Power LED blinks 7 times again.
- If SC20 is disconnected while SC2 and SC23 are still concerted the Power Turns ON [Black picture, No OSD, Sound OK and there should be video out of the monitor jack. SS LED is On, and SC LED is off.
PANASONIC PLASMA - 9th GENERATION Troubleshooting _LED Blinking Codes
ISOLATION OF THE 'SC' BOARD
- Sometimes the TV goes into 'Shutdown' indicating that the problem is located on the 'SC' board. This does not means that the 'SC' board is the cause of the problem. When this occurs, disconnect both 'SU' and 'SC' boards from the 'SC' Board. To disconnect, remove 2 screws holding each of these boards in place and disconnect {SC41, SU45, SD46 & SC42.

Some times the TV may go into shutdown, when there is a scan problem.
This symptom seems to be caused by a defective 'D' or 'SC' board. In
reality, it is caused be the 'SU' board. When this occurs, disconnect
the 'SU' board from the 'SC' board. Disconnecting 'SU' board yields a
good picture at the bottom half of the screen and a completely black
area in the upper half of the screen.
Screenshot due to defective SU Board.

Defects due to faulty 'SD' board.
Top half of the picture to be normal, while the bottom is black. {2 examples}


LED BLINKING CODES & SUSPECTED LOCATIONS.
D BOARD SOS DETECT
|
||
SOS LINE
|
LINE MONITORED
|
NUMBER OF BLINKS
|
SOS-2
|
15V
|
2
|
SOS 3
|
P3.3V [15V 7 STB 5V]
|
3
|
SOS 4
|
PS
|
4
|
SOS-5
|
5V
|
5
|
SOS-6
|
SC1
|
6
|
DRVRST
|
5V DET
|
6
|
SOS-7
|
SC2
|
7
|
SOS-8
|
SS
|
8
|
SOS 9
|
CONFG. DC LEVEL SHIFTER
|
9
|
DG BOARD SOS DETECT
|
||
SOS LINE
|
LINE MONITORED
|
BLINKS
|
STB 3.3V DET
|
STB 3.3V
|
10
|
MAIN 3.3 DET
|
MAIN 3.3V
|
10
|
SUB 5V DET
|
SUB 5V
|
10
|
SUB 9V
|
SUB 9V
|
10
|
PA TUNER SOS
|
PA TUNER+30V
|
10
|
FAN SOS
|
FAN CIRCUIT
|
11
|
SOUND
|
SOUND OUT CIRCUIT
|
12
|