 Sony KDL-50W800C KDL-50W805C – LED blinking codes – Service mode and
adjustments KDL-50W807C KDL-50W809C KDL-55W800C KDL-55W805C
Sony KDL-50W800C KDL-50W805C – LED blinking codes – Service mode and
adjustments KDL-50W807C KDL-50W809C KDL-55W800C KDL-55W805C
Applicable to:Sony KDL-50W800C Silver RMT-TX100U (LA1) MX Black RMT-TX100U (UC2) US, CND
Sony KDL-50W805C Silver RMT-TX100B (BR6) BRAZIL
(CR1) COSTA RICA
(LA8) CHILE, PERU,VENEZUELA
(AR4) ARGENTINA
Sony KDL-50W807C Silver RMT-TX100B (CO1) COLOMBIA
Sony KDL-50W809C Silver RMT-TX100B (ECU) ECUADOR
Sony KDL-55W800C Silver RMT-TX100U (LA1) MX Black RMT-TX100U (UC2) US, CND
Sony KDL-55W805C Silver RMT-TX100B (BR6) BRAZIL
(LA8) CHILE, PERU, VENEZUELA
SELF DIAGNOSIS FUNCTION
The units in this manual contain a self-diagnostic function. If an error
occurs, the STANDBY LED will automatically begin to flash.
The number of times the LED flashes translates to a probable source of the problem.
A definition of the STANDBY LED flash indicators is listed in the instruction manual for the user’s knowledge and reference.
If an error symptom cannot be reproduced, the remote commander can be
used to review the failure occurrence data stored in memory to reveal
past problems and how often these problems occur.

DIAGNOSTIC TEST INDICATORS
When an error occurs, the STANDBY LED will flash a set number of times
to indicate the possible cause of the problem.
If there is more than one error, the LED will identify the first of the problem areas.
Result for all of the following diagnostic items are displayed on screen.
If the screen displays a “0”, no error has occurred.

SELF-DIAGNOSTIC SCREEN DISPLAY
For errors with symptoms such as “power sometimes shuts off” or “screen
sometimes goes out” that cannot be confirmed, it is possible to bring up
past occurrences of failure for confirmation on the screen:
To Bring Up Screen Test
In standby mode, press buttons on the remote commander sequentially in rapid succession as shown below:
Display > Channel-5 > Volume (-) > TV Power
Since the diagnostic results displayed on the screen are not
automatically cleared, always check the self-diagnostic screen. After
you have completed the repairs, clear the result display to “0”
Clearing the Self Check Diagnostic List
Panel operation time : Press the Channel 7 > Channel 0
Exiting the Self-diagnostic screen
To exit the Self Diagnostic screen,
turn off the power to the TV by pressing the POWER button on the remote
or the POWER button on the TV
SELF DIAGNOSTIC SAMPLE SCREEN DISPLAY

SERVICE
MODE
1) Turn on the main power switch to place this set in standby mode.
2) Press the buttons on the remote commander as follows, and entering service mode.
1) Turn on the main power switch to place this set in standby mode.
2) Press the buttons on the remote commander as follows, and entering service mode.
Display
> Channel 5 > Volume (+) > TV Power

After
entering service mode, then turn off the power switch to Exit.
ACCESSING
SOFTWARE VERSION
In
Service Mode, select “Model Information “ Press + (Enter), or (=>) button on
Remote to enter status information.
Press
+ (Enter) or “Return” button on Remote to back to Service Mode.

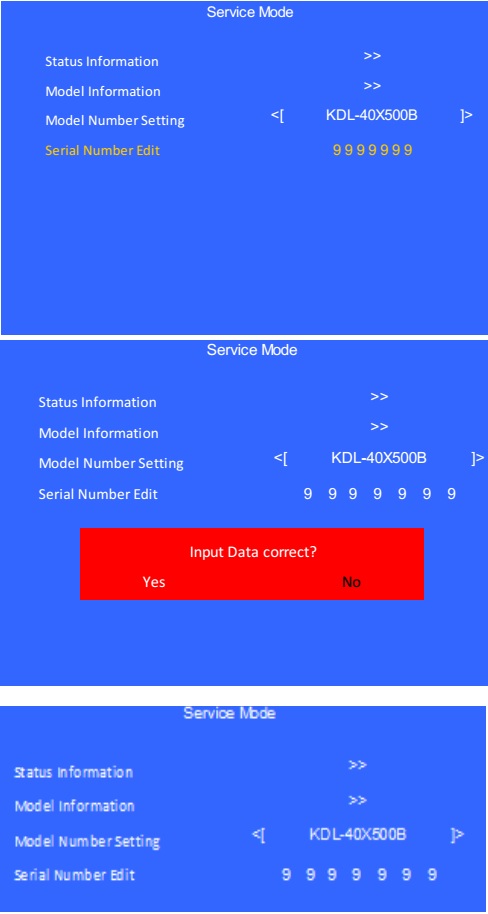
ACCESSING
SERIAL NUMBER EDIT
1) In Service Mode, select “Model” pressing the (Right) button. Select “Serial Number Edit” pressing the (Right) button.
1) In Service Mode, select “Model” pressing the (Right) button. Select “Serial Number Edit” pressing the (Right) button.
2)
Press the (Up) / (Dn) button to select number.
* The font color of “Yes” is change to black when it is selected.
* The font color of “Yes” is change to black when it is selected.
3)
Serial Number can be set ONLY ONCE.> After user input data , press
<Enter>.> Pop dialog will appear to
inform user to confirm data.> Press or button to select
“Yes” or “No” .> Select “Yes” if input data is
correct.> Select “No” if input data is
incorrect.> Press <Enter> to save
answer.
Note: The font color of “Yes” is change to black when it is selected.

4)
If “Yes” is selected, the input data is saved into EEPROM.> “Serial Number Edit” is grayed
out and the serial number that has been input is displayed.> User will not able to edit anymore.
Note:
* The font color of “Serial Number Edit” is change to orange after “Yes” is
selected.
5)
If “No” is selected, the input data is not saved into EEPROM.> The serial number that has
been input is displayed.> User can still edit the Serial
Number.
Note:
* The font color of “No” is change to black when it is selected.
ACCESSING
MODEL NUMBER SETTING
1)In
Service Mode, select “Model” pressing the (Right) button. Select “Model Number
Setting” pressing the (Right) button.
2)
Press (Up) or (Down) button on Remote to input numbers.
3) Press (Up) or (Down) arrow key to Product Name Candidate. (e.g. KDL-40X500B CO1, KDL-40X500C BR6)
4) Select one Product Name from the LIST, press (Enter) will pop dialog to inform user to confirm data.
5) Press “OK” button to select YES or No.> Select OK if input data is correct.> Select NO if input data is incorrect.> Press <Enter> to save answer.> Model dependent settings will be overwritten into EEPROM.

W/B
ADJUSTMENT VIA SERVICE MODE
Apply when B* board or Panel is replaced.
1) In Service Mode, select “Panel/PQ” pressing the (Right) button.
Apply when B* board or Panel is replaced.
1) In Service Mode, select “Panel/PQ” pressing the (Right) button.
2)
Go to “WB Adjustment”, category by Up or Down button. To select “WB
Adjustment”, press the (Right) button.
3)
To change data, press the (Left) or (Right) button.

WB/MURA/CUC
DATA TRANSFER VIA SERVICE MODE
Apply
when B* board or Panel is replaced.
1) In Service Mode, select “Panel/PQ” pressing the (Right) button.
1) In Service Mode, select “Panel/PQ” pressing the (Right) button.
2)
Go to “WB/Mura/CUC data transfer”, category by (Up) or (Down) button.
To select “WB/Mura/CUC data transfer”, press the (Right) button.
3) To change data, press the (Left) or (Right) button.
To select “WB/Mura/CUC data transfer”, press the (Right) button.
3) To change data, press the (Left) or (Right) button.
4)
In “WB/Mura/CUC data transfer:
a) Select “WB/Gamma data transfer” by pressing (Up) or (Down) on remote commander until cursor is on “WB/Gamma data transfer”.
Selectable items are:
> 0. SoC to T-con
> T-con to SoC
> Initialize data
b) To change the items, press the (Left) or (Right) on remote commander.
c) Select “[Start]” and press “Enter” button to start transfer.

Triangle
chart

Click on the pictures to magnify