 Toshiba 37ZV635D – how to enter service mode – Hotel mode – adjustments – LCD Color Television

Toshiba 37ZV635 - How to enter service mode - Self diagnosis - Hotel mode
Entering to Service ModePress the “Mute “button once on remote control.
Press the “Mute” button again and hold button down.
While holding the “Mute” button, press MENU button on TV set.
Displaying the Adjustment Menu
Press MENU button on TV.
Press ↑ ↓ Press
Adjustment Mode
Key Function in the Service Mode
Never try to perform initialization unless you have changed the memory IC

Selecting
the Adjusting Item
Every
pressing of PROGRAMME [Up] button in the service mode changes the adjustment
items in the order of table below. (Dn
button for reverse order)
The
image system data of RCUT-BDRV is different by each image format.
The PAL value is indicated in the table.

Factory
preset data will be loaded after setting Model ID data
Adjusting
the Data
Pressing
of VOLUME +/- button will change the value of data in the range from 00H to
FFH. The variable range depends on the adjusting item.
Setting
TVOP
Enter
to service mode and select menu of TVOP by pressing P Up or P Dn during display
of adjustment menu. After selecting TVOP, press Vol + or Vol - to set I2C check
function to disable or enable as below.
Setting Panel Option Data
For a complete list of OPT4 data values corresponding to the model, see MODEL ID TABLE.
Enter
to service mode and select menu of OPT4 by pressing P Up or P Dn during
display of adjustment menu. After selecting OPT4, press + or - to set
OPT4 value as table below.
OPT4
Ex. OPT4 value 0x16 indicates that panel vendor is LGD and panel size is 37.
Upper 4bit is decided as below table.

Convert from Bit (Binary) to Hex
E.g. If Bit D7-0 = 0101 1010, Hex data is 0x5A.

Exit from Service Mode
Pressing POWER button to turn off the TV once.
Initialization of TV Micro Data
After replacing Digital Board, the following initialization is required.
1) Enter the service mode.
2) Select menu of ID by pressing P Up or P Dn during display of adjustment menu in the service mode.
3) Change ID data into MODEL ID to initialize by pressing Vol + or Vol -, refer to "MODEL ID TABLE".
For example, if initializing 37ZV635D with LGD panel, change MODEL ID into "0x17".

Note: MODEL ID is hex value. For example, set value for 37ZV635D is not Decimal 17
but hex 17.
There are two MODEL IDs for 32ZV635D/625D, and 37ZV635D/625D. The MODEL ID is subject to the panel vendor.
There are two MODEL IDs for 32ZV635D/625D, and 37ZV635D/625D. The MODEL ID is subject to the panel vendor.
4)
Change PANEL OPTION data into OPT4 to initialize by pressing Vol + or Vol -,
refer to "OPT 4" tables.
For example, if initializing 37" LGD PANEL, change OPT4 into "0x16".
Note: OPT4 is hex value.
For example, if initializing 37" LGD PANEL, change OPT4 into "0x16".
Note: OPT4 is hex value.
5)
Enter the service mode and select version check mode. Confirm if MODEL ID
corresponding to the model name is set correctly. If not, do over again from
the start.
Note: In case initialization by setting wrong MODEL ID is done, there is a possibility of abnormal display.
Note: In case initialization by setting wrong MODEL ID is done, there is a possibility of abnormal display.
6)
Execute initialization of the memory
Refer to "KEY FUNCTION IN THE SERVICE MODE".
Press "i+" + PROGRAMME Up button on TV.
7) Check the picture carefully. If necessary, adjust any adjustment item above.
Perform "Auto tune" on the owner's manual.
Refer to "KEY FUNCTION IN THE SERVICE MODE".
Press "i+" + PROGRAMME Up button on TV.
7) Check the picture carefully. If necessary, adjust any adjustment item above.
Perform "Auto tune" on the owner's manual.
Self
Diagnostic Function
1. Press
"9" button on remote control during display of adjustment menu in the
service mode. The diagnosis will begin to check if interface among IC's is
executed properly.
2. During diagnosis, the following displays are shown.
* Self check displays and items are subject to the models.
2. During diagnosis, the following displays are shown.
* Self check displays and items are subject to the models.

TV
CPU SW Version:
Version information of TV Micro SW: Display 1 byte data. (Hex)
EEPROM Version: Version information of TV Micro EEPROM: Display 1 byte data. (Hex)
Power On Time: Total time the TV has been powered on. (Unit: Hours) (Decimal)
Main PLL: Displays Data 11 - Data 18 (8 bytes) of tuner control data. (Hex)
BL_STATUS:
BL_STATUS 1 : The total number of times that the panel did not light. (backlight doublelight also failed) (Decimal)
BL_STATUS 2 : The number of times that the backlight failed to light. (Decimal)
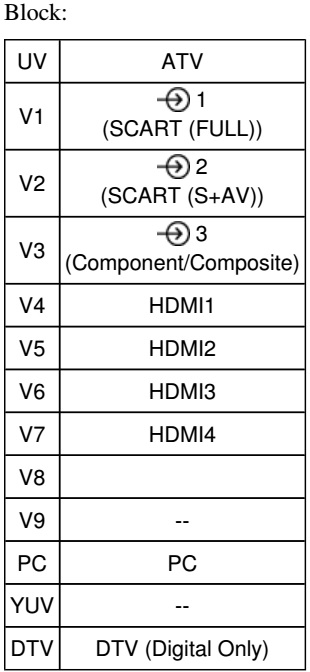
Block:
UV
: ATV reception mode
V1 - V7 : VIDEO 1-7 input mode.
DTV : DTV mode
For current input: OK: Signal Sync Detected.
V1 - V7 : VIDEO 1-7 input mode.
DTV : DTV mode
For current input: OK: Signal Sync Detected.
NG:
No Sync Detected
TV
Status: "official" is normal.
Bus Errors: "none" is normal.
Bus Errors: "none" is normal.
Version
Check Mode
Press
"9" button twice on remote control during display of adjustment menu
in the service mode.
2. During Version Check, the following displays are shown.
* Version check displays and items are subject to the models.
2. During Version Check, the following displays are shown.
* Version check displays and items are subject to the models.
TV
Model
TV Model ID
Boot Code Version
Core SW Version
Seine SW Version
TV Micro SW Version:
Version information of TV Micro SW: Display 1 byte data.
TV Model ID
Boot Code Version
Core SW Version
Seine SW Version
TV Micro SW Version:
Version information of TV Micro SW: Display 1 byte data.
TV Micro EEPROM Version:
Version information of EEPROM: Display 1 byte data.
EDID Checksum: Pass/Fail Result Listed for HDMI 1-4 (left to right)
Global Data Version
LCD Panel Opt: Panel Option (OPT4) Data: Display 1 byte data. (see Setting Panel Option Data)
Factory Test Status: Optional Data Bits that can be used by factory.
A/D Adjust:
COMP : Component input
RGB : RGB (SCART or PC) input
OK : A/D adjustment set correctly.
NG : A/D adjustment set incorrect.
A/D adjustment is not needed because the picture format is not used.
Setting
Hotel Mode
Enter
to service mode and select Hotel Mode menu by pressing P Up or P Dn .
After selecting Hotel Mode, press Vol + to enter details setting in Hotel Mode.
To select menu, press P Up or P Dn and press OK to enter the adjustment menu..
To move the cursor in the adjustment, press Vol+ or Vol-.
1. By pressing P Up or P Dn , following table data setting will change the value either 1 or 0 on selected items.
VOLUX
Set VOLUX as following.
1) Set speaker volume to 100. (Any value is OK, but 100 is better to check sound level.)
2) Down value of VOLUX until finding suitable sound volume level.
DTV
Software Update - While Watching TV
1. Extract
the update files onto a USB drive.
2. Turn on the TV set.
3. Connect the USB drive to the USB port on the side panel.
The following message is displayed:
2. Turn on the TV set.
3. Connect the USB drive to the USB port on the side panel.
The following message is displayed:

4.
Highlight OK and press the OK key on the remote.
5. The status of the update is displayed during update. Never turn off the power while updating.
5. The status of the update is displayed during update. Never turn off the power while updating.
6.
When the update is complete, the following message is displayed
7.
Disconnect the USB drive.
8. The TV set is automatically turned off and then on.
8. The TV set is automatically turned off and then on.
DTV Software Update - from Boot Up
1. Extract the update files onto a USB drive.
2. Unplug the TV.
3. Connect the USB drive to the USB port on the side panel.
4. Press and hold the menu button on the control panel of the TV set.
5. Plug in the TV and watch the LEDs on the front of the TV set.
a.
After several seconds, the orange PowerOn/Standby LED and the green
OnTimer LED light is on, indicating that the TV set is being updated.
b. Once the update started, release the menu button.
6. When only the PowerOn/Standby LED is turned to green, the update has completed successfully.
If the update is unsuccessful, the PowerOn/Standby LED is red.
7. Unplug the TV set.