 Motorola Moto X – Disassembling procedure – How to remove the battery –
How to remove the Earpiece speaker – How to remove the camera
Motorola Moto X – Disassembling procedure – How to remove the battery –
How to remove the Earpiece speaker – How to remove the camera
Motorola Moto X: DISASSEMBLING PROCEDURE
Locate the SIM card tray on the
side of the smartphone and utilize a SIM card ejection tool, or paper clip, to
release and remove the tray from the Moto X.
Next, near the dock connector on the bottom of the smartphone, insert the precision knife in the seam that separates the frame/front housing and rear cover. The seam is very tight so we used the precision knife instead of a plastic opening tool or spudger.
Next, near the dock connector on the bottom of the smartphone, insert the precision knife in the seam that separates the frame/front housing and rear cover. The seam is very tight so we used the precision knife instead of a plastic opening tool or spudger.
Once the first clip is released,
you can continue around the perimeter of the Moto X with your plastic opening
tool gently freeing the clips.

Before completely removing the
rear cover you need to release the camera flash ribbon cable from its socket.
Release the cable by lifting the side opposite the cable up 90 degrees. You can
now remove the rear case from the Moto X (be sure to keep track of the power
& volume buttons).
Next, locate and remove the
eleven T5 torx screws that secure the upper & lower protective
covers/housing to the motherboard (marked with orange circles).
How to remove Battery
First, remove the lower
protective cover; it should release easily with the securing screws removed.
Next, remove the upper cover; it
should release just as easily from the motherboard.
There are four connectors (marked
with orange rectangles) that need to be released. The connector that rests upon
the battery is a locking socket that needs to be disconnected before removing
the ribbon cable. The other three connections can be pried up and released.
Now, slide the flat end of the
spudger under the battery and carefully lift it up from the securing adhesive.
You can now remove the battery from the Moto X.
How to remove Front-Facing
Camera
The front-facing camera is housed
in the upper corner of the Motorola smartphone. Use the fine tip curved
tweezers to pry the connector up from the motherboard and remove the
front-facing camera from the Moto X.
How to remove Earpiece
Speaker
Use the fine tip curved tweezers
to pry up the earpiece speaker from its securing adhesive and remove it from
the smartphone.
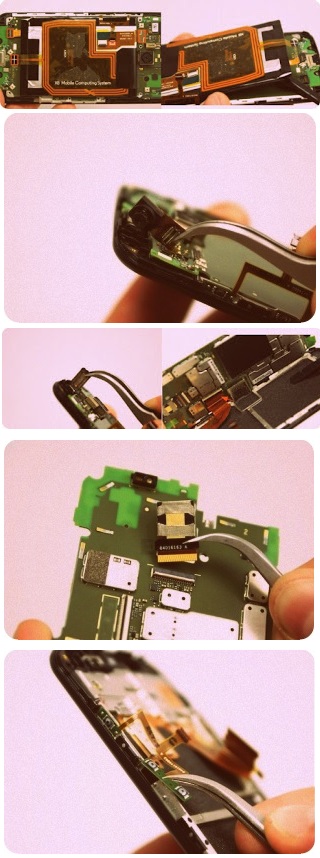
Next, use the flat end of the spudger to carefully separate the display assembly from the motherboard.
There is a ribbon cable that needs to be released before you can completely remove the motherboard (marked with orange arrow).
Next, use the flat end of the spudger to carefully separate the display assembly from the motherboard.
There is a ribbon cable that needs to be released before you can completely remove the motherboard (marked with orange arrow).
How to remove Rear-Facing
Camera
The rear-facing camera rests on
the bottom side of the motherboard. Use the fine tip curved tweezers to release
the locking socket and disconnect the ribbon cable, freeing the rear-facing
camera for removal from the Moto X.
How to remove Power &
Volume Button Flex Cable
The power and volume button flex
cable is located on the back of the display assembly and frame of the Moto X.
Use the fine tip curved tweezers to peel the ribbon cable from the securing
adhesive. The use of a heat gun or blow dryer is encouraged to free and
carefully remove the power and volume button flex cable.