 DVD Home Theater System LG LHD625 troubleshooting – PCB level – firmware
update procedure, SMPS and Audio output schematic and voltages
DVD Home Theater System LG LHD625 troubleshooting – PCB level – firmware
update procedure, SMPS and Audio output schematic and voltages

LG
(LHD625, S63S1-S, S63T1-C, S75T1-W) AMPLIFIER: Stereo mode 167 W + 167 W (3 Ω at 1kHz)
Hidden key mode
DISPLAY
SYSTEM INFORMATION
1) Change function to DVD/CD by pressing input key, and wait until home menu is shown.
- Do not insert disc or USB at the set.
2) Go to SETUP menu by pressing SETUP button in HOME menu.
1) Change function to DVD/CD by pressing input key, and wait until home menu is shown.
- Do not insert disc or USB at the set.
2) Go to SETUP menu by pressing SETUP button in HOME menu.
3)
Move highlight at "DISPLAY > TV Aspect -> 16:9".
4)
Press "1 > 3 > 9 > 7 > 1 > 3 > 9 > ENTER"
in order.
5) and then, system reset menu is displayed
5) and then, system reset menu is displayed
6)
Power off and on by pressing POWER key.

EEPROM EDIT
1) Change function to DVD/CD by pressing input key, and wait until home menu is shown.
- Do not insert disc or USB at the set.
2) Press "PAUSE > 1 > 4 > 7 > 2" in order.
3) and then, option setting menu is displayed.
You can see 10 bytes option value.
4)
Move a cursor by pressing Arrow < > key.1) Change function to DVD/CD by pressing input key, and wait until home menu is shown.
- Do not insert disc or USB at the set.
2) Press "PAUSE > 1 > 4 > 7 > 2" in order.
3) and then, option setting menu is displayed.
You can see 10 bytes option value.
5) Press number 0 ~ 9, character a ~ f (1 ~ 6 for a while) for more than 5
seconds
6) Press "PAUSE" key to exit option setting menu.
After change option value, you need to make system reset.
6) Press "PAUSE" key to exit option setting menu.
After change option value, you need to make system reset.
DOOR LOCK / UNLOCK
1) Press Front “STOP” + Remote control “STOP” for more than 5 seconds.
2) “LOCKED” / “UNLOCKED” display on the VFD.
1) Press Front “STOP” + Remote control “STOP” for more than 5 seconds.
2) “LOCKED” / “UNLOCKED” display on the VFD.
FIRMWARE UPGRADE
MPEG
1) Copy firmware to USB (Do not change file name).
Ex) LG_LHD655LD7_1501051.rom
2) Change function to DVD/CD by pressing input key, and wait until home menu is shown.
3) Inset USB device which includes firmware.
4) Firmware is detected automatically and then, shows blue screen in TV.
If home menu is maintained after inserting USB, press music icon.
5)
Take off the USB and press PLAY key.
6)
and then, upgrading get started.
- Do not turn off the set or uplug the unit from mains power sourse until upgrade is finished.
7) After finishing firmware upgrading, set will restart automatically.
8) Power off and on again by pressing POWER key.
- Do not turn off the set or uplug the unit from mains power sourse until upgrade is finished.
7) After finishing firmware upgrading, set will restart automatically.
8) Power off and on again by pressing POWER key.
AUDIO MICOM
1) Copy firmware to USB (Do not change file name).
Ex) LHD655_1501050.HEX
2) Change function to DVD/CD by pressing input key, and wait until home menu is shown.
3) Inset USB device which includes firmware.
4) Firmware is detected automatically and then, shows blue screen in TV.
If home menu is maintained after inserting USB, press music icon.
EQ
1) Copy firmware to USB (Do not change file name).
Ex) EQ_PRG.BIN
2) Change function to DVD/CD by pressing input key, and wait until home menu is shown.
3) Inset USB device which includes firmware.
4) Firmware is detected automatically and then, shows blue screen in TV.
If Home menu is maintained after inserting USB, press music icon.
5)
Upgrading is started.
- Do not turn off the set until upgrade is finished.
- Do not pull out the USB device using firmware upgrading.
6) After finishing firmware upgrading, set will be turned off.
- Do not turn off the set until upgrade is finished.
- Do not pull out the USB device using firmware upgrading.
6) After finishing firmware upgrading, set will be turned off.
NO POWER PROBLEM
No power problem occurs when you power on the unit.
No power problem occurs when you power on the unit.
Fuse
& Bridge diode
Replace F901, BD901 on SMPS board.
1) Look at the physical state of fuse F901.
2) Check the bridge diode BD901.
Replace F901, BD901 on SMPS board.
1) Look at the physical state of fuse F901.
2) Check the bridge diode BD901.

No power problem occurs when you power on the unit.
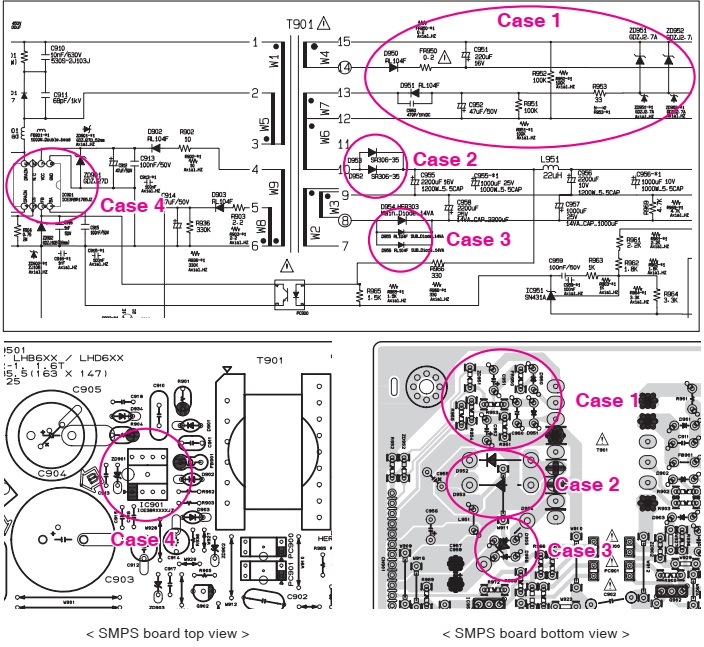
VFD,
14 VA, 5.5 VA
Replace D922, D923, D924, D925, D926, D927, IC901.
Case 1) FLD abnormal: Check D950, D951, ZD951, ZD952, FR950 and replace it.
Case 2) 5.5 VA abnormal: Check D952, D953 and replace it.
Case 3) 14 VA abnormal: Check D955, D956 and replace it.
Case 4) All voltage abnormal: Check IC901 and replace it.
Replace D922, D923, D924, D925, D926, D927, IC901.
Case 1) FLD abnormal: Check D950, D951, ZD951, ZD952, FR950 and replace it.
Case 2) 5.5 VA abnormal: Check D952, D953 and replace it.
Case 3) 14 VA abnormal: Check D955, D956 and replace it.
Case 4) All voltage abnormal: Check IC901 and replace it.
NO BOOTING WHEN YOU TURN THE UNIT ON, NO MESSAGE ON FRONT PANEL
When you turn on your set, it will blank / no message on front panel, and stand-by LED no working.
IC103 (No 3.3 VA)
Replace IC103 on MAIN board.
1) Check 3.3 VA of IC108.
2) If 3.3 VA is abnormal, please check 5.5 VA of IC103 pin1.
3) If 5.5 VA is OK, but 3.3 VA is abnormal, replace IC103.
When you turn on your set, it will blank / no message on front panel, and stand-by LED no working.
IC103 (No 3.3 VA)
Replace IC103 on MAIN board.
1) Check 3.3 VA of IC108.
2) If 3.3 VA is abnormal, please check 5.5 VA of IC103 pin1.
3) If 5.5 VA is OK, but 3.3 VA is abnormal, replace IC103.

When you turn on your set, it will blank / no message or Welcome
on front panel, and it will not boot-up.
IC105
System 3.3 V (No System 3.3 V)
Replace IC105 on MAIN board
Replace IC105 on MAIN board
How
to troubleshoot
1) Please check 5.5 VA of IC105 pin3 (VIN).
2) If 5.5 VA is abnormal, check SMPS 5.5 VA.
3) If 5.5 VA is OK, but 3.3 V is abnormal at the IC105 pin6 (VOUT), replace IC105.
1) Please check 5.5 VA of IC105 pin3 (VIN).
2) If 5.5 VA is abnormal, check SMPS 5.5 VA.
3) If 5.5 VA is OK, but 3.3 V is abnormal at the IC105 pin6 (VOUT), replace IC105.

When you turn on your set, it will display “WELCOME” on front
panel, and it will not boot-up normally.
Xtal
500
Replace X500 on MAIN board.
Replace X500 on MAIN board.
1) Check the soldering status of 27 MHz crystal (X500).
2) Check the frequency of 27 MHz crystal (X500).
3) If the crystal doesn’t oscillate, replace X500.
4) After changing it, if the set is still not booting :
- Check Serial Flash IC (IC504)
- Check SDRAM IC (IC503)
- Check MT1389 IC (IC500).
2) Check the frequency of 27 MHz crystal (X500).
3) If the crystal doesn’t oscillate, replace X500.
4) After changing it, if the set is still not booting :
- Check Serial Flash IC (IC504)
- Check SDRAM IC (IC503)
- Check MT1389 IC (IC500).

When you turn on your set, it will display “WELCOME” on front
panel, and it will not boot-up normally.
IC503
(SDRAM MEMORY)
Replace IC503 on MAIN board.
Replace IC503 on MAIN board.
1) Check 3.3 V IC503.
2) If it doesn’t work even though IC105 is no problem, IC503 (DDR memory) could have problem.
3) After changing it, if the set is still not booting : Check MT1389IC
2) If it doesn’t work even though IC105 is no problem, IC503 (DDR memory) could have problem.
3) After changing it, if the set is still not booting : Check MT1389IC

When you turn on your set, it will display “WELCOME” on front
panel, and it will not boot-up normally
IC500
(MPEG IC)
Replace IC500 on MAIN board.
Replace IC500 on MAIN board.
1) Check 1.2 V of C510 on main board.
Check 3.3 V of C548 on main board.
2) If it doesn’t work even though IC105 is no problem, IC500 (MT1389) could have problem.
2) If it doesn’t work even though IC105 is no problem, IC500 (MT1389) could have problem.

BAD HDMI VIDEO / AUDIO OUTPUT
When unit is connected to HDMI TV using HDMI cable, picture shows bad color, no output or mixed color on the screen. But component output is OK.
When unit is connected to HDMI TV using HDMI cable, picture shows bad color, no output or mixed color on the screen. But component output is OK.
JK501
(HDMI JACK)
Replace JK501 (HDMI Jack)
1) Check JK501 pin soldering.
2) If there is short soldering on pin JK501, re-soldering pin JK501.
3) If problem still occurs, check HDMI data.
- If all data OK, replace JK501.
- If data NG, check set on BD mode :
Replace IC500
2) If there is short soldering on pin JK501, re-soldering pin JK501.
3) If problem still occurs, check HDMI data.
- If all data OK, replace JK501.
- If data NG, check set on BD mode :
Replace IC500

NO AUDIO FROM SPEAKER
When unit is connected to speaker, no audio from speaker
When unit is connected to speaker, no audio from speaker
IC601
(PWM IC)
Replace IC601 (PWM IC).
Replace IC601 (PWM IC).
How
to troubleshoot
1) Check IC601 pin soldering.
2) If there is short soldering on pin IC601, re-soldering pin IC601.
3) If problem still occurs, check AMP IC (IC700, IC701, IC702).
- Check IC700, IC701, IC702 pin soldering.
- If soldering OK, check the AMP heat sink :
Replace IC700, IC701, IC702
1) Check IC601 pin soldering.
2) If there is short soldering on pin IC601, re-soldering pin IC601.
3) If problem still occurs, check AMP IC (IC700, IC701, IC702).
- Check IC700, IC701, IC702 pin soldering.
- If soldering OK, check the AMP heat sink :
Replace IC700, IC701, IC702

BT connection error
BT
module
Replace BT module on Main chassis
Replace BT module on Main chassis
1) Check your BT device. Make sure that BT function is on-state.
2) If it is OK, please check the CN201.
3) If there is soldering problem, please re-soldering pin CN201.
4) If after re-soldering problem still occurs, replace BT module.
5) If problem still occurs after change BT module, check MT1389 IC (IC500)
2) If it is OK, please check the CN201.
3) If there is soldering problem, please re-soldering pin CN201.
4) If after re-soldering problem still occurs, replace BT module.
5) If problem still occurs after change BT module, check MT1389 IC (IC500)

SMPS – Audio output and voltage chart

