REPAIRING AND NOT THROWING AWAY

Richtige Fernseher haben Röhren!

Richtige Fernseher haben Röhren!

In Brief: On this site you will find pictures and technical information about Service Modes, Circuit Diagrams, Firmware Update procedure, Disassemble procedure, Universal remote control set-up codes, Troubleshooting and more....

If you go into the profession, you will obtain or have access to a variety of tech tips databases HERE IT IS Master Electronics Repair !.

These are an excellent investment where the saying: 'time-is-money' rules. However, to learn, you need to develop a general troubleshooting approach - a logical, methodical, method of narrowing down the problem. A tech tip database might suggest: 'Replace C536' for a particular symptom. This is good advice for a specific problem on one model. However, what you really want to understand is why C536 was the cause and how to pinpoint the culprit in general even if you don't have a service manual or schematic and your tech tip database doesn't have an entry for your sick TV or VCR.

While schematics are nice, you won't always have them or be able to justify the purchase for a one-of repair. Therefore, in many cases, some reverse engineering will be necessary. The time will be well spent since even if you don't see another instance of the same model in your entire lifetime, you will have learned something in the process that can be applied to other equipment problems.
As always, when you get stuck, checking out a tech-tips database may quickly identify your problem and solution.In that case, you can greatly simplify your troubleshooting or at least confirm a diagnosis before ordering parts.

Happy repairing!
Today, the West is headed for the abyss. For the ultimate fate of our disposable society is for that society itself to be disposed of. And this will happen sooner, rather than later.

How to use the site:

- If you landed here via any Search Engine, you will get what you searched for and you can search more using the search this blog feature provided by Google. You can visit more posts scrolling the left blog archive of all posts of the month/year,
or you can click on the main photo-page to start from the main page. Doing so it starts from the most recent post to the older post simple clicking on the Older Post button on the bottom of each page after reading , post after post.

You can even visit all posts, time to time, when reaching the bottom end of each page and click on the Older Post button.

- If you arrived here at the main page via bookmark you can visit all the site scrolling the left blog archive of all posts of the month/year pointing were you want , or more simple You can even visit all blog posts, from newer to older, clicking at the end of each bottom page on the Older Post button.
So you can see all the blog/site content surfing all pages in it.

- The search this blog feature provided by Google is a real search engine. If you're pointing particular things it will search IT for you; or you can place a brand name in the search query at your choice and visit all results page by page. It's useful since the content of the site is very large.

Note that if you don't find what you searched for, try it after a period of time; the site is a never ending job !

..............The bitterness of poor quality is remembered long after the sweetness of todays funny gadgets low price has faded from memory........ . . . . . .....
Don't forget the past, the end of the world is upon us! Pretty soon it will all turn to dust!

©2010, 2011, 2012, 2013, 2014 Frank Sharp - You do not have permission to copy photos and words from this blog, and any content may be never used it for auctions or commercial purposes, however feel free to post anything you see here with a courtesy link back, btw a link to the original post here , is mandatory.
All posts are presented here for informative, historical and educative purposes as applicable within fair use. NOTHING HERE IS FOR SALE !

Saturday 16 February 2019

HISENSE LHD19W57EU LHD22W57EU SERVICE MODE - SOFTWARE UPGRADE PROCESS

HISENSE LHD19W57EU LHD22W57EU Service Mode - Software Upgrade Process

There are two ways to enter service mode to these sets.  One is by using Factory Remote control and the other is by using User's Remote control: Enter Service Mode, by using Factory Remote Control
  • Press "M" button, and enter Factory Mode.
  • Press "Menu" button, and enter Factory OSD Menu.
  • Press [Ch Up | Ch Dn] button to select the Function Menu, press {Volume Up | Volume Dn} button to adjust the data value to selected item.
Enter Service Mode, by using user's Remote Control
  1. Power ON the TV.
  2. Press "Menu" button to call up user OSD Menu.
  3. Select 'Sound => Balance.
  4. Enter {0 => 5 => 3 => 2} in sequence. (If necessary, re-do number keys).
  5. Factory OSD will be displayed.
Before adjusting change the desired source.  Different sources have different White Balanc [WB] values.
Factory Menu date varies according to different sources.  In case, changing the factory data by error, choose to "Clear EEPROM" by which can resume default value.
TO CLEAR EEPROM
  • Select the button "Clear All"
  • Press 'Volume +" button to clear the EEPROM data.
  • When the "Clear All" buttons become white, turn OFF the Power.
  • Restart TV.
SOFTWARE UPGRADING
  • The software is upgraded by a burning tool-Mtk Tool, which can be burn the program file *.bin to the main board of the unit.
Proceedings:
Install the Driver.
Double click the Icon, Install the Driver
Select the default value, the driver will be installed step by step.
# Hardware connecting: Connect the unit to the PC with a USB-to-jack _4pin_ port cable.  USB port connects the PC, and the 4-pin jack to J3 of the Main Board.
     For the first connecting, the PC will recognize and automatically install USB device.  The process is just like the installation of a mini disk.   USB Device install:
UPGRADING WITH MtkTool
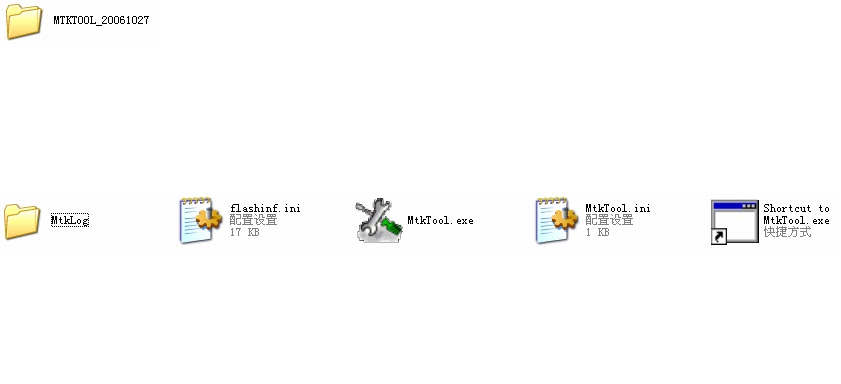
  • MtkTool is a green program need no installation.  It is saved in the folder.  There are '5' folders/files altogether.  
  • The MtkTool using log is restored in the MtkLog folder.  It records the running time and date whenever this tool is used.  The log will be a txt file named by the date and time.
     After connecting the TV to PC, double click 'MtkTool.exe' icon, open the MtkTool.  If the following error appears, it means that the related port is not set properly.
     Ignore these errors, click 'confirm' and enter the MtkTool main interface.  See the following picture.
  • Flash chip model.
  • The port through which the PC communicate with the chip.
  • The communicating baud rate.
  • The new program file (*.bin) for upgrading.
  • Click this button can select the *.bin file to be used for upgrading.
  • Click to start upgrading. 
     Open "Device manager" and find which port is connected with the TV.  In the above picture, COM2 is connected to the TV; so, select [COM2] in the MtkTool main interface.  Select the right Baud Rate according to chip model.  For this unit; the chip model is MT537X, select 115200*2.
     Where or not click the 'Auto Set Flash Baud rate' in the 'Window' menu depends on chip type.  If the Flash Cip does not support high speed transport, do not select this option; otherwise, reserve the selected mode.
     Click 'Browse' button (5) and find the upgrading program file and select it.  Press "Upgrade" button to start upgrading.  The following interface will appear on the screen, indicating upgrading successfully.