FOSTEX MR16HD - DIGITAL MULTI-TRACKER - HOW TO UPDATE SOFTWARE - HOW TO ENTER SERVICE MODE

- Connect the AC power cable to the AC IN connector.
- Press the MR16 power switch.
- Press the [MENU/ENTER] dial to enter the MENU mode.
- Rotate the [MENU/ENTER] dial and select the “USB” menu.
- Press the [MENU/ENTER] dial.
- Locate the [MENU/ENTER] dial and select the “Disk Protect” menu.
- Press the [MENU/ENTER] dial and set “Disk Protect” to “Off” by rotating the [MENU/ENTER] dial. Then, press the [MENU/ENTER] dial. With this setting, the Disk Protect mode is turned off indicating the condition that the software update file can be copied to the MR16 internal HDD.
- Rotate the [MENU/ENTER] dial to select the “< < Back” menu and press the [MENU/ENTER] dial.
- Rotate the [MENU/ENTER] dial and select the “USB Device Mode” menu.
- Press the [MENU/ENTER] dial. If MR16 is correctly put into the USB mode, the display on the right will appear on the LCD. Now MR16 is ready to connect to PC or Macintosh.
- Connect the USB cable from the MR16 USB port to PC on which Windows XP/2000 is running or Macintosh on which OS X is running.


- Disconnect the USB cable between MR16 and PC / Macintosh.
- On MR16 with the normal display appears, press the [MENU/ENTER] dial while holding down the [STOP] key to access the Service Mode menu.

- Rotate the [MENU/ENTER] dial and select the “Service Mode” menu.
- Press the [MENU/ENTER] dial.
- Rotate the [MENU/ENTER] dial and select the “Version Up” menu.
- Press the [MENU/ENTER] dial.
- Rotate the [MENU/ENTER] dial and select a software update file with the version number you would like to update.
- As long as the file name is different, up to five-software update files can be placed in the root directory.
- Press the [MENU/ENTER] dial.
- The selected software file is displayed together with the software version number. To go on, press the [MENU/ENTER] dial while holding down the [REC] key.
- The software updating procedures begin. “File loading...”, “Flash ROM Erasing...” and “Flash ROM Writing...” will appear in order. It will take about one minute to complete the procedures.
- Upon completion, “Completed” will appear on the LCD.
- Turn off the power once and then back on to complete the software update procedures. In the meantime, confirm the software version number and the programming date displayed for a short instance in the boot-up process.
- The software version can be checked by the “Version” Service Mode menu. In the condition with normal display appears, press the [MENU/ENTER] dial while holding down the [STOP] key to access the Service Mode menu. If you do so, the display on the right will appear on the LCD. Rotate the [MENU/ENTER] dial to select the “Service Mode” menu and press the [MENU/ENTER] dial.
- Select the “Version” menu and press the [MENU/ENTER] dial. The display on the right will appear on the LCD. It indicates that the programming date is February 5th, 2007,the version number is V1.02 and the CPU revision number is E2. To get back to the normal display, press the [STOP] key.
- Press the [STOP] key to return to the normal display mode. Then, press the [MENU/ENTER] dial to enter the MENU mode.
- Rotate the [MENU/ENTER] dial to select the "System" menu and press the [MENU/ENTER] dial.
- Rotate the [MENU/ENTER] dial and select the “Init Memory” menu.
- Press the [MENU/ENTER] dial.
- The display contents on the right appear on the LCD. Press the [MENU/ENTER] dial while holding down the [RECORD] key. This operation will initialize all the system settings to default.
- Connect the AC cable and power on MR16. After the boot up procedure is completed, the display on the right will appear on the MR16 LCD.
- Press the [MENU/ENTER] dial while holding down the [STOP] and [POWER] keys. If you do so, "Service Mode" is displayed on the MR16 LCD.
Rotate the [MENU/ENTER] dial and select “Service Mode”. Then, press the [MENU/ENTER] dial. You can see service menus will appear on the MR16 LCD. Select one of the service menus you would like to execute and press the [MENU/ENTER] dial.
 FOSTEX MR16HD DIGITAL MULTITRACKER HOW TO UPDATE THE SOFTWARE OF - HOW TO ENTER THE SERVICE MODE, SERVICE MODE ADJUSTMENTS DETAILS
FOSTEX MR16HD, FOSTEX MR16HD-CD DIGITAL MULTITRACKER - Service mode, firmware update, service mode adjustments and more
SOFTWARE UPDATE
1) Connect the AC power cable to the AC IN connector.
2) Press the MR16 power switch.
3) Press the [MENU/ENTER] dial to enter the MENU mode.
4) Rotate the [MENU/ENTER] dial and select the “USB” menu.
5) Press the [MENU/ENTER] dial.
6) Rotate the [MENU/ENTER] dial and select the “Disk Protect” menu.
7) Press the [MENU/ENTER] dial and set “Disk Protect” to “Off” by rotating the [MENU/ENTER] dial. Then, press the [MENU/ENTER] dial. With this setting, the Disk Protect mode is turned off indicating the condition that the software update file can be copied to the MR16 internal HDD.
8) Rotate the [MENU/ENTER] dial to select the “< < Back” menu and press the [MENU/ENTER] dial.
9) Rotate the [MENU/ENTER] dial and select the “USB Device Mode” menu.
10) Press the [MENU/ENTER] dial. If MR16 is correctly put into the USB mode, the display on the right will appear on the LCD. Now MR16 is ready to connect to PC or Macintosh.
11) Connect the USB cable from the MR16 USB port to PC on which Windows XP/2000 is running or Macintosh on which OS X is running.
CAUTION: MR16 can be connected to PC on which Windows XP/2000 is running or Macintosh on which OS X is running for software update as well as audio data transfer. Of course PC/Macintosh has to be equipped with a USB port.
12) PC or Macintosh recognizes MR16 as an external removable disk.

Windows XP/2000
The example indicates that MR16 is recognized as a removable disk (E) in the My Computer on Windows XP PC. Unzip the software update file with “zip” extension (e.g. MR16_V102.zip) normally sent together with a technical bulletin. If you do so, a software update file (e.g. MR16V102.MOT) will be created. Place a newly created software update file with “MOT” (motorola format) extension in the root directory tree of the Removable disk (E).
By double-clicking the removable drive (E) (MR16), the window on the right will appear. You can see that the software update file (MR16V102.MOT) is placed in the top directory tree of the Removable Disk (E)
After transferring the software update file is completed, do not tun off the USB connection by pressing the MR16 STOP key. First, you need to safely remove the MR16 from PC side by opening the “Safety Removable Hardware” in the tool bar and pressing the “Stop” button on Windows XP/2000 PC. Then, you can turn off the USB connection from the MR16 side.

Macintosh OS X
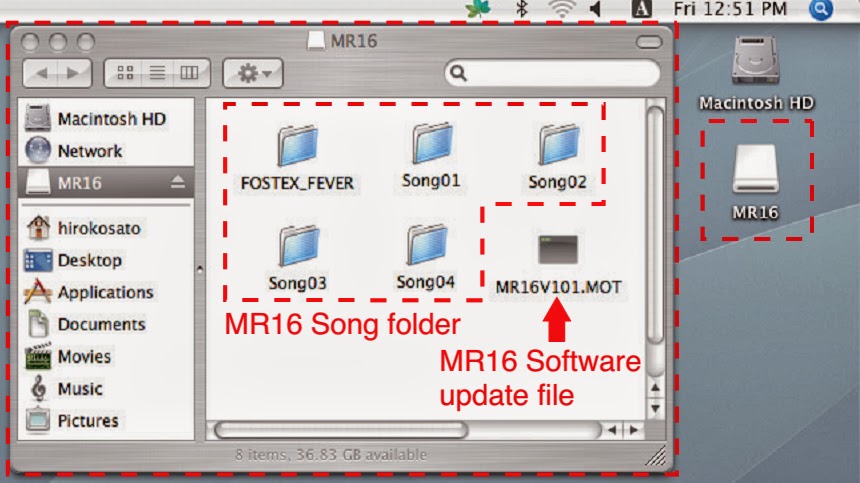
MR16 is recognized as “MR16” on the Macintosh OS X desktop. By double-clicking the MR16 icon, the window on the right will appear. There are five song folders and one software update file “MR16V101.MOT”.
Unzip the software update file with “zip” extension (e.g. MR16_V102.zip) normally sent together with a technical bulletin.
Copy and paste a newly created software file with “MOT” (Motorola format) extension (e.g. MR16V102.MOT) onto a root directory of MR16 HDD connected to Macintosh (OS X).
After transferring the software update file is completed, do not turn off the USB connection by pressing the MR16 STOP key. First, as shown on the right, you need to press the EJECT button on Macintosh. Then, you can turn off the USB connection from the MR16 side.
[CAUTION: There is a case that it takes time for PC or Macintosh to recognize MR16 as an external device. While the “ACC” (access) indication on the upper right of the MR16 LCD is flashing in the USB mode, do not disconnect the USB cable between MR16 and PC / Macintosh.]
13) Disconnect the USB cable between MR16 and PC / Macintosh.
14) On MR16 with the normal display appears, press the [MENU/ENTER] dial while holding down the [STOP] key to access the Service Mode menu.

15) Rotate the [MENU/ENTER] dial and select the “Service Mode” menu.
16) Press the [MENU/ENTER] dial.
17) Rotate the [MENU/ENTER] dial and select the “Version Up” menu.
18) Press the [MENU/ENTER] dial.
19) Rotate the [MENU/ENTER] dial and select a software update file with the version number you would like to update.
NOTE: As long as the file name is different, up to five software update files can be placed in the root directory.
20) Press the [MENU/ENTER] dial.

21) The selected software file is displayed together with the software version number. To go on, press the [MENU/ENTER] dial while holding down the [REC] key.
22) The software updating procedures begin. “File loading...”, “Flash ROM Erasing...” and “Flash ROM Writing...” will appear in order. It will take about one minute to complete the procedures.
23) Upon completion, “Completed” will appear on the LCD.
24) Turn off the power once and then back on to complete the software update procedures. In the meantime, confirm the software version number and the programming date displayed for a short instance in the boot-up process.
The software version can be checked by the “Version” Service Mode menu. In the condition with normal display appears, press the [MENU/ENTER] dial while holding down the [STOP] key to access the Service Mode menu. If you do so, the display on the right will appear on the LCD. Rotate the [MENU/ENTER] dial to select the “Service Mode” menu and press the [MENU/ENTER] dial.

Select the “Version” menu and press the [MENU/ENTER] dial. The display on the right will appear on the LCD. It indicates that the programming date is February 5th, 2007, the version number is V1.02 and the CPU revision number is E2. To get back to the normal display, press the [STOP] key.
25) Press the [STOP] key to return to the normal display mode. Then, press the [MENU/ENTER] dial to enter the MENU mode.
26) Rotate the [MENU/ENTER] dial to select the "System" menu and press the [MENU/ENTER] dial.
27) Rotate the [MENU/ENTER] dial and select the “Init Memory” menu.
28) Press the [MENU/ENTER] dial.
29) The display contents on the right appear on the LCD. Press the [MENU/ENTER] dial while holding down the [RECORD] key. This operation will initialize all the system settings to default.
[CAUTION: The “Initialize Memory” operation sets all the system settings to the default values. For example, the “Disk Protect” setting in the USB menu is set to “ON” after initializing the memory. If you would like to update the software in future, please remember that it has to be set to “OFF” again.]

SERVICE MENU
In addition to various MENU modes, SERVICE menus are available to check and maintain the MR16 condition. Please utilize them when servicing MR16.
Entering Service Menu
Connect the AC cable and power on MR16. After the bootup procedure is completed, the display on the right will appear on the MR16 LCD.
2) Press the [MENU/ENTER] dial while holding down the [STOP] and [POWER] keys. If you do so, "Service Mode" is displayed on the MR16 LCD.
[CAUTION: If the [POWER] key is held down for more than three seconds, MR16 turns off. Please be careful to expedite the above manipulation 2).]
3) Rotate the [MENU/ENTER] dial and select “Service Mode”. Then, press the [MENU/ENTER] dial. You can see that the following service menus will appear on the MR16 LCD.
Select one of the service menus you would like to execute and press the [MENU/ENTER] dial.
Version
In the “Version” service menu, the current MR16 software version as well as the corresponding software programming date can be checked.
After selecting the “Version” menu, press the [MENU/ENTER] dial to check the current software version and the programming date. The example on the right indicates that the software version is “V1.02” the programming date is February 5th, 2007 and the CPU revision number is E2.
By pressing the STOP key, MR16 returns to the service menu select condition.
Version Up
The “Version Up” service menu allows you to update the MR16 software by placing the software update file in the root directory tree of the MR16 3.5” internal hard disk. For the update procedures, refer to the previous section “3. SOFTWARE UPDATE”

Advanced Format
MR16 checks the remaining capacity / partition information written on the internal HD in the bootup process after powering on. In case this information does not match the current HD condition, the “Advanced Format” service menu can be used. For example, even if no song has been created (recorded) but the remaining capacity indicates only 10MB, execute the “Advanced Format” menu.
As indicated on the right, please remember that executing the “Advanced Format” deletes all the songs recorded on the internal HD.
Upon completion of “Advanced Format”, the message “Boot Sector Clear” appears on the LCD.
[NOTE: In case MR16 is not booted up correctly and displays an alert message such as “Please Wait!” permanently, power if off once. Then, while holding down the [STOP] key, power on MR16. This mode allows to boot up without loading any recorded songs. Next, execute the “Advanced Format” menu.]
CD-RW Disk Erase
Executing the “Disk Erase” service menu erases all existing song data on the CD-RW disk put into the MR16HD/CD internal CD-R/RW drive.
1) Rotate the [MENU/ENTER] dial and select “CD-RW”. Then, press the [MENU/ENTER] dial.
2) Rotate the [MENU/ENTER] dial and select “Disk Erase”. Then, press the [MENU/ENTER] dial.
3) To go on, press the [MENU/ENTER] dial while holding down the [REC] key.
4) The CD-RW disk erasing procedures begin. “Erasing...” will appear . It will take about one minute to complete the procedures.
5) Upon completion, “Completed!” will appear on the LCD.

Display Test
This menu checks if the EFFECT SEND / PAN / REVERB/DELAY pots & faders / self-illuminating tact switches are working properly.
After selecting the “Display Test” menu, press the [MENU/ENTER] dial.
2) Press the [MENU/ENTER] dial again. If you do so, the display below will appear on the MR16 LCD.
As shown in the drawing below, each value the EFFECT SEND / PAN / TO STEREO BUSS LEVEL / REVERB/DELAY pots & faders position. Rotate the EFFECT SEND / PAN pots and move the faders to check if the value changes from "0" to "F" in hexadecimal depending on the pots / fades position as follow.

3) After checking, press the [MENU/ENTER] dial to proceed the next Display Test. The next test is to check if the self-illuminating tact switches are lit in red.
Check if the self-illuminating tact switches are properly lit in red as indicated in the drawing below.

4) After checking, press the [MENU/ENTER] dial to proceed the next Display Test. The next test is to check if the self-illuminating tact switches are lit in green.
Check if the self-illuminating tact switches are properly lit in green as indicated in the drawing below.

5) After checking, press the [MENU/ENTER] dial to proceed the next Display Test. The next test is to check if the self-illuminating tact switches are lit in umber.
Check if the self-illuminating tact switches are properly lit in orange as indicated in the drawing below.

6) After checking, press the [MENU/ENTER] dial to proceed the next Display Test. The next test is to check if the tact switches on the MR16 top panel except the POWER SW is in good contact. If the tact switch is pressed, the corresponding asterisk mark on the MR16 LCD will go out. If not, the tact switch might be worn out and be replaced. After all the tact switches are confirmed to be in good contact, the display on the right will appear on the MR16 LCD.

Bus Check
This menu checks if various bus signals connected to the CPU are correctly working or not.
1) After selecting the “Bus Check” menu, connect the foot SW to the foot SW jack and the USB cable between the USB and USB HOST ports.
2) Press the [MENU/ENTER] dial to initiate the Bus Check mode.
AUDIO BUS
The AUDIO BUS setting is fixed at “THRU” in this menu. In the “THRU” setting, the A/D and D/A converters are internally connected. Also the CHAN A/C and B/D PAN setting are set to left and right respectively. Thus, the signals fed to CHAN A and C are summed and output from the STEREO OUT L and the signal fed to CHAN B and D are summed and output from the STEREO OUT R. This mode is convenient when checking the input circuit.
ATA BUS
The “OK” sign indicates that the ATA bus communication between the internal HD and the CPU is properly made. If the “NG” sign appears, something must be wrong with the ATA bus communication.
INPUT SEL
The “INPUT SEL” indicates the number corresponding to the INPUT A SELECT switch setting as follow.
GTR CLEAR: 2
GTR DISTORTION: 1
MIC/LINE: 3
FOOT SW
When an unlatched type foot switch is connected and it is pressed, the “ON” indication will appear. If the foot switch is released or is not connected, the “OFF” sign will appear.
USB BUS
If the “USB BUS” section indicates the “OK” sign 3 ~ 5 seconds after the “WAIT..” sign is displayed, the USB HOST function works properly. If the “NG” sign is displayed, press the [MENU/ENTER] dial and then try to enter the Bus Check mode again by pressing the [MENU/ENTER] dial. ATAPI BUS
The “OK” sign indicates that the ATAPI bus communication between the CD-R/RW drive and the CPU is properly made. If the “NG” sign appears, something must be wrong with the ATAPI bus communication.