 LG 32LF520D LED TV – SMPS schematic, troubleshooting, firmware update procedure, Service mode and more

North/Latin America,
Europe/Africa and Asia/Oceania Models
IC
Remove/Replacement
Some chassis circuit boards have slotted holes (oblong) through which the IC leads are inserted and then bent flat against the circuit foil. When holes are the slotted type. When working with boards using the familiar round hole, use the standard technique.
Some chassis circuit boards have slotted holes (oblong) through which the IC leads are inserted and then bent flat against the circuit foil. When holes are the slotted type. When working with boards using the familiar round hole, use the standard technique.
Circuit Board Foil Repair
Excessive heat applied to the copper foil of any printed circuit board will weaken the adhesive that bonds the foil to the circuit board causing the foil to separate from or "lift-off" the board. The following guidelines and procedures should be followed whenever this condition is encountered.
Excessive heat applied to the copper foil of any printed circuit board will weaken the adhesive that bonds the foil to the circuit board causing the foil to separate from or "lift-off" the board. The following guidelines and procedures should be followed whenever this condition is encountered.
Adjustments
(1) The adjustment is according
to the order which is designated and which must be followed, according to the plan
which can be changed only on agreeing.
(2) Power adjustment: Free Voltage.
(3) Magnetic Field Condition: Nil.
(4) Input signal Unit: Product Specification Standard.
(5) Reserve after operation: Above 5 Minutes (Heat Run)
Temperature : at 25 °C ± 5 °C
Relative humidity : 65 ± 10 %
Input voltage : 100-220 V~, 50/60 Hz
(6) Adjustment equipment
: Color Analyzer(CA-210 or CA-110), Service remote control.
USB
DOWNLOAD(*.prg file download)
(1) Make sure USB disk format is FAT32.
(2) Copy "MBOOT_AS_*.prg"(for Mboot updated if need) and "UPDATE_A71_INIT_PAD_*.prg" two files to root of USB disk.
(3) Insert USB disk to USB slot. (if no need to update Mboot, jump to step 7 directly)
(4) AC OFF > ON
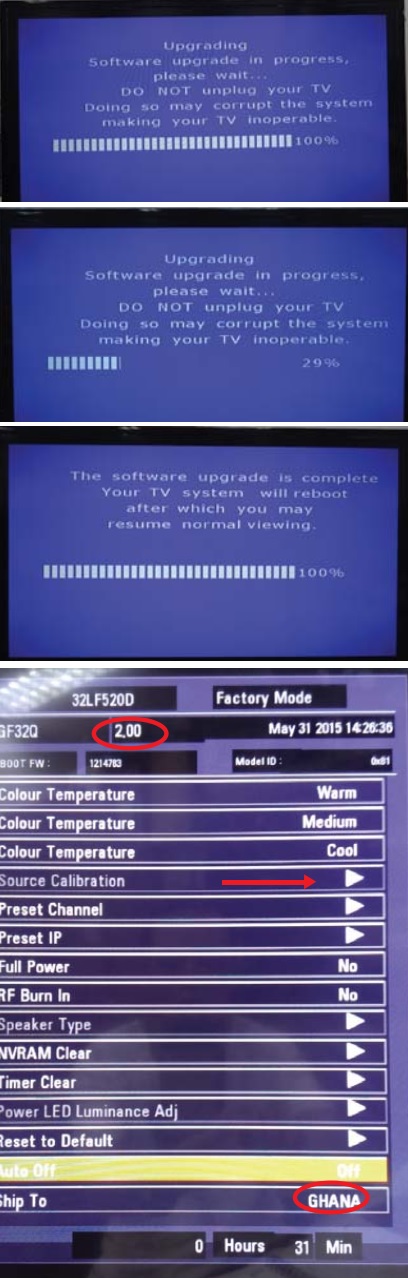
(5) TV set will display like as this photo. It will take around 10 sec. wait for 100%.
(1) Make sure USB disk format is FAT32.
(2) Copy "MBOOT_AS_*.prg"(for Mboot updated if need) and "UPDATE_A71_INIT_PAD_*.prg" two files to root of USB disk.
(3) Insert USB disk to USB slot. (if no need to update Mboot, jump to step 7 directly)
(4) AC OFF > ON
(5) TV set will display like as this photo. It will take around 10 sec. wait for 100%.
(6) Keep USB disk in USB solt.
(7) AC OFF > ON
(8) TV set will display like these.
(7) AC OFF > ON
(8) TV set will display like these.
(9) Wait for display
"100%"
(10) AC Off.
(11) Unplug USB disk.
(12) AC On.
(13) Check firmware version : 2.00(for example)
When you finish initialization setting, you can check firmware version on Factory Menu Switch to AV input source, press "Left" key > 7 > 9 > "OK" key to enter Factory Mode.
(11) Unplug USB disk.
(12) AC On.
(13) Check firmware version : 2.00(for example)
When you finish initialization setting, you can check firmware version on Factory Menu Switch to AV input source, press "Left" key > 7 > 9 > "OK" key to enter Factory Mode.
(14) Select a country : GHANA
(for example)
Go to "Ship To" and use "Left", "Right" to select country and press "OK", TV should be turn Off.
Go to "Ship To" and use "Left", "Right" to select country and press "OK", TV should be turn Off.
(15) After turn on again, Check
selected country : GHANA (for example)
Press "Right"> "EXIT"> "OK" to go to Engineering Information menu.
Press "Right"> "EXIT"> "OK" to go to Engineering Information menu.

ADC
Process
Enter Factory mode.
The screen will show as below, select Source Calibration and pushing enter key.
After pushing the right key, this function will be implement and show OK on screen button side as below.
Only Component is requested calibration.
The timing: 1080i/60Hz,
Enter Factory mode.
The screen will show as below, select Source Calibration and pushing enter key.
After pushing the right key, this function will be implement and show OK on screen button side as below.
Only Component is requested calibration.
The timing: 1080i/60Hz,

Manual
W/B process using adjusts Remote control.
* Color analyzer( CA210) should be used in the calibrated ch by CS-2000.
* Operate the zero-calibration of the CA-210, then stick sensor to the module when adjusting.
* After enter M Mode by pushing up or down key to select “Cool”, ,
* Press “enter” key to enter the item.
* For manual adjustment, it is also possible by the following sequence. (1) Set TV in M mode using learning remote controller and then operate heat run longer than 15 minutes. (If not executed this step, the condition for W/B may be different.)
(2) Zero Calibrate the probe of Color Analyzer, then place it on the center of LCD module within 10 cm of the surface (3) Select each items (Red/Green/Blue Gain) using ▲/▼ (CH +/-) key on Remote control.
(4) Adjust R/ G/ B Gain using ◄/►(VOL +/-) key on R/C.
(5) Adjust three modes all (Cool / Medium / Warm)
- For G-FIX model
Cool Mode
1) Fix the G gain to 132 (default data) and decrease the others.
2) Adjust B Gain to set y in spec.
3) Adjust R Gain to set x in spec.
Medium / Warm Mode - Fix G gain to 132 (default data) and adjust the others.
(6) When adjustment is completed, exit adjustment mode using EXIT key on Remote control.
CASE
Cool
First adjust the coordinate far away from the target value(x, y).
1) x, y > target
i) Decrease the R, B.
2) x, y < target
i) First decrease the B gain,
ii) Decrease the one of the others.
3) x > target, y < target
i) First decrease B, so make y a little more than the target.
ii) Adjust x value by decreasing the R.
4) x < target, y > target
i) First decrease B, so make x a little more than the target.
ii) Adjust x value by decreasing the R.
* After you finish all adjustments unplug the AC cable.

SMPS & LED driver schematics


Troubleshooting procedure


