
With just one bad LED, the TV will shut down thus no picture can be seen.
(THIS IS HOW MODERN TV WORKS)
Failure of the TV LCD backlight is a fairly common problem beginning to crop up in LCD technology. If the backlight fails, the monitor/display will go dark and it will become unusable. Repair of a failed backlight requires expert repair.
LED malfunction is a fairly common problem among budget TVs. This is often due to the poor quality and fragility of the materials used in the assembly. And if the warranty period for the equipment after the purchase has already expired, then for the repair you will have to fork out for repairs ... Fortunately, the procedure for replacing the LED can be done at home on your own.Unlike an incandescent lamp, where failure is fairly simple (the bulb produces light until the filament breaks), with an LED, the failure modes range from mechanical and electrical to material.
- LEDs have many advantages over incandescent light sources, including lower energy consumption, longer lifetime, improved physical robustness, smaller size, and faster switching. LEDs are used in applications as diverse as aviation lighting, fairy lights, automotive headlamps, advertising, general lighting, traffic signals, camera flashes, lighted wallpaper, horticultural grow lights, and medical devices
- The quality of the material in an LED has a direct impact on its performLEDs have two primary classes of failure: gradual and catastrophic. With rare exceptions, LED failure tends to be rooted in gradual degradation rather than catastrophic change. Vendors don't define failure as a binary condition but rather as a designated point in a continuum. According to studies, the output of a lamp can degrade as much as 30 percent in luminous flux before the human eye can detect the change. Accordingly, most manufacturers define the lifecycle of a device by the time at which its output luminous flux drops below 70 percent of the initial value.ance and lifetime.
The larger the number of defects in the material, the greater the likelihood that electron-hole recombination will give rise to nonradiative decay. Gallium nitride LEDs, which form the basis of most white-light LEDs, are currently grown primarily on sapphire substrates coated with a layer of GaN. Lattice mismatch between the two materials introduces strain that causes a type of defect known as a threading dislocation. These are fine cracks that propagate vertically from the GaN film into the active region, causing nonradiative decay. The greater the percentage of nonradiative decay, the lower the output of the lamp. These defects can propagate, especially if the material undergoes thermal cycling.
Structural defects introduced a different kind of loss by creating paths for leakage current, opening the way for reverse-bias current flow. This injection of carriers through the active region can generate new defects or cause existing defects to propagate. The resultant defect density reduces breakdown voltage which can impair performance.
In addition, LED elements are more reliable and do not overheat like bulbs due to prolonged glow.
Parameters of LED elements
For the backlighting of the screens, standard LED elements are used, designed for the corresponding voltages and currents. In addition, it is important to pay attention to the power of the installed element, which for various types of TVs and monitors can fluctuate significantly. This parameter determines the luminous flux formed by a specific model of the LED element and the efficiency of the entire backlight system.
When examining the parameters, special attention is paid to the dimensions of the mounting platform for the case of a particular LED, which characterizes its geometric parameters (standard size).
Please note: The cost of an LED product is also of some interest, which is a determining factor for a number of users when assessing the possibility of self-repairing a monitor or TV.
In addition to the differences noted above, LED backlighting elements for LCDs can be classified according to the following characteristics:
- Screen color (solid white or RGB).
- Glow uniformity.
- Location within the matrix (lateral or central).
Correctly designed color backlighting expands the possibilities of fine-tuning the entire spectrum of the screen glow, and also allows you to enhance the contrast and black depth in a television image (picture).
Let us consider all these parameters using the example of specific LED samples used for LED backlighting.
Characteristics of specific products
Among the most common types of LED products, the following examples are most commonly used for illumination purposes.
For LG monitor or TV models:
6-volt LEDs with standard sizes 7030 and power of one watt in various colors;
- everything is the same, but only the power of the LEDs is 2 watts, and the standard size is 3535;
Additional
information: These elements are produced in two versions with different
polarity (either an anode or a cathode is located on the larger
diameter area).
- 3-volt products of 0.5 Watt with a typical size of 7020 and a different set of colors;
- the same, but standard size 3528 and a plus on a platform with a larger diameter (with the same set of colors).
The
choice of one or another type of LED product depends on the specific
model of a television receiver or monitor that needs refurbishment.
For models of monitors and television receivers of the "Ssmsung" brand, as a rule, the following types of LED products with a different set of color shades are used:
- 3-volt LEDs per watt with standard size 3537;
- the same, but with a characteristic size of 7032;
- and, finally, half-watt products with a standard size 5630.
In the final part of the review, we recall that the choice of a specific type of LED for a particular brand of TV or monitor also depends on its color performance (single-color matte or RGB).
- How to tell if the LED is defective?
In visual systems with LED elements, the formation of an image on a monitor or TV display is carried out by means of LED backlighting, which ensures its uniform distribution over the matrix area. The LED driver and the system module called "main board" are also responsible for the correct operation of this module.
The most common symptom of LED breakdown is the absence of an image on the screen, while the sound is present. In this case, the voltage is supplied through the driver, however, the LEDs cannot work due to overheating.
Signs of a broken LED backlight
A chain of LED lamps, consisting of many links, is responsible for the backlight function, therefore, breakdowns of its individual elements often occur. In the event that the backlight fails, the LED TV may have no image, although there is sound and the device responds to commands from the remote control: the channels are switched, the volume level changes. If you look closely at the display, you can see a dark image and even distinguish the silhouettes of figures, but the damaged backlight makes it impossible to reproduce the picture as expected.
The LED backlighting of an LCD TV can malfunction for one of two reasons:
- burnout of one or more LEDs;
- malfunction of the LED driver
It is quite difficult to identify the cause of the breakdown, since checking all the links in the backlight chain is a long and painstaking work. The technician must measure the voltage at each LED and thus find the damaged one.
There is another way to check LED backlighting - to supply independent power to each backlight strip, thus finding out the strip on which the faulty LEDs are located, and then individually check each diode on this strip.
If all the elements are in order, then the cause of the breakdown lies in the LED driver, which is usually installed on the TV's power supply.
If the image looks distorted or twitches, the cause of the failure is driver malfunction, mechanical damage to the loops or loss of contact. Also, the image may be distorted with a picture of normal brightness, the appearance of stripes and streaks in certain areas of the screen. It should be noted that the same symptoms occur when the loop contacts are broken, so it is important to correctly identify the problem. If, when you press the screen, the picture is restored or, conversely, new stripes appear, then the problem is in the loop and the LED backlight has nothing to do with it.
Causes of LED driver breakage
LED backlighting often comes out of standing even in LCD TVs from leading brands. The main reason for the failure is overpowering: manufacturers by default adjust the image to maximum clarity and brightness to increase the product's appeal. Usually, customers use the specified settings and as a result, the current supply to the LEDs exceeds the permissible level and the elements quickly burn out.
The LED driver is a power supply for the backlight with a specific wattage. With a constantly increased load, the electrolytic capacitors of the unit break off and the backlight turns off. The breakage is easy to fix if you replace the part with a more powerful one. There are frequent cases when power surges occur in the power grid. In this case, one of the elements of the LED driver may fail:
- a transistor required to convert electrical impulses;
- low resistance resistor that serves as a fuse;
- capacitors.
If one or more elements of the unit fail, the TV screen turns on for a short time and then goes out. In this case, the LED backlight flashes for a few seconds, then the circuit is overloaded and the driver is completely turned off. This happens when overheating: the tightly closed housing of the unit has no ventilation and may fail when the temperature rises.
When the driver is overloaded, the overvoltage protection is triggered and the supply of current to the backlight circuit is cut off. In this case, an open circuit occurs in the circuit and the backlight goes out.
If the LEDs are supplied with excessive power, the lamps quickly burn out. In this case, even with the naked eye, you can notice darkening on the back of the chain. The LED driver is responsible for stabilizing the voltage and, when the recommended load is exceeded, interrupts the current supply. With a standard current of 400mA, the load on the LED lamps exceeds the norm and they fail after a short time. To avoid damage, it is necessary to limit the flow of electric current until the moment when the load becomes excessive. With a power of 300 mA, the brightness of the LCD screen will slightly decrease, but the heating temperature of the LED will drop by 35 ° C: from 95 to 60 degrees.
To fix such a breakdown, it is necessary to replace the electrolytic capacitors and make several ventilation holes in the block case.
- In order to prevent the problem in advance and increase the life of the TV, it is necessary to reduce the brightness of the screen backlight set by the manufacturer. This will not affect the quality and clarity of the picture, the image will become more natural and easier to read, and an expensive TV will last much longer.
Causes of breakdowns and their localization The backlight of the monitor is organized using ladder chains from a series of LED bulbs connected in series. If at least one of them fails, the screen stops glowing, and the image disappears, although the rest of the functionality continues to operate normally. Please note: In this case, only the shadows of the image and the faint outline of the moving figures are visible on the display.
Sometimes the LEDs work properly when the TV is turned on, but after half an hour of operation, the image begins to disappear. This is due to microcracks in the circuit or other damage to the LEDs. Often, in such cases, a comprehensive diagnosis of the problem is required from the master, because it is quite problematic to identify it on your own.
The malfunction of the LCD system backlight is possible not only due to the combustion of one of the LEDs. It can also be caused by a malfunction of the LED driver responsible for connecting the light module to the power supply.
According to the described signs, it is possible only to outline the area of troubleshooting, but you should always start by checking the LED links. In order to find a burned-out element, the user will need to measure the voltage on each LED separately, which is very tedious and irrational.
Experts offer a simpler option for testing the backlight, which consists in applying voltage from an external source to the ribbons included in it. After finding a non-igniting strip, it will be much easier to find a faulty element in it.
Important! A burned-out light bulb in the lighting chain can often be found without the use of a measuring tool.
This can be done by the characteristic darkening on the back of the tape in the place where the failed LED is located. After identifying it, for fidelity, you should ring this element with a multimeter, finally making sure of its malfunction.
How to solve the problem?
Many PROFESSIONALS carry out the revision of the power supply, reducing the supplied voltage. For this, one or more resistors are soldered from the power supply circuit. However, this method is only suitable if the TV breaks down regularly within a short period of time after purchase - otherwise, the problem is not in the voltage supplied, but in the malfunction of a particular LED.
Malfunctioning LED driver After checking all the LED strips, the cause of the malfunction should be looked for in the module that provides power to the matrix (in the LED driver). It is possible to identify irregularities in its operation by means of a multimeter, with the help of which the voltage levels at the control points of the board.
If deviations from the established value are found, the board should either be replaced with a new one or try to restore it yourself. Another sign of a driver malfunction while maintaining a normal picture on the display is a slight twitching or deformation of the image, accompanied by longitudinal distortion.
Additional information: The same problem is caused by a mechanical defect on the loop connecting the driver to the LED matrix or by a broken contact in it. They are also the reason for the appearance of longitudinal stripes and streaks in some areas of the screen. In order to accurately determine the location of a possible malfunction, you should slightly press your palm on the screen. If the picture is partially restored or additional stripes appear on it, this means that the problem is hidden in the connecting cable (and the LED backlight has nothing to do with it).
Causes of LED driver malfunction The main reason for the failure of the backlight "through the fault" of the driver is a violation of the power supply mode (its increased or decreased value).
- Please note: Often, manufacturers, wishing to improve the image quality (its brightness and contrast), overestimate this indicator, as a result of which the currents through the matrix elements increase sharply. As a result, the LEDs work in extreme modes and often burn out.
- In order to avoid this trouble, experts advise immediately after purchasing a monitor or display to reconfigure the power levels on the driver board. If this is not done in time, some of the working elements (filtering electrolytic capacitors, in particular) may fail due to increased load. If the backlight disappears, they should be checked first, and if a broken part is found, replace it with an electrolyte with a high limit voltage. Failure of the driver board is also possible due to sudden power surges in the network, when the input filters cannot withstand the resulting overloads. In this situation, the following elements may "burn out":
- A key transistor that converts electrical impulses into an operating supply voltage. Low resistance resistor used as a fuse. The same filtering electrolytes. Specialist recommendation: After replacing burnt-out parts, it is advisable to drill several additional ventilation holes in the power module housing, which will improve heat dissipation from the working elements. In order to prevent the backlight from burning out and to prolong the life of the monitor, its brightness should be slightly adjusted by the manufacturer at the factory. To do this, you will need to find the corresponding resistors on the driver board and, by changing their values, set the optimal image parameters. After readjustment, it will become less bright and contrasting, but it will acquire more naturalness, and an expensive product will start working in a “sparing” mode.
System board malfunctions
The system or control module of the TV (monitor) only indirectly affects the performance of the LED matrix. If the strips of the LED illuminators and the driver are in good working order, the cause of the disappearance of the image or its distortion should be sought in the malfunction of the "main-board".
It usually manifests itself in the loss of control signals to the power driver, as a result of which there is no voltage on the LEDs.
- To find out the reason for their disappearance, you will need an oscilloscope with a sufficiently wide bandwidth. It can be used to check the presence of output signals according to the table of voltage diagrams attached to the operating instructions of the main board.
MORE TECHNICAL ADVANCED SPECIAL INFORMATIONS -----------> CLICK HERE
In this case, there are two options: replace the entire LED strip or fix the problem pointwise. The second option will cost less, but it will require some skill and accuracy.
It is best to use both methods at once: first, replace the non-working LEDs, and then reduce the voltage by soldering the resistors, or - much easier - through adjusting the image, by about 20%. This will increase the service life of the LEDs significantly.
How to replace a non-working LED?
For the "operation" to be successful, you need the skill of handling a soldering iron and a little patience. Below is a step-by-step sequence of execution - do not get confused.
- Step 1. De-energize the TV, remove it from the mounts and lay the screen down. It is advisable to place a soft cloth under the display so that it does not get scratched during operation. Avoid putting pressure on the TV while you work.

- Step 2. Use a screwdriver or a screwdriver to remove all screws and screws from the case. Remove the back cover carefully. In this case (as in most modern TVs) there are only two motherboards in the device - one motherboard responsible for software processes, and the other with an LED driver, which supplies voltage to the LEDs.

- Step 3. Unscrew the screws that fix the matrix to the frame. Be careful about their number, so as not to accidentally damage the case, forgetting about a couple of screws.

- Step 4. Detach the flat cables.

- Step 5. Carefully peel off all plastic fasteners and peel off the matrix layer. Be patient - the plastic clips are strong but fragile. There is a great risk of damaging them during the procedure.YOU WILL END WITH A BROKEN UNREPAIRABLE TV.

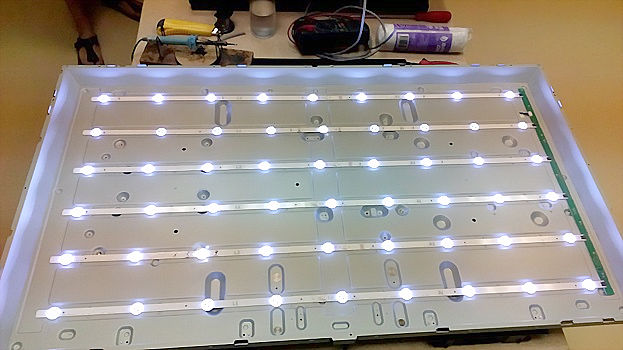
- Step 6. This is how the LEDs under look.

And so - without the "filters mask" DO NOT INVERT THEM IF THEY ARE MULTIPLES. THEY WON'T WORK AS EXPECTED.

As you can see, there are 6 LED “bars” that are connected in series with voltage. If one OR MORE of them is faulty, then it is off and no PRECISE VALUE current flows to the next LEDs in the circuit.
- Step 7. Check the voltage on each strip with a multimeter and determine on which LED the circuit is interrupted.THIS TEST MAY UNRELIABLE AS THE DEFECTIVE LED WILL BRIEFLY WORK BUT NOT UNDER THE CONTROL OF TV CIRCUITS.

- Step 8. Take a "donor" LED strip from another TV or purchase a new one according to your TV model. When ordering, do not forget to indicate the diagonal of the device - models of different sizes may be found in the same line.

- Step 9. At the marked (similar) points, you need to solder the non-working LED from the "native" strip. From the new strip - a worker (always at the same points of the chain). Then solder a new LED into the "native" strip. After soldering, check the voltage again with a multimeter. If everything is done correctly, the entire strip should be on, including the soldered LED.

- Step 10. Put the strip back in place and connect the assembly to the led circuit network. If all the LEDs are working, then everything is done correctly. It remains only to assemble the case in reverse order and check the image on the screen.
Tips & Tricks
Replacing one LED from a new strip is a dubious benefit. If you have the opportunity to purchase an entire LED strip, replace the entire faulty chain with a new one. This replacement will last longer.

- Pay attention to the power of the "donor" LEDs and other compatibility parameters. It is best if you take spare parts only from a similar model - so the voltage will not suffer during the backlighting and the operation of the repaired device will be as harmonious as possible.
- It's another matter if you use "donor" bars. Then it is more expedient to drop out only the serviceable parts you need and put them into work.
- Do not neglect to decrease the brightness on the TV (decrease the menu voice "backlight").
Purpose, applicability, where to buy
It has long been no secret that about 80% of all malfunctions of modern LCD LED TVs due to malfunction backlighting: that is, simply burned out LEDs (one or more) and they need to be replaced.
At first glance, everything is easy and simple - we open the TV, change the light and the repair is complete, but the LEDs used in the backlighting of TVs, there are some variety (in parameters and dimensions and manufacturers), so sometimes there are questions, what LEDs are used in what models, where they can buy and what manufacturer to give preference when buying.
After analyzing various sources, and based on my own experience, I offer you ordering information on the LED lighting, the most common LEDs, what models they are most often used and, most importantly, a list of verified sellers where you can buy LEDs for repairing illumination.
LEDs for LG LCD LED TVs
The most common options are:
3535, 6V, 2W LEDs with wide anode.

3535 LEDs, 6V, 2w with wide cathode.

3528 LEDs, 3V, 1W. Also found in PHILIPS, TCL, BBK, Mystery TVs.

LEDs for SAMSUNG LED TVs
Samsung LEDs are different from all other LEDs and the parameters and contact pads.
The voltage is 3v.
They look like this:

Chinese models
As well as many "mimicking" a la-brand such as SONY, TOSHIBA, RUBIN, AIWA, etc...
2835 LEDs, 3V

Frequently found in SONY, FUZION, TELEFUNKEN, MYSTERY televisions.
2835 LEDs, 6V:

found in TVs FUZION, IZUMI, ORION
An important point:
LEDs of sizes 2835 and 3528 have an external similarity, but they have small differences in parameters and brightness, so they are not exactly interchangeable. To be able to tell them apart, simply place them side by side, as in the photo below:

3030 LEDs, 3V.:

3030 LEDs, 6V:

Many manufacturers (especially those sinning with the Chinese assembly) deliberately "twist" the brightness in order to create a more effective and eye-catching image, while deliberately reducing the longevity of the LEDs.

MORE SPECIAL INFORMATIONS -----------> CLICK HERE
- Owners and users of the TV must remember that self-repair without special knowledge, skills and qualifications can be fraught with negative consequences that can lead to complete non-repairability of the device!